Structured Data JSON/LD for “Parent – Child” Locations

Parent Child Local Business Heirarchy JSON Structured Data

With Google and others increasingly serving information in new formats on both mobile and desktop search engines (e.g. product, service or company “cards”), maintaining accurate and up-to-date structured data is a must as an SEO best practice.

Many businesses fit neatly into one of the organization types provided by Schema.org, but we encountered a case of a business that’s dependent on both local and national SEO results (but not large enough to completely separate corporate and retail). For this reason, we wanted to maintain a parent Organization for organic searches while still marking up individual locations data to improve their local SEO. It was important to us to maintain an explicit relationship between locations and the company as a larger entity.

We settled on creating a parentOrganization > LocalBusiness hierarchy, allowing us to define information for the larger organization & homepage while optimizing location pages. Below is an example of the JSON-LD script that we used for both the parent organization and the local listings.

Other situations where this could be useful include:

  • Defining Headquarters / Corporate Offices and service locations
  • Websites that do business both online and in brick and mortar locations

Homepage:

The script below is pared down to basic information and defines the umbrella business information:

<script type="application/ld+json">{
    "@context": "http://schema.org",
    "@type": "Organization",
    "name": "Your Parent Company Name",
    "logo": "https://yourParentCompany.com/LOGO.png",
    "url": "https://yourParentCompany.com",
    "sameAs": [
        "https://www.facebook.com/yourParentCompany/",      “https://www.twitter.com/yourParentCompany/”
    ],
    "contactPoint": {
        "@type": "ContactPoint",
        "telephone": "+1-800-111-1111",
        "contactType": "Sales",
        "email": "[email protected]",
        "contactOption": "TollFree",
        "areaServed": "United States",
        "availableLanguage": "English"
    },
    "address": {
        "@type": "PostalAddress",
        "addressCountry": "United States",
        "addressLocality": "Los Angeles",
        "addressRegion": "CA",
        "postalCode": "90230",
        "streetAddress": "1025 mainOffice Street"
    }
}</script>

Location Pages:

The goal here is to markup location data, without abandoning the “parent” organization, done so by creating each location as a LocalBusiness subtype of the parentOrgnanization.

<script type="application/ld+json">
{
  "@context": "http://schema.org",
  "@type": "LocalBusiness",
  "@id": "https://yourParentCompany.com/location-1/",
  "name": "Your Company Name - Location Number 1",
  "description": "Your Company Location Number 1, Providing the best goods and or services to the area since mid-March of 1699 BC.",
  "image": [
 "https://yourParentCompany.com/LOGO.png"
  ],
  "areaServed": "serviceArea",
  "url": "https://yourParentCompany.com",
  "telephone": "+1-650-801-3333",
  "address": {
    "@type": "PostalAddress",
    "streetAddress": "123 localBusiness Street",
    "addressLocality": "San Francisco",
    "addressRegion": "CA",
    "postalCode": "94117",
    "addressCountry": "US"
  },
    "parentOrganization": {
    "@type": "Organization",
    "@id": "https://yourParentCompany.com",
    "name": "Your Parent Company Name",
    "description": "Your Parent Company Name: Providing local and international services since Mid January of 1699 BC.",
    "image": [
      "https://yourParentCompany.com/LOGO.png"
    ],
    "url": "https://yourParentCompany.com/",
    "telephone": "+1-800-111-1111"
  }
}
</script>

Needless to say, the above code is just a starting point for creating JSON-LD markup for businesses with similar needs. For example, one of our key goals was to display each locations’ reviews on SERPs, and if you’re adding or updating your structured data this is a great time to add any such data to the localbusiness JSON.

Once you’ve added the data, make sure to confirm that Google’s seeing the right values with their testing tool.

Have other ideas, improvements, questions? Let us know!


07 Getting Started with JIRA: Start From Your Free Trial

This article is a part of Astral Web’s Comprehensive Guide to JIRA!

8

Previously: Before You Start Using Atlassian JIRA Part 3: Create A JIRA Workflow For Your Business

Overview

Jira Cloud trial is free for only 7 days. Make sure you understand enough of your business and work process foundation before you get started, because 7 days is a short time to test and confirm features.


image3

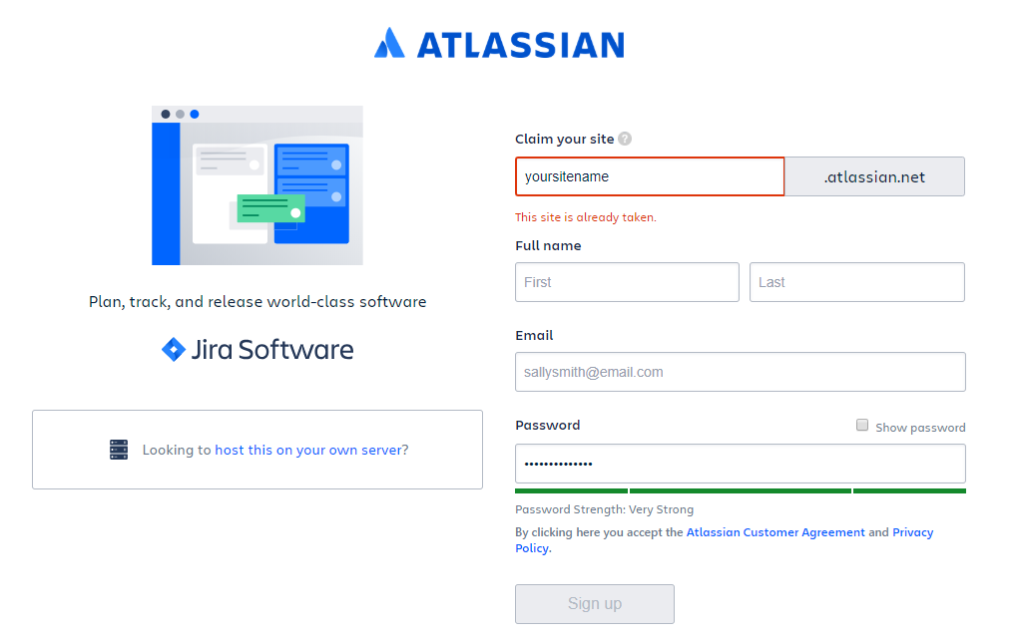
Select the Jira Software “Try it free” button to get started. The other two choices, which we don’t need now, are the combination of Jira Software and Confluence (Wiki style document management) or Jira Service Desk (Atlassian’s customer service platform). You can try these other services another time on a different trial session.

Complete the required information to get started.

Login to Jira Cloud

image4

Once you’re set up, you’ll have access to all Jira features for a week.

To learn more about the basics features of Jira Software at the official website:
https://www.atlassian.com/software/jira

If you haven’t, log into your Jira Cloud at your unique Jira website. Otherwise, you will see a default menu with no accessible content. You can login from the bottom left icon.

image5

Exploring the Jira Workspace

You will be able to access your Jira Cloud account from any internet browser, as well as the Jira Mobile App that is available for iOS and Android. Mobiles apps will not have a full workspace, but will give you access to all of your projects and issues.

image1

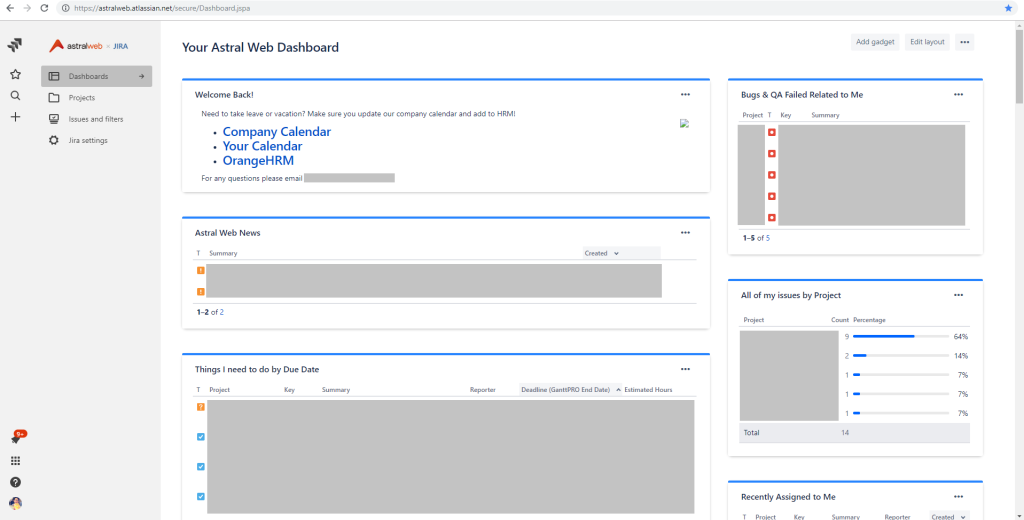
First landing page is the Dashboard tab.

Astral Web’s example login dashboard has continued to evolve, but currently has enough widgets to get our team members informed about the latest information and groups issues so they are easy to access. Some useful filters we have put together are “Things I need to do by Due Date”, “Bugs & QA Issues assigned to me”, and “Recently assigned to me”.

Jira Cloud Dashboards are limited to the widgets available, but we were able to experiment and set up to get these results.

  • The Projects tab takes you to a section that lists all of your projects. We use projects to organize issues by type of project and by teams. We use teams to collect multiple projects and display issues efficiently for each team.
  • Issues and Filters tab are all the filters created within your Jira Cloud. These are some that we used on the dashboard as well as some being unique to each project. We’ll discuss more about filters in the future.
  • Jira Settings are where you will be setting up projects, users, custom workflows, and all other admin features.

image6

  • The top left icon, also shown on the Jira Settings section, will take you back to your main dashboard.
  • The Star icon will pull up all issues, projects, and pages that you have favorited or recently accessed.
  • The Search icon will let you search for anything in your Jira Cloud. Typically used to quickly search for a project or an issue by name.
  • The Plus icon will let you create a new issue from anywhere.

Jira Software Keyboard Shortcuts

Useful to learn early on are Jira Software keyboard shortcuts. This will let you operate your workspace faster without scrolling and searching.

Some examples are when navigating issues:

  • “o” to open the selected issue
  • “a” to assign the issue to someone
  • “i” to assign an issue to yourself
  • “m” to add a comment

Full details on the Atlassian’s Support Confluence:

https://confluence.atlassian.com/jirasoftwarecloud/using-keyboard-shortcuts-764478271.html

Atlassian Marketplace

7 days may be too short to play around with 3rd party plugins, but if you get stuck because of a lack of Jira Cloud features, the marketplace may be a good place to see if there are solutions.

Atlassian Marketplace

https://marketplace.atlassian.com/

Astral Web uses plugins such as Issue Checklist to make our issue processing even more efficient.

Issue Checklist Plugin

https://marketplace.atlassian.com/apps/1213231/issue-checklist?hosting=cloud&tab=overview

image2

We hope this gets you started on the right foot to understand Jira Cloud’s possibilities within the short trial period. If you are a small team under 10 people, then it is more than worth it to invest in the monthly $10 usd plan to test further.

Astral Web spent at least 3 months to fully configure workflows before we had all of our 30+ members go on board.

We will discuss more about our Jira Cloud setup decisions in our future articles.

Next: Getting Started with JIRA: Manager Your User Profile

Before You Start Using Atlassian JIRA Part 3: Create A JIRA Workflow For Your Business

This article is a part of Astral Web’s Comprehensive Guide to JIRA!

7

Previously: Before You Start Using Atlassian JIRA Part 2: Create A Master Workflow For Your Business

Overview

If your business process is documented, you are ready to convert them into a JIRA process.

image12

We chose JIRA Cloud because it has great features for agile development teams. The Kanban method provided in JIRA Cloud was our best choice to visualize our tasks and process them. We’ll show you these examples when we set up JIRA.

Understand JIRA Workflow Concept

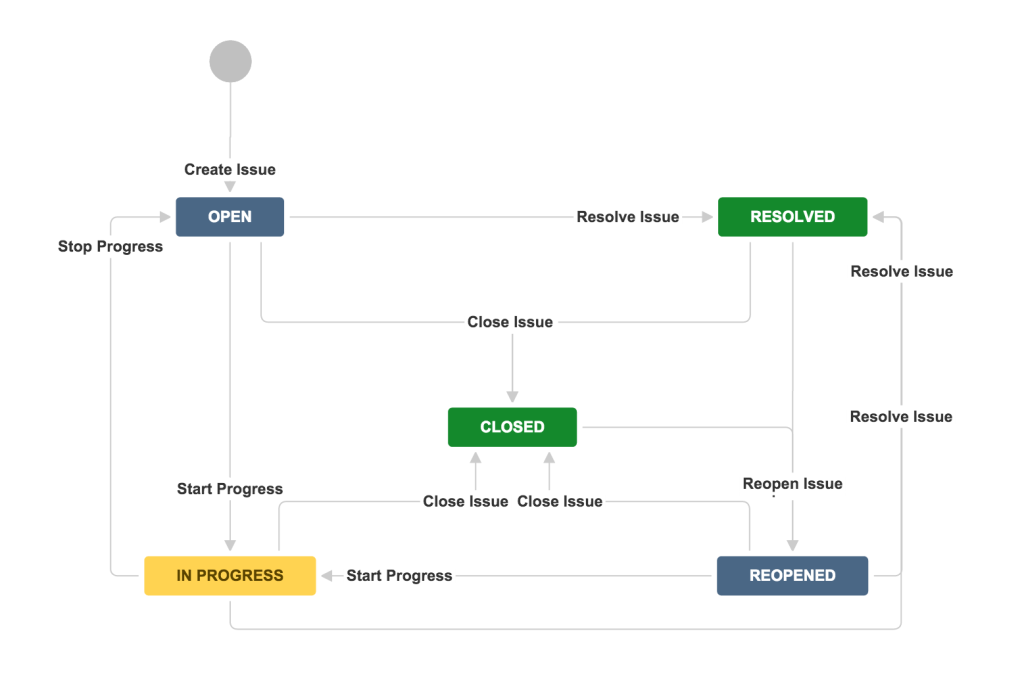
image3

(source: atlassian.com)

As Atlassian describes: “A JIRA workflow is a set of statuses and transitions that an issue moves through during its lifecycle and typically represents processes within your organization.”

It is the logical process to move your issues to different states so you always know the status of an issue by just looking at the status information. Statuses cannot be vague, so make sure you can clearly describe steps in your business process to be able to create them in JIRA.

Astral Web Master Workflow

As we described in our “Understand your business workflow” article, after spending nearly 3 months to review of how our teams and team members work, we were able to put together a master workflow that is compatible for even our biggest projects.

image8

  1. Backlog: A list for all pre-planning issues (ideas, to-do, etc.)
  2. Selected for Planning: Issues that are ready for planning and need to be assigned
  3. In Planning: Issues that are in planning
  4. In Review: Plans that need approval
  5. Selected for Development: Issues that need to be assigned to development team
  6. Selected for Design: Issues that need to be assigned to design team
  7. PM Review: Issues that need to be checked by PM
  8. Select for QA: Issues that need to be assigned to QA team
  9. Deploy: Issues that need to be deployed (website)
  10. Pending Approval: Issues that have been deployed and need 3rd party approval
  11. Done: Issue has been approved and completed

These are all the checkpoints for project managers to keep our solution quality high, regardless of what kind of task or project we need to complete.

However, this workflow is overkill for simple and general tasks. So, we also made sure transitions are flexible for different teams and project sizes.

Customize workflow for each team

Development, design, and QA team branches off from the master workflow to process issues in their internal teams. Project managers are focused and handing off issues and receiving them for final review, so we omit detailed development, design, and QA tasks.

image4

For smaller projects and teams, we simplified the master workflow with less steps and completely omit the development process. We kept the handover to the design team process, since many of our projects require design elements. This process is good for our marketing team, corporate strategy team, and other general work.

image7

However, our sales team use completely different sales and crm system, so we took the general team workflow and added a few more status to customize a new process. We still borrow statuses from the master workflow when we can.

image2

Prepare for naming transitions

You will need to set up a logical transition between each status. For example, if you are moving an issue status from “In Planning” to “Review”, you can name the transition “Review plan with PM”.

Create multiple workflows using status from your master workflow

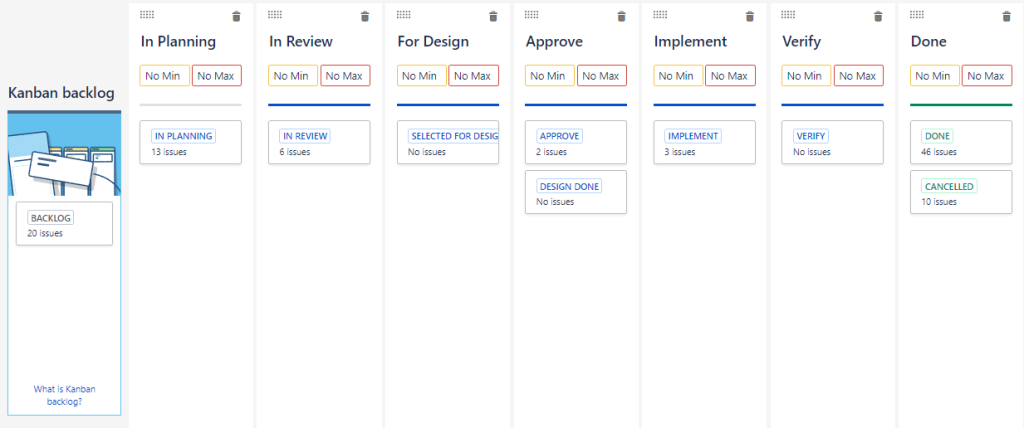
Here is a preview of the master workflow we will create in JIRA. To create this workflow, we made many new status labels and transition that do not exist in JIRA by default. When we make simpler workflows for teams and smaller projects, we want to make sure we’re using the same label so the data is clean, shareable, and easy to report.

image9
Here’s an example of a general team workflow that simplifies the master workflow by many steps, but still borrow some statuses.

image6

We need to share statuses, so all similar issues are organized together. For example, we want all issues for any project that needs design work to be shared with the design team. So, all of these issues need to fall under “For Design” status at some point of the workflow.

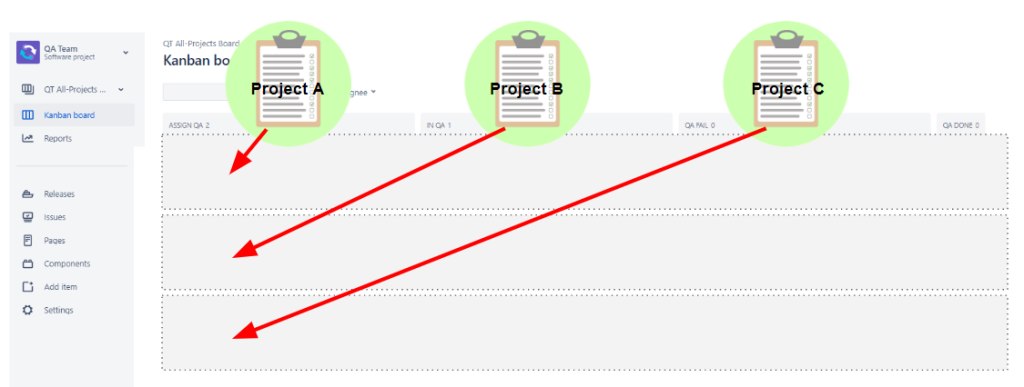
Project focused vs multi-project teams

Another point to consider, is how teams view projects. Are engineers focused on single projects and designers working on multiple projects at once? You will have control over how issues will show on each team or project task board.

image11


Understand Your Non-development Teams

JIRA is great for software development, but can it be great for other teams, too?

We believe this can be true, so we also designed processes for our non-development teams.

Other JIRA workflows to consider:

  • Corporate strategy
  • Overview for all project managers
  • Sales team
  • Small projects

This resulted in a optimized general team type board which was simple but also capable of sending job requests to visual designers. The process uses the same master workflow, but fewer statuses to get things done.


image5

We even created a flow for our sales team to replace are simple sales and crm processes. We used our general team flow and added new custom status that is compatible with our master workflow so some work can be shared with the design team.

image10

Get started on JIRA

Once you have all your processes documented, be prepared to convert your list into JIRA status labels, and flow chart with transitions that connect each status.

image1


We started using JIRA after our master workflow was decided, and continued to experiment live. However, we recommend to plan as much as possible beforehand to prevent too many changes or fixes that may cause confusion and stoppage to current projects.

We’ll show you how to set up everything in our upcoming articles.

Next: 07 Getting Started with JIRA: Start From Your Free Trial