Differences between Facebook Subdomains in Google Analytics

When visiting Google Analytics and looking at Source / Medium -> search for: Facebook -> you’ll see Facebook referral traffic listed in up to four different types:

google analytics Facebook referral types

By typing Facebook in the filter search bar you can see the total facebook referral traffic. However, understanding what each link type is can give more detailed insight into referral traffic.

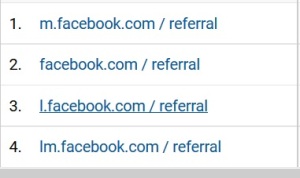
The four types of Facebook referral traffic will be displayed as follows in Analytics:

1) m.facebook.com – Referral traffic coming from a click in facebook mobile app.

2) facebook.com – Referral traffic coming from normal web link click in facebook.com

3) l.facebook.com – Referral traffic coming from a link shim link click. A link shim link is facebook’s internal system checking this URLs against internal and external blacklists of malicious or spammy sites.

4) lm.facebook.com – Referral traffic from link shim link on mobile browser.

Why do I care?

  1. Knowing whether your facebook referral traffic comes from desktop or mobile app is an advantage that it allows you to tailor your landing pages & content to the appropriate device(s).
  2. If you’re not seeing l.facebook, or lm.facebook referral links but you have good reason to expect them, check whether your site’s been blacklisted by Facebook..

Using URL Builder to Improve Analytics Reporting

When using Analytics, Google itself has access to enough information to feed you a lot of data in terms of users’ interactions with your website, as well as where they originated from. However, there are a couple types of marketing efforts efforts that can lead to users accessing your site from sources that Google either can’t identify or can’t segment enough to be useful to you.

The two prominent examples are email marketing campaigns and running multiple ads on a single domain. In the case of email campaigns, google doesn’t have control over your email client, and thus doesn’t know where the email link originated. As a result, without using URL builder, one’s email campaign traffic will likely end up showing up under Acquisition Channels as Direct traffic. When running multiple ads on one website– you may have one banner ad, header, footer, plain text, etc.– google will not be able to differentiate which traffic came from which ad, preventing you from assessing their performance and adjusting accordingly.

In these cases, Google offers a simple tool to feed it the information it needs in order to give you this useful data- URL builder. Using URL builder allows you to create a custom url for your destination page and attribute the desired source information, in turn allowing Google Analytics to better display the exact behavior of users.


To access URL Builder click here or search for “URL builder” and ,if you’re logged into analytics, you should see a page like the following:


URL builder homepage


Taking the example of an email marketing campaign, what you’ll want to do is enter the url of the page that you are linking to in your emails. In this case lets say that I’m sending links to Astral Web’s content page:


URL Builder Landing page

I then fill out the boxes as required below:

URL Builder Demonstration image

*when copying and pasting destination URLs, be sure that they do not contain any excess coding or characters- you’ll end up with a non-functional link.

After clicking Submit, we’re given a long link that includes all of the information that has just been entered into URL Builder.

Unique URL from URL builder

This is the link that I’ll want to put into my emails (or ads, etc.) in order to identify them in analytics.

In order to ensure that the link is functional and visible in analytics, paste this link into a separate browser window while you’ve got your viewing your Real Time > Traffic Sources. As you can see below, if the link is functioning properly, you’ll be able to see it almost immediately in Analytics. Furthermore, all the information you’ve input to distinguish the medium, campaign, and target are now identified by Google, and Analytics can give you the kind of information that is really crucial to optimizing your marketing campaigns.

Checking URL builder with Real Time view

If you’d like more information, please check out Ori’s video tutorial on using URL Builder.


Tracking Completed + Problematic Contact Forms in Analytics

In this article we’ll show you a basic method to track your form submission with emphasis into fields filled out, fields not filled and problematic fields all input into Google Analytics using event tracking. With this data you’ll be able to gather conclusions, fix errors and remove unneeded fields.

event tracking fields

Setup Scripts

In our form pages, we will need to add the following 2 scripts in order to input information into Analytics

Script 1: Load Jquery

<script src="//code.jquery.com/jquery-1.7.2.js"></script>

* please note that jquery MUST load before 2nd script PLUS make sure that your page does not have other jquery or conflicting loads of scripts.

Script 2: Javascript Event Tracking for Form

<script type="text/javascript">
(function($) {
$(document).ready(function() {
$(':input').blur(function () {
if($(this).val().length > 0) {
ga('send', 'event', 'contactf', 'completed', $(this).attr('name'));
}
else {
ga('send', 'event', 'contactf', 'skipped', $(this).attr('name'));
}
});
});
})(jQuery);
</script>

The above script reads your form and checks if length of each field in form is more than 0 characters. If field is empty, it sends an event tracking (using the latest universal analytics code) with the label “skipped” and the field name. If the field is not blank it will label the field in analytics event tracking as “completed”.

In addition, you will want to add the following to your form processing script

On script, if form was submitted correctly ->
<script>ga('send', 'event', 'contactf', 'completed', 'success');</script>

Else ->
<script>ga('send', 'event', 'contactf', 'completed', 'problemwithform');</script>

real-time-event-tracking

message-sent

See our Video How-To

* special thanks to Lunametrics for initial data and help with their article

How to run Analytics Experiments (A/B Testing) on WordPress

In our daily marketing scramble, we many times forget the importance of conversions and conversion rate and only focus on gaining new customerss. Due to this fact, we have setup in our own company a policy of always running tests on our clients’ websites.

a-b-testing-experiments

We have included below a simple step by step guide on how to setup A/B testing using WordPress and Google Analytics Experiments.

Step 1 – Business Goals

a. Think about what are your core conversions are (purchase of product, form filled out, newsletter joined, commented on blog, etc)

b. Define a goal in Analytics
If you have not defined a goal in analytics, see our analytics goals article

Step 2 – Define Experiment

Create variation page in wordpress by visiting the “Pages” -> Add New. Create your new variation page with the specific element you want to test and publish. Try not to test out too many changes on your pages.

add-new-page

* don’t forget to note the live url for later.

url-of-page

Step 3 – Setup Experiment in Analytics

Visit the Behavior -> Experiments page:

behavoir-experiments

a. Enter original page you want to test against (and click on start experiment)

start-experiment

b. Setup settings for Experiment

– name
– objective
– % of traffic to experiment on
– email notifications

step1-experiments

c. Enter URL of Variation Page

* you can add more than one variation if desired
* check previews to make sure you are defining the correct pages

step2-experiments

d. Add code to site pages

step3-experiments

You will need to add the correct analytics code to begin your experiment. Follow the instructions below to proceed:

1. all pages must have analytics tracking code
2. the original page has to include additional code

Use the following format:

<?php if (is_page('') ):?>

<?php endif; ?>

Find the original page. edit the page in wordpress and look at url
“post=x” -> take the number and add to our code:


<?php if (is_page('x') ):?>

<?php endif; ?>

b. go to appearance -> editor -> header.php and paste the code with analytics
extra code right after the <head> tag and click on “update file”.

wordpress appearance editor


<?php if (is_page('') ):?>
xxxxxxxxxxxxxxx
xxxxxxxxxxxxxxx
xxxxxxxxxxxxxxx
<?php endif; ?>

Step 4 – Complete and set experiment live

Verify that you have two check marks underneath “Experiment Code Validation” and click on “start experiment”

step4-experiments

That’s it! Let us know if you have any questions with A/B testing. We’ll be happy to answer your questions.

Phone Call Event Tracking with Google Analytics & Twilio Number

This article explains in a simple manner how to track phone calls and call duration with twilio phone numbers and input into google analytics (universal) for event tracking.

Step 1 – Make sure you have google universal analytics on your website

If you don’t, please install the latest tracking code or upgrade at google.com/analytics

Google Analytics Universl Code

Step 2 – Register with twilio and get a phone number

Register and login to twilio.com

Twilio

Step 3 – Create script to input into google analytics

All you have to do is add the following code to a webpage on your server.
DON’T FORGET TO:
a. change ANALYTICSACCOUNTID to your account analytics account id (“UA-xxxx-xx”)


<?php

$datetime = date('m-d-Y--H:i:s');
$call=$_GET['CallDuration'];

header("Location: http://www.google-analytics.com/collect?v=1&tid=ANALYTICSACCOUNTID&cid=123&t=event&ec=Contact&ea=Call&el=$datetime&ev=$call");
exit;

?>

Step 4 – Reference script in twilio

After you login to twilio, on main dashboard page, click on “numbers” page and click on your phone number. Under “voice” section, click on “optional voice settings” in order to open more options and add url of script we just created to “Status Callback URL” and click on “save changes”.

* see google guidelines at Google Analytics Universal – Measurement Protocol Developer Guide –https://developers.google.com/analytics/devguides/collection/protocol/v1/devguide

Status CallBack URL

Step 5 – Test in Analytics

Make a phone call and look at the real-time events section and test over time.

Look at analytics events

Hope you enjoyed this simple video. We love twilio and analytics, especially the bridge between offline and online.

Let us know if you have any questions. We’ll be happy to help!

Video Transcription:

Hey everybody. This is Ori from Astral Web. I’m very excited to create this video to show you how we bridge the gap between the offline and online world. in this video we’re going to track everytime someone calls our phone number, we’re going to put into google analytics the duration of the call. This is a very simple example so you can understand what’s going on and you can build upon that. Very cool thing – let’s dive into it very quickly. The first thing we want to do is buy a twilio number. Twilio is a really nice company and enbales you to add programmatic addons. Go to twilio.com and register and we recommend them. After you register with twilio , login and click on phone number and go under the voice section under optional voice settings and status callback url. What that means is anytime a phone call is completed, at the end of the call it will trigger the url you specify. We will create this script in a second. The script will then take information from twilio and input it into google analytics. Very cool!

Let’s look at the file. eventtracking.php. Let’s go to our server via ftp client and edit eventtracking.php. All you have here are 3 or 4 lines. What i actually did was included the date and the time in order to track in analytics when the call was made and the GET field we receive from twilio. After you get the time and the date from the server plus you might want to adjust the time if your server time is different from you home or work computer. After that you will use the latest google analytics universal url (/collect/). If you don’t have analytics universal you will need to install on website. Let’s look at code and check if we have latest analytics universal code. You can also check in analytics in admin, tracking info and tracking code. It should say, this is the universal analytics code… It came out a few months back (as of 2013). Looking at the redirect header url, google analytics enables you to pass offline information via a collect url in a very simple manner. Now you have to insert different fields. TID is the account id starting with UA dash …. CID is just a userid and this case we don’t use it. Now we specify that we want to track an event. EC category is called contact. EA is the action is called call and the label is the date time and the value is the call duration. So anytime someone calls you at the end of the call, twilio will go to your specified url and the script will give analytics the call duration. And i’ll show you how it looks. In the events section in analytics, you’ll be able to see time of calls and durations. You can translate into minutes instead of seconds. To test, make a phone call and go to google analytics, real-time and look into events and make sure it works correctly.

If you’re running a pay per click campaign, you might want to have different phone numbers
for your landing pages or from SEO. Try to have a unique twilio number for your website, different from your regular store or other numbers for better tracking. Super simple code and works real well. If you have any questions, i’ll be happy to share and answer questions.