12 Getting Started with JIRA: How To Manage Issues

This article is a part of Astral Web’s Comprehensive Guide to JIRA!
Previously: 11 Getting Started with JIRA: Issue Management with Basic Agile Workflow

How To Manage JIRA Issues

Editing and assigning issues are good features, but now it’s time to understand best practices on how to manage all of your issues in JIRA.
In general, we will look at two types of users who will be using issues: Managers (those who are responsible of assigning tasks) and General Users (those who are responsible for doing the tasks).

Managers need to schedule, customize, and inter-relate all existing issues to successfully achieve project goals. Sometimes, they will need to bulk change multiple counts of issues and maybe even change security permissions on individual issues if non-employee users need access.

General Users will need features such as attaching files and images (such as screenshots), commenting, logging work progress, and get notifications on issues they need to follow.

Below we showcase all the options that are available on each JIRA issue.

Useful Features For Managers

Here are useful features for manager level users on JIRA. Make sure your permissions (described in other sections of our series) are set if or if you don’t want managers to have access to these features.

Scheduling an Issue

The default method to add a schedule to an issue is using the “Due date” field. This field uses a date field so, you’ll easily be able to save dates. You will be able to use this date field to show on dashboard widgets or export to calendar data.

However, Astral Web uses external gantt charts (GanttPro) so we configure custom fields called “Start Date (GanttPro Start Date)” and “End Date (GanttPro End Date)”. We then disable the default “Due date” field so all of our staff use the same fields to schedule tasks (whether they sync to the external GanttPro tool or not).

In this way, all members can track their issues by due date on their dashboard calendar, while managers can continue to use GanttPro using same end/due dates.

Adding a field to an issue

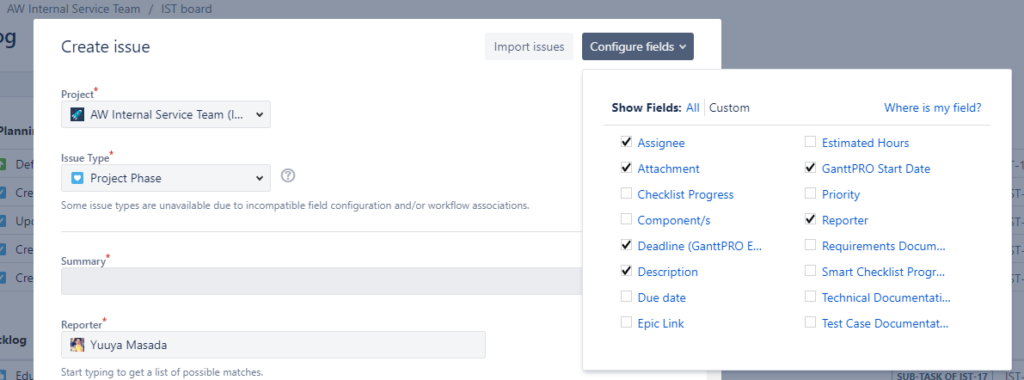
By default, some fields may not be showing on the screen you want to fill details. The available fields vary by different screens: Create Issue screen, Edit Issue Screen (both sidebar and full screen), and others. On the Create issue screen, you can select “Configure fields” to see which fields are active and others that can be added. You will need to have management permission to access this feature, but most manager and general user level should be able to see. If it is not visible, talk to your administrator.
Creating issues using the CSV importer

While creating issues directly on JIRA is convenient, sometimes you may have a whole WBS (work breakdown structure) document that you want to import. You will need to organize your template to make sure that all attribute headers and values match your project settings, but once this has been done, it’ll be so much easier when you want to add dozens or hundreds of tasks at once.

In our case, we know we have custom fields that we sync with external tools, so we make sure those fields are covered in our template. We even have a master projects template that holds about 150 tasks that helps kick-start our managers to make progress on their projects.
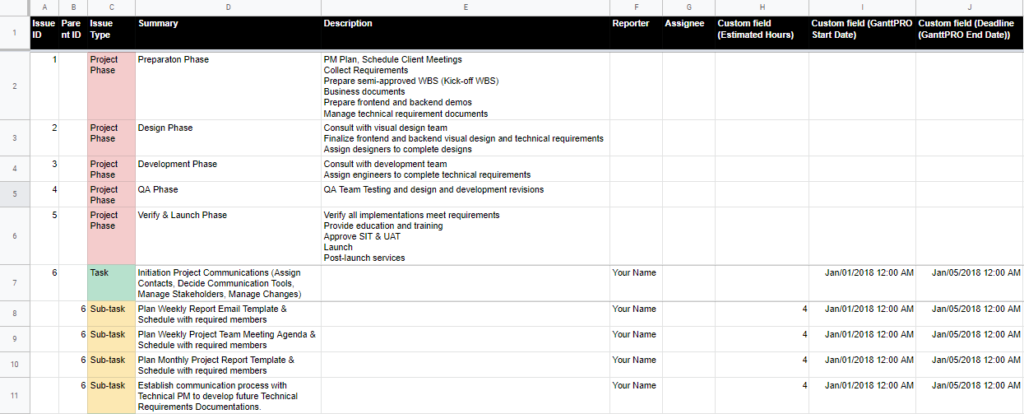
To bulk import your tasks, make sure your document is converted into a .csv file. (In Google Docs, you can export using File > Download as > Comma-separated values.) Then, you have to options to access the import page.

One is the “Import issues” button from the “Create issue” screen.

Or, from Admin > System > Import and Export > External System Import.
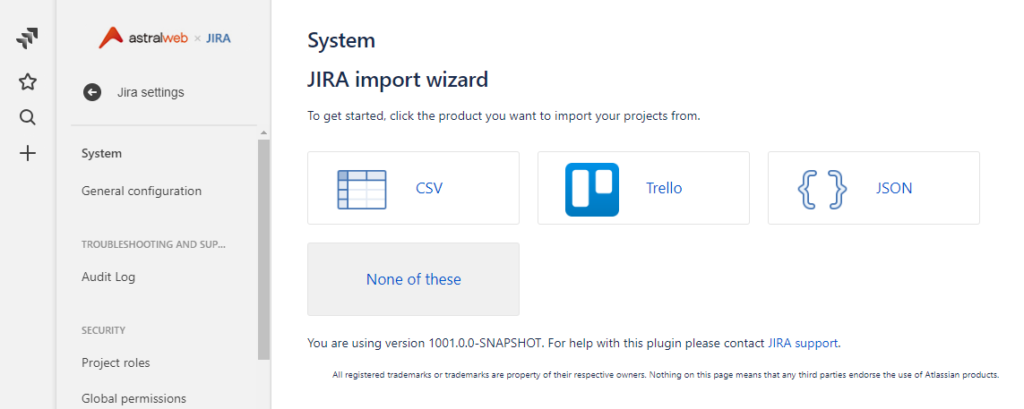
Then, you will be at the import csv page where you can select your .csv source file.

If you import often, then creating a configuration file that helps you assign issues to projects and map all data values to the right headers. You can get this at the end of the import, if you would like.

Select “Next” button.
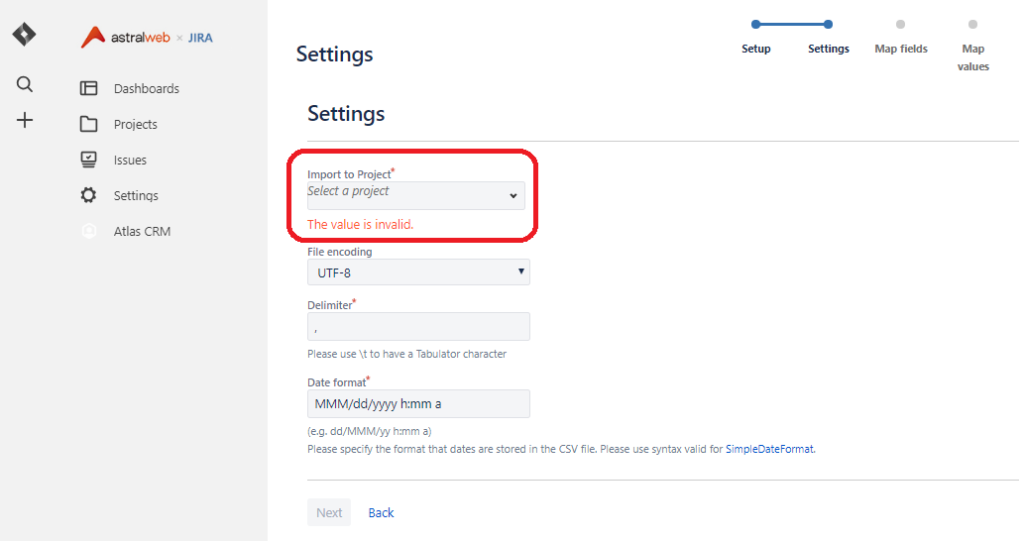
Select your project that you have created under “Import to Project” dropdown.

Select “Next” button.
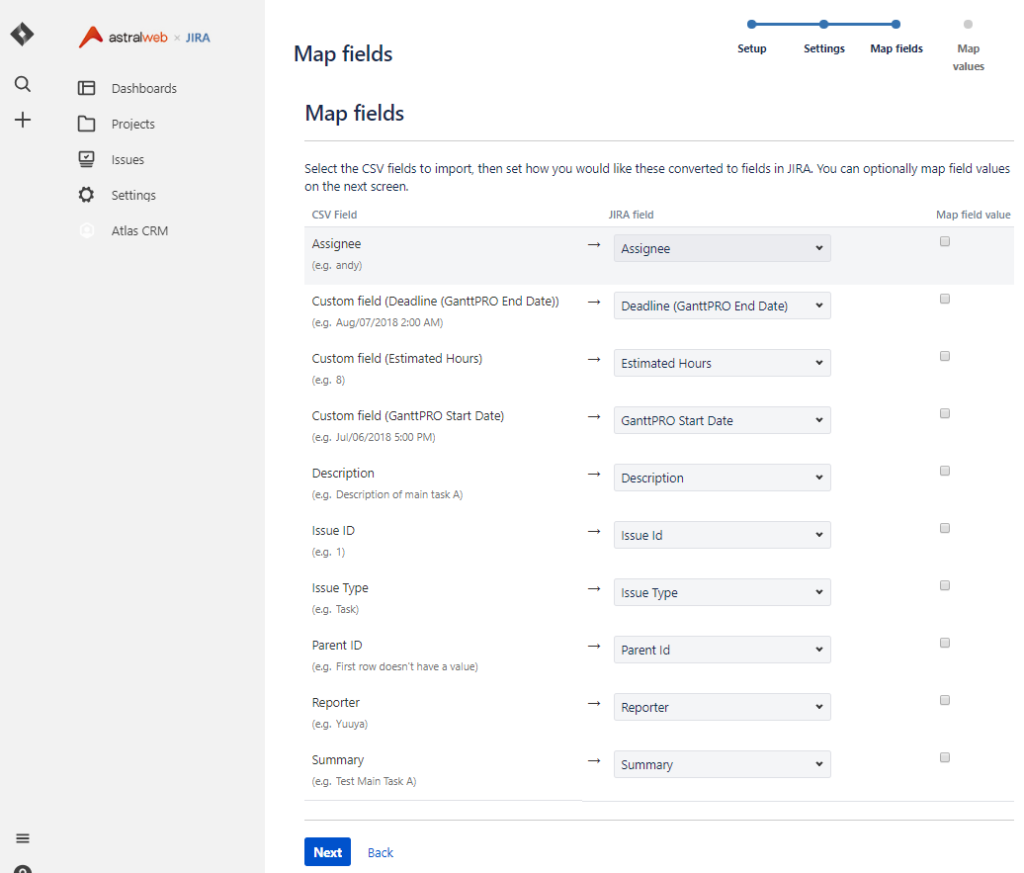
All fields should automatically be assigned. If there is no issue select “Next” button.

To make sure your data is good, press “Validate” button. This process may take a few minutes.
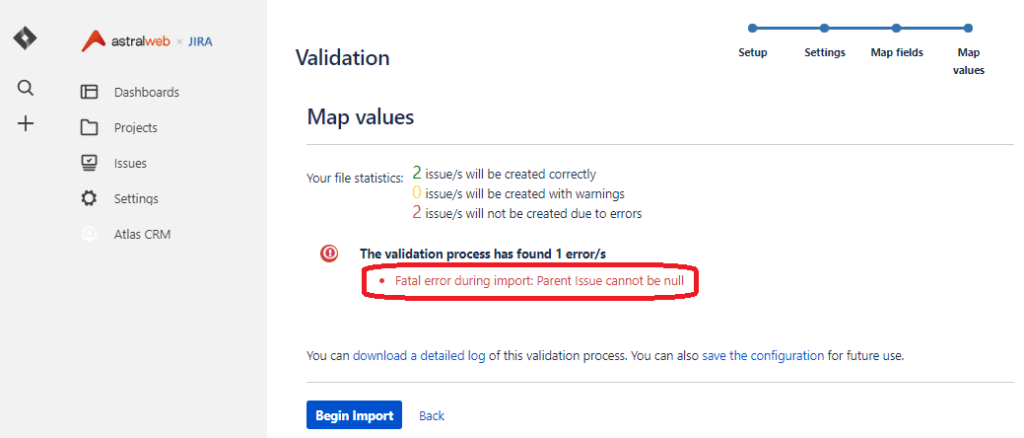
If you have more than one error, please fix your CSV file.

If you only get one error “Fatal error during import: Parent Issue cannot be null” you are ok. This is because the validator does not know that Sub-Tasks cannot have a unique ID.

You can proceed to select “Begin Import”.

Confirm that the count of issues are the same as what you have prepared in your CSV, and your import is all set.

Creating a Sub-Task

Sub-tasks are useful when a large issue needs to be split into smaller tasks, such as when you need to assign different people or multiple deadlines are required.

If you are on a full-page issue, then you will click on the “Create subtask” icon.

You will be able to quickly add sub-tasks that are under the current parent issue.

After you add a sub-task, you will be able to edit and manage the sub-task like any other issue. In the breadcrumbs, you will easily notice that a task is under another parent issue. This feature of of many that is helpful for managers to organize different levels of tasks. You may also find other features such as Epics, Versions, and Components useful when creating task relationships. (Details in our topics!)

Linking Issues

Using sub-tasks is limited 2 levels, so you will not be able to assign many issues under another. Instead, you can use issue linking. Linking issues are useful or tasks such as bugs, so you know that a bug is related to a specific issue.

On the full-screen issue page, you can select the “Link issue” button to show the Linked issues block. You will be able to easily search issues to link. You can also define the type of relationship such as “is blocked by”, “blocks”, “has to be done after”, “related to”, and more. These are not only labels, but actually function as they are read. So, if you define an issue to be done before or after another specific issue and you try to close an issue wrongly, JIRA will notify you that something goes wrong.

Modifying Multiple (Bulk) Issues

As a manager, modifying multiple issues at once is a life saver. Even something simple as closing issues at once, or re-assigning a bulk of issues to another person or project, these can be done quite easily.

In your project, go to your Issues and filters tab.

You can use the simple search, or click “Advanced search” for better results.

For example, I want to re-assign everything assigned to a specific person to another person. I will use JIRA Query language to filter down the issues to the project and assignee. (Please search JQL for more details on how to query.)

Next, select the “…” menu on the top right.

Because the query creates a specific list, you are able to use this list to make bulk changes. So, next, select “Bulk change all ** issues(s)”.

You will be able to further refine your list, or select the top check box to select all. Select “Next” on the bottom of the page.

You will be able to edit issues (field values in issues), move issues (from one project to another), transition issues (change status), delete issues (permanently remove from JIRA), watch issues (assign who gets notifications to the issues), or stop watching issues.

Select Edit issues to make issue changes.

You will be able to change multiple values at once, but here we will re-assign all the issues to someone else. Make sure you select the checkbox and choose the new assignee.

Select “Next” at the bottom of the page to confirm. (You can also choose to get an email log of the operation by selecting the checkbox .)
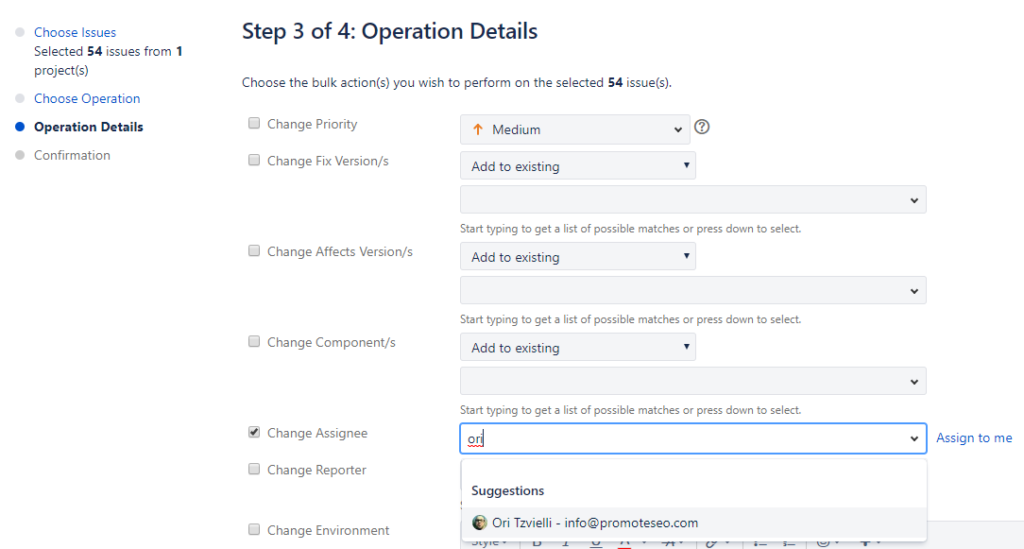
Once you press confirm, your editing will complete.

Useful Features For General Users

General Users features are the most commonly used features that all team members will need to use, unless you are a guest user that can only view issues.

Attaching a File

You can attach files by dragging in documents or files directly into the issue description or into comments. They will automatically be listed in the “Attachments” section of the issue.

To delete an attachment, selec the “X” icon on a file under the Attachments section.

Attaching a Screenshot

Attaching a screenshot is also easy. This applies to any copied image. After you copy an image or take a screenshot capture, select Ctrl+V to paste the image into the issue description or comment. Your image will be saved automatically as an attachment.

Cloning an Issue

In a case you want to duplicate or clone an issue, you can go to the “…” menu on the top right and select clone. JIRA will create the same issue on a new issue ID number for you.

Commenting on an Issue

Any user with the permission can comment on an issue. Go to the bottom Activity section on an issue to add a comment.

Editing Rich-Text Fields

Comments are one example, but you will be able to style your content in Rich-Text Fields.

You can bold and italicize text, add bullets, images, and even block text in quote or code format.

Watching and Voting on an Issue

If you are a reporter or assignee, you will be a watcher and get notifications as how you have set in your admin settings. However, in case you want to watch or have other members to follow an issue, go to the top of the issue and select the “Watch options” icon. You will be able to add users to watch and get notifications.

Logging Work on an Issue

Work log is useful for tracking how much time has been spent on a specific issue. In the Activity section, switch the view to Work log to view all work that has been logged to the issue.

To add a new work log, go to the top of the issue and under “…” menu select “Log Time”.

In the popup you can log the amount of time and the description of the work that has been done. The feature relates to the “Estimate Time” of the task a manager has assigned, so members do not under or over report work done on tasks.

We hope that gives you greater insight on what JIRA issues are capable of! Stay tuned for more in our upcoming articles.

Next: Coming Soon
11 Getting Started with JIRA: Issue Management with Basic Agile Workflow

This article is a part of Astral Web’s Comprehensive Guide to JIRA!

Previously: 10 Getting Started with JIRA: User Interface

What is an Agile Workflow?

An agile workflow is a project management style that takes an iterative approach to development where regular feedback is folded into intervals of work called sprints. This is in contrast to a more traditional waterfall style workflow where development is based on set phases prior to launch (e.g. develop database, then back end, then frontend, etc.).
In an iterative, agile workflow, teams can be diverted to different issues while another part of the project is being resolved. Customers can also review more of the project throughout the development period, instead of waiting until the very end of each phase.

Such workflow has both pros and cons, but in an ever changing web development environment, being agile and flexible is important to stay competitive. At Astral Web, our workflow is hybrid with our internal processes being iterative, but our reporting still shows traditional development phases, such as “Design Phase”, “Development Phase”, and “QA Phase”. We maintain milestones for our clients, but internally we are working with multiple components and schedules simultaneously.

Your JIRA workflows are setup, and your team members are ready to manage tasks. If you haven’t yet, it’s time to create a new project with all your customized settings configured.

Atlassian is continuously updating new JIRA Cloud project features, so please see their latest notes on the options available.

Everything you want to know about next-gen projects in Jira Cloud

https://community.atlassian.com/t5/Next-gen-articles/Everything-you-want-to-know-about-next-gen-projects-in-Jira/ba-p/894773

Otherwise, adding people, setting issues and workflows, and other general settings should be the same. Please go through each tab to check defaults or switch to any custom configurations you have made in the steps before.

For more details on workflows, checkout our previous article: Before You Start Using Atlassian JIRA Part 2: Create A Master Workflow For Your Business

Create an Issue

If your project is set up, you can finally begin to create and assign tasks.

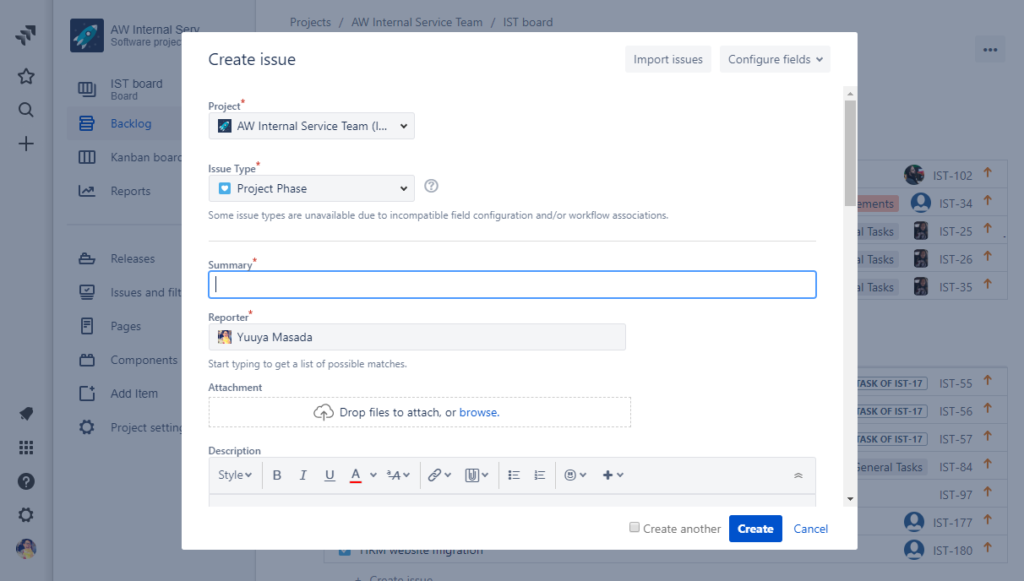
Either start from your project or your dashboard and select the “+” icon on the very left menu bar. If you started from your dashboard, you will need to select the correct Project to create the issue.

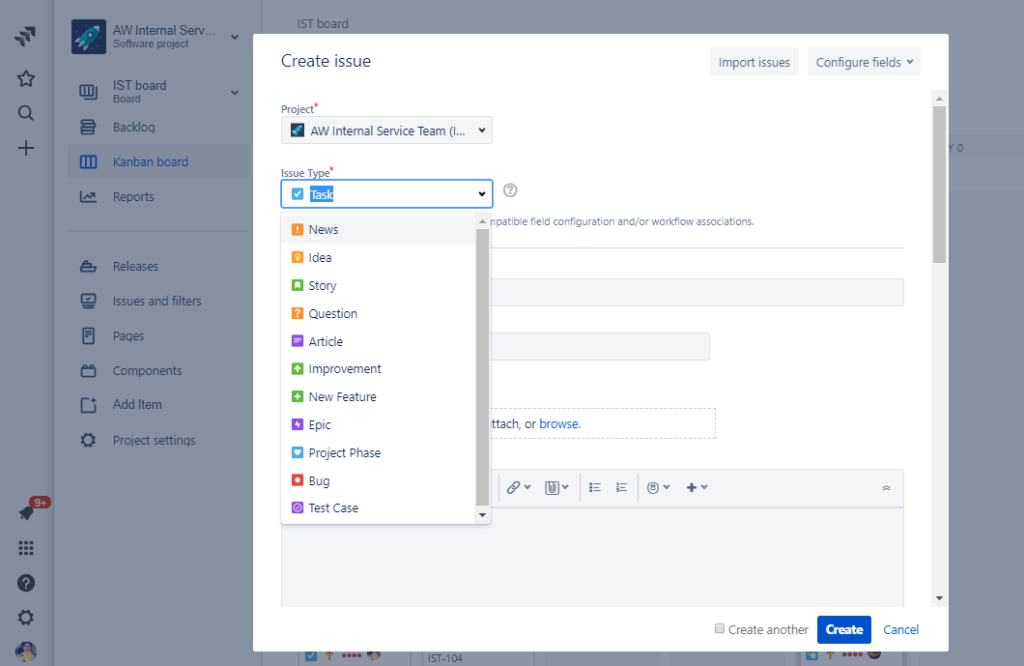
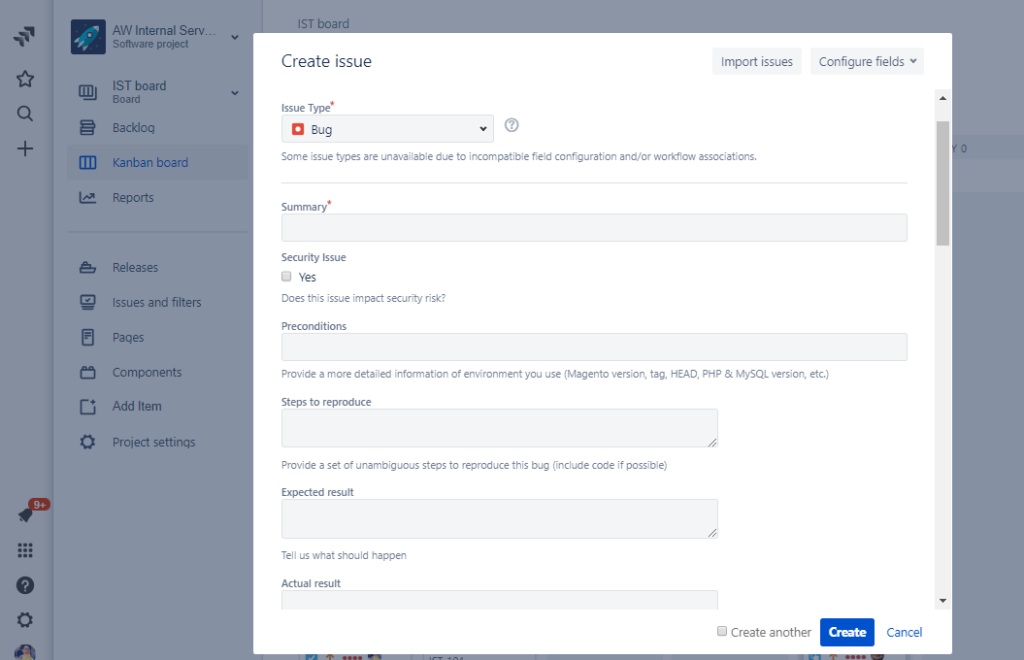
Next, select the issue type. Our maser workflow contains multiple types of issues, and each issue has its own custom workflow in alignment with the master workflow. This is because, some issues have higher priority or different steps. For example, if we find a bug, we never want this issue to start from a backlog and sit there until someone moves it forward. We want bugs to be flagged immediately and ready for review by project managers.

We also customized what field should be inputted by the reporter for each type of issue. This helps reporters to complete details without missing anything. A general task would only have a Summary and space to describe the task, but Bugs require more details such as Preconditions, Steps to reproduce, and Expected results.

Editing an Issue

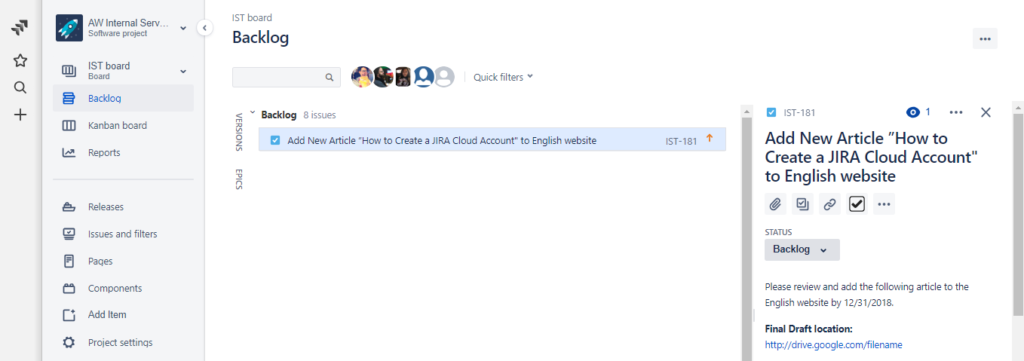
Your new issue should be under the Backlog section, or the location defined as the issue type’s starting point within your workflow.

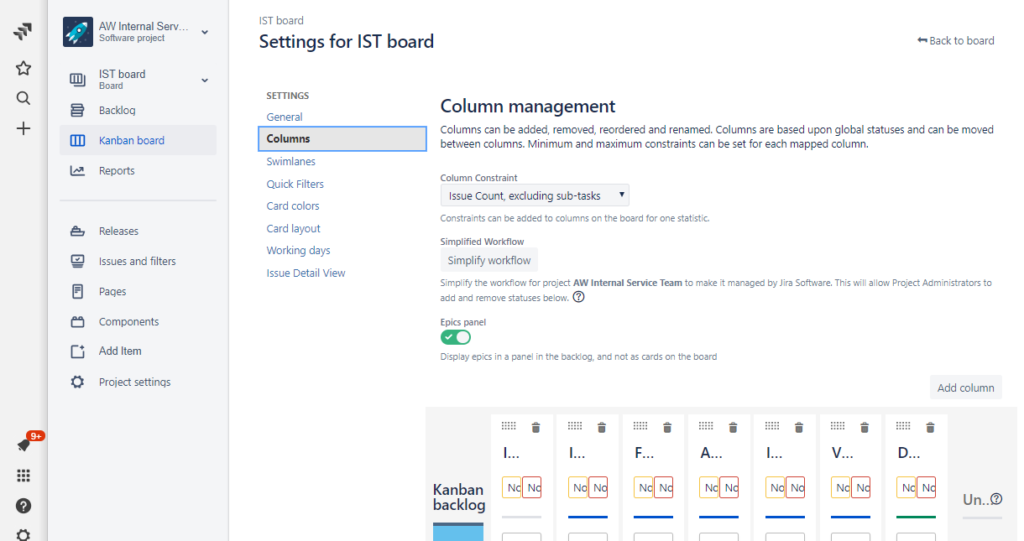
Backlog issues may not show inside your Kanban board if you did not set up your Kanboard board to display Backlog. Also, you may not have a Backlog tab if you did not set up Backlogs. These can be changed in the Kanban Board settings accessed from the top right “…” option on your Kanban board and go to “Board Settings”.

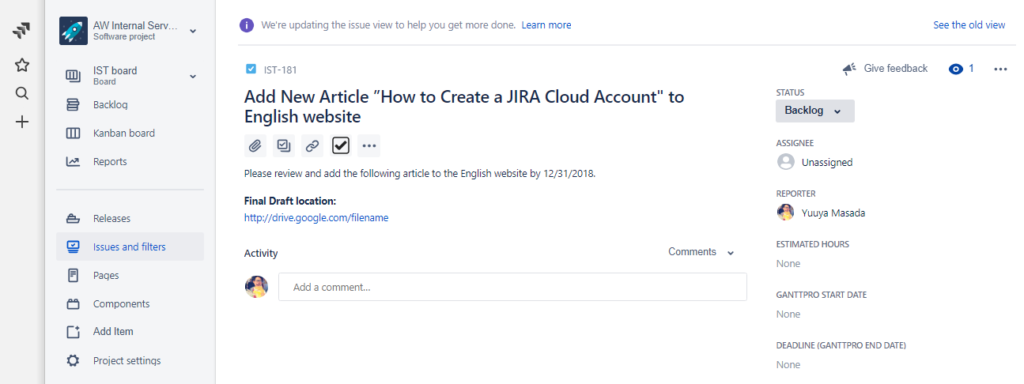
To edit your issue, you can simply select it to see a mini-view inside your browser. You will be able to change the basic options such as comment, change status, or access your plugins. If you need to change the content of the issue, as long as you are the reporter or admin of the project, you will be able to click any of the fields to make changes.

You can also see the issue on a full page by clicking the issue ID.

You may see this page first, if you have accessed the issue from other methods instead of the backlog section.

Moving an Issue

You can visually move an issue from status to status on your Kanban board.

This is an alternative to selecting your issue status from the issue status dropdown inside your issue details. The mobile JIRA Cloud app, you will only have the select from dropdown option, unless your version supports touch and drag on Kanban boards.

If you need to move an issue to another project, you can do so from the issue details page and select the “…” menu and choose “Move”.

You will go through administrative steps to transfer the data to other projects.

We will cover more of these administrative options in future articles!

10 Getting Started with JIRA: User Interface

This article is a part of Astral Web’s Comprehensive Guide to JIRA!

COMPREHENSIVE GUIDE TO JIRA 10

Previously: 09 Getting Started with JIRA: User Roles & Permissions

By now you may have gotten used to how JIRA Clouds looks and navigates, but here are some additional details about the interface that you may or may not already know.

Dashboards

Dashboards are the first page your users will land when they log into JIRA. The space is useful for filtering and sharing JIRA information, which is achieved by adding different types of gadgets such as search filters, pie charts, and other data collection formats.

image1

System Dashboard

The default dashboard you will get when you start JIRA is the System Dashboard. This default dashboard includes the “Introduction”, “Assigned to Me”, and “Activity Stream” gadgets. These are basic and fairly useful, but there are much more gadgets that JIRA provides for you to make user of. To do this, you will need to create new custom dashboards.

Custom Dashboards

To add or modify more gadgets, you will need to create a new dashboard since you cannot make changes to the default dashboard. Select the top right “…” icon and select “Create Dashboard”. You must be an admin or user with permission to create new boards, and usually only the creator or user with higher permissions will be able to make changes.

Add a name (e.g. “Project Team ABC Dashboard” or “Design Team Dashboard”) that will be relevant to the users who will be using this dashboard.

image4

We have created 3 basic levels of dashboards for our teams. Our highest level is a “Company Dashboard” that displays top level overall project information so we can quickly view the status of multiple projects at once. Only administrators can access this dashboard. We also have dashboards for each team by function such as “Design Team”, “Development Team”, and “Sales Team”. These filter projects and issues so they are most useful for each team and their members. We also have “Project Dashboards” for larger projects, so the project managers can get an overview of their entire project on the dashboard.

We use different dashboard gadgets to share information. For example, our Project Dashboard shows a calendar with hot issues, a line chart to show how many tickets have been created, and a pie chart to show the status of all of the tickets. This helps us understand the overall situation of one project.

image7

Dashboard Gadgets

JIRA offers a few dozen dashboard gadgets to use. There are some 3rd party gadgets that can be purchased, but we have never tried any. Not many of the gadgets are amazing, but they do basic data collection and show different charts. The Calendar gadget and Pie Chart are some of the most useful ones. We recommend you to try all of them to see and feel if they are useful for you.

image5

The most important factor is the data you are feeding to the gadget, which is all controlled by another feature called “Filters”. We will discuss how to use Filters in another article, but note that adding a gadget will not have enough power to filter fine details.

One type of gadget that is missing and we would love to have (which apparently used to be available in a much older version) is one that can add plain text or code. JIRA decided to remove these features. But, we do describe in our previous article that the “Introduction” section under your JIRA General System Settings is the only and best way to share custom text and basic code. Otherwise a 3rd party gadget may fulfill your needs.

More Dashboard Space

Select the “Edit layout” button to change the dashboard layout. You will be able to select between basic 1-3 columns. We use the default 2-column layout since it’s a good balance. The 3-column layout gets too small to show detailed information. You can try switching between them to see which works best for you. Just be careful that your gadgets may jump around when you make changes.

image2

You can also improve your viewing space by making the side menu smaller. Click the divider between the left menu and right side content to make the menu bar smaller. It isn’t much, but it does help to show more content on the right side if you have a small monitor. Otherwise you can zoom out on your browser (e.g. “ctrl” + ”-”) to see more.

image3

Look and Feel

The overall usability of JIRA Cloud cannot be changed so much, but you can change the logo and colors of your interface. Go to the section under “JIRA Settings” > “System” > “Look and feel”.

We added a nice company logo (and JIRA since we had some extra space), which needs to be around 368px by 64px. There are also options to show Titles on browsers tabs, Colors, and Time Display.

image6

You can only choose two colors for interface. The background color of your sidebar, and the Text and Icon colors. It would be nice to have more control, but you can at least unify colors for easy reading or differentiate between multiple Atlassian web-apps, or just having the right color for your company.

image8

JIRA Cloud, as most web-apps, is limited to modifying the interface, but we hope these tips help you improve usability for your team members.

Next: Getting Started with JIRA: Issue Management with Basic Agile Workflow

09 Getting Started with JIRA: User Roles & Permissions

This article is a part of Astral Web’s Comprehensive Guide to JIRA!

COMPREHENSIVE GUIDE TO JIRA 9

Previously: 08 Getting Started with JIRA: Manage Your User Profile

General Configuration

After we have added some users that can help configure and check our changes, we can now complete our general configurations that apply to your entire JIRA system.

The “Title” of your JIRA should be related to the overall system. We just simply named ours “Astral Web’s JIRA”. The naming isn’t too important, since the most prominent place you ever see it is in the tab title area.

image10

A very useful setting is the “Introduction” section. This section allows for some basic JIRA markup code that lets you add links, styling, and images.

image11

Go ahead and select “Edit Settings” to make changes.

image2

JIRA dashboards don’t allow any html code (unless you buy a 3rd party plugin), but you are able to add the “Introduction” block, so it may become useful for sharing important notes with all of your users.

Here is an example of how our Introduction block looks like on our main dashboard.

image4

Use the “Internationalization” settings to configure default language settings for all of your users. We use JIRA in both English and Chinese with English being our primary language, so we have “Other” for Indexing and “English” as our default system language. Language display settings can be changed per user as described in our previous User Profile article.

image5

Options are useful if you want to customize even further. We used the default setting as-is, but you can optimize what users see and access by turning on or off all the features you actually need to use. For example, Voting is a great feature for prioritizing issues, but we don’t use it in any of our teams. So, we could turn it off and keep it hidden from all of the interfaces. For now, our teams just ignore these options if we don’t need them.

Security

Security options are going to be important if you have different types of internal or external users on your project teams. You don’t want all of your users to have admin powers that allows them to accidentally add or remove important users, features, or billing options. Define which users are admins early on, so only specific users have access to these high-level options as described in our previous articles.

Project Roles

Project Roles are what you want to change for all the types of users you want to define and configure permissions for.

image7

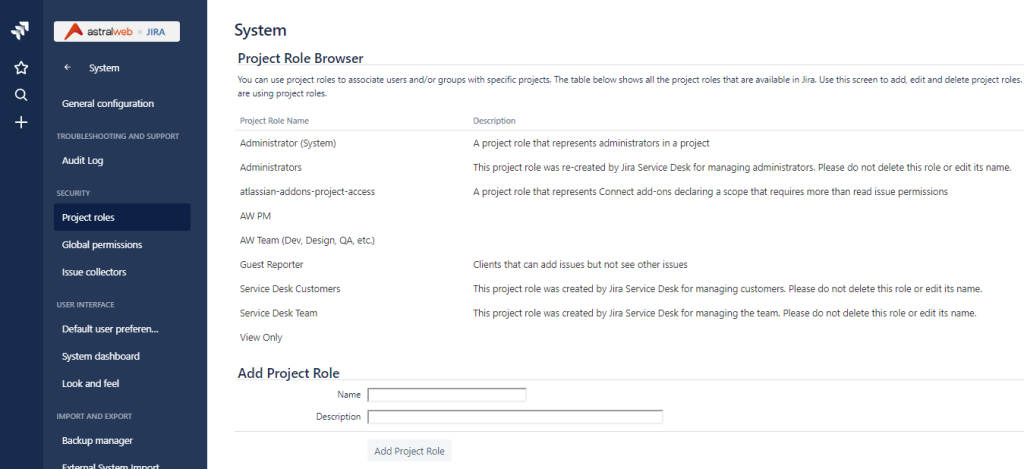
In addition to the system Administrators roles, we have added “PM (Project Manager)”, general “Team Member”, and “Guest Reporter” roles.

Project Manager Roles

PMs will have full access to their own projects allowing them to add/remove users and configure their projects as they please. The highest-level option they have is to delete their project. They cannot change global settings such as system settings, workflow schemes, etc.

General Team Member Roles

Team Members can only be invited to a project by a PM, and can only create, edit, and delete issues within the project. They can see other users’ issues and support editing them, but they will not be able to change any project settings.

Guest Reporter

Guest Reporters are roles reserved for our external stakeholders who need access to our project tickets. They can never see other projects, nor can they view issues they are not related to. So a PM must assign or add a Guest Reporter as a watcher to tickets they need access. Otherwise, the Guest Reporter can create and modify their own issues within the project.

Add Your Custom Roles

Above are examples that we use, but you should add your own custom roles as necessary. Go to the bottom of the list to “Add Project Role” to add your own.

image3

The new role will be added to the list. You will be able to add this role to different “Permission Schemes”. We will explain after our next step to set up “Global Permissions”.

Global Permissions

Global Permissions are configurations for top level users. If you have multiple Atlassian tools, you will be able to configure how different admins can access the different tools. Global Permissions apply to all projects, so you will most likely only add admin groups or users in this area.

image9

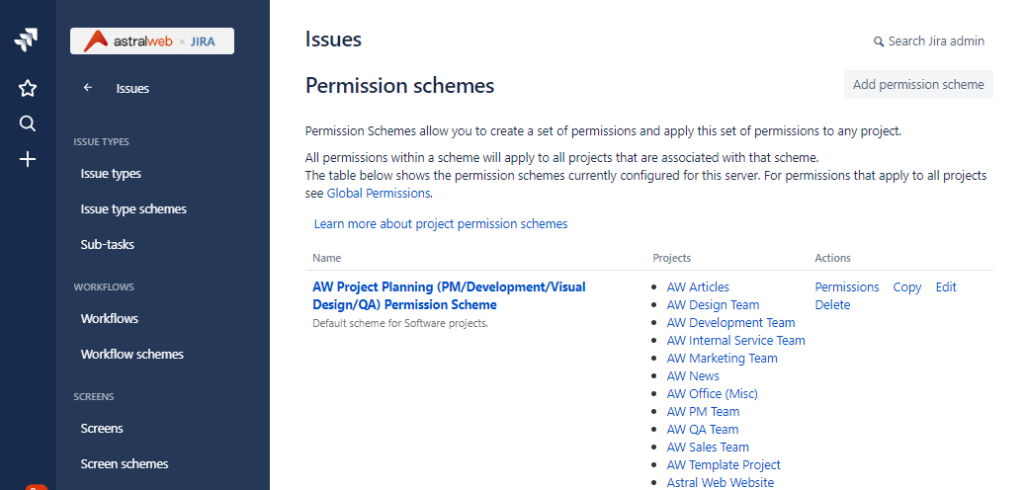
To add your new Project Roles to different permissions schemes, select the “Permission Schemes” in the description or click the “Permission Schemes” on the left menu panel.

image8

We created a new permission scheme that we apply to all of our projects that we create called “AW Project Planning”. You can do this by selecting the “Add permission scheme” button on the top right.

image1

After you create a new scheme, it will be listed on the permissions schemes list page. Select “Permissions” under the actions column to change configurations.

image6

Inside the scheme, you will see a list of actions and options for Projects, Issues, Comments, and more. You can assign different roles to each of these actions. Once a role has been assigned to an action, then the user within that role for each project will be able to access the feature. For example, we add PMs to the “Administer Projects” permission so they can make high-level changes to projects. We do not add other roles. Other general roles are added to the “Browse Project” permission.

In this way, we continue to add our roles to permissions so we can balance security, efficiency, and necessity for all of our teams and projects.

Next we’ll show you how to change your JIRA interface appearances.

Next: 10 Getting Started with JIRA: User Interface

08 Getting Started with JIRA: Manage Your User Profile

This article is a part of Astral Web’s Comprehensive Guide to JIRA!

image6

Previously: 07 Getting Started with JIRA: Start From Your Free Trial

Manage Users

The first thing you should set up are the users, starting with yourself, that will be accessing your JIRA Cloud. As a JIRA administrator, you will be able to add, remove, and edit any user. For each user, you will be able to assign different groups, project roles, and applications. Your Atlassian site uses single sign on for all your applications so your members don’t have to different accounts if you have multiple applications such as Confluence.

Add Admins

Add your administrators (or just yourself for now is ok) so we can work on JIRA setup together. Go to “JIRA Settings” from the dashboard and select “Users”  under User Management. Type in your administrator emails and select “Jira Software” so they have access to JIRA when they finish registration. Your other applications will show here, so you can select them as necessary if you would like.

image5

Organize Groups

If you’re a small team, you may be okay with less organization, but setting customized permissions for different types of member is good for management and security. There are several default system administration groups. You should be in the highest “site-admins” and “administrators” to have access to these backend setting options. Don’t change access details of these groups since you may lose access to key features. If you need custom access, start adding new groups and add new users to the custom groups.

image7

We customize our users into groups that relate to our internal departments. Project Managers have access to most projects and permission to modify project contents so they have their own group. Designers have access to the design team board and general access to most projects. Engineers are assigned to their responsible projects by project managers. By hiding options that are not relevant to each user, security improves and helps each member focus on what they need to do most. You do not need to create a group for each project, since each project will have user settings that is much quicker to manage. You will be able to add whole groups and adjust permissions per group or individual for each project.

Customize Roles

To customize the access permissions by role, go to “Project Roles” under “JIRA Settings” > “Security”. The highest role a user could be assigned is an “administrator” that grants  permission to edit and delete a project. Lowest is “View only”, which only allows a user to see issues related to them and cannot modify those issues. We added a few extra roles that are easy to change by project managers. Most are for internal members, but we also have external guest roles prevents external users from accessing too much options or information of our projects.

image8

Update Individual Profiles

Each user can update their user profile under “Your profile” menu from the bottom left of the JIRA dashboard screen. Adding a profile image is highly recommended when you have a large team so it is easier to identify each other on thumbnails and name searching.

image4

You can also change settings of JIRA per person under “Personal settings”. We have English and Chinese speakers, so here they can individually set their preferred language setting when they use JIRA. You can also translate workflows and statuses in the backend so all of your documentations are optimized for different languages. Each user can also have their own time zone, if they work remotely or in a different area from your main team.

image2

Maintain Users

We review our member list each month to make sure only active users are registered. We have many projects and guests accounts, so we are careful to communicate with each project manager to understand who needs access. We try to stay in our 50 user subscription limit to control our budget for JIRA.

If a user needs your help or you need to see how a dashboard looks like on a different user’s account you can login as another user under the User Management section. A “Log in as user” option is available under each user. However, you will not be able to log in as another admin. This is one reason you should not add all your members as an admin, since there will be situations you need to help administrate other users.

image3

Next, we will help you go through some general settings of JIRA Cloud so your users can add and manage new projects.

Next: 09 Getting Started with JIRA: User Roles & Permissions