Get Started With Amazon PPC -Auto Targeting Campaigns

amazon auto targeting ppc banner

With small margins due to the competitive nature of the marketplace and a search algorithm that might not be as intuitive as Google’s, it can be difficult to figure out where to start with Amazon’s PPC advertising campaigns. A simple but effective strategy to start by using an Automatic Targeting ad campaign.

Auto Targeting is a great way to begin to collect information on what search terms are associated with your products or, more specifically, what search terms Amazon thinks should be associated with your product – essential information. A good way to look at it is as an investment in data for future campaigns – as well as a paid boost to a product’s sales rank.

Setting up an auto targeting campaign is incredibly easy. Start by mapping out a daily budget that you can afford. Unless you’re under serious time pressure, it’s best to start with a low daily budget in your campaign settings and then increase it incrementally until you’re getting the amount of sales and/or data that you need.

The actual setup of a campaign is straightforward. If you have a Seller Central account you can begin here.

Note that auto targeting is chosen at campaign level as seen below:
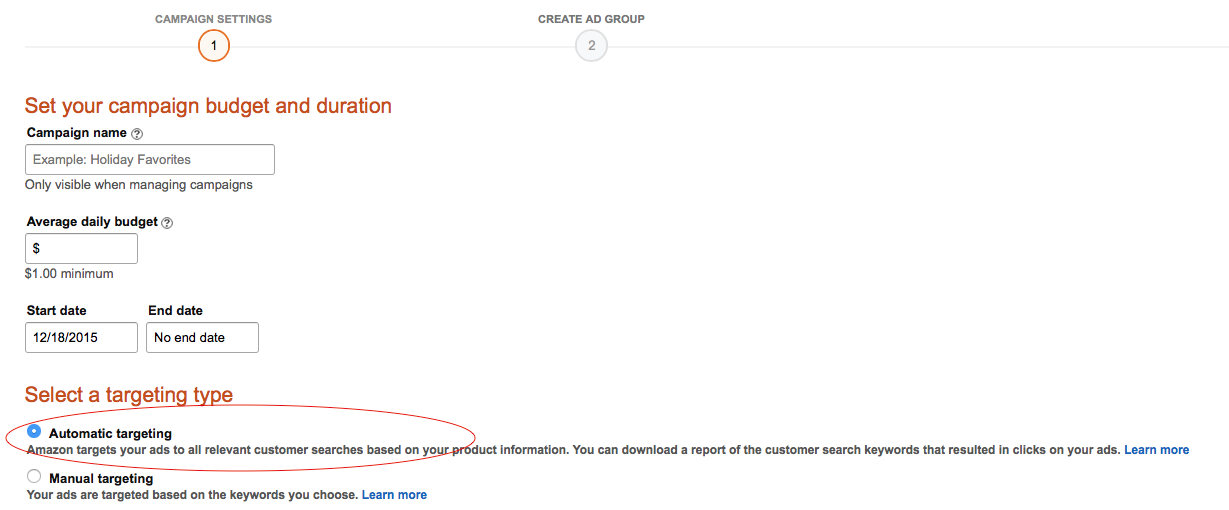
amazon automatic targeting ad campaign


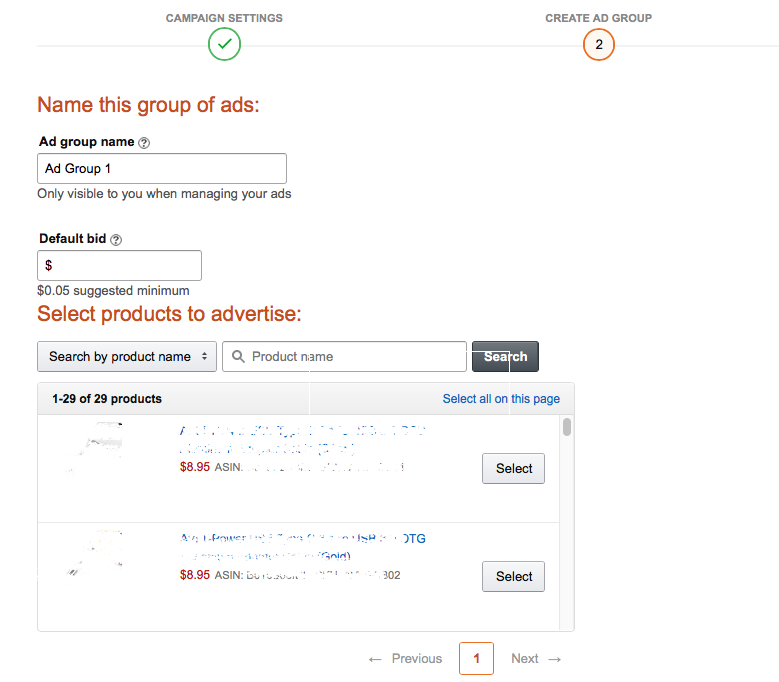
On the next page, it’s as simple as selecting the products you’d like within one adgroup. Be sure to set up individual ad groups for variations of a single product to get the most accurate data possible.

A quick not for anyone new to Pay Per Click Advertising, the Default Click field what you’ll pay when an Amazon user clicks on your product ad. Your costs consist only of clicks, not impressions (display of the ad)

amazon auto targeting ad group


Search Terms Report

As your campaign runs, you can view the number of impressions and clicks that your product is getting in the Campaign Manager of your Seller Central account. Once your campaign has been running for a couple of days, you can start to download more detailed information on search terms. You can get to this page either by clicking into your ad group and following the link (below) or going to Reports > Advertising Reports > Search Terms Report.

Ad Group Overview:

ad group overview seller central


Search Terms Report Download:

download search terms report amazon seller central

Once you’ve downloaded this report you have some concrete information with which to start assessing your ad strategy. Not only do you have a list of the search terms that are actually being used by shoppers to help hone a manual keyword list, but you’ve also got an idea of how Amazon identifies your product which can be useful for improving the product detail page itself.

The Report itself includes:

  • Search Terms
  • Ad Impressions
  • Ad Clicks
  • Total Spend
  • Avg. Cost Per Click
  • Click thru Rate
  • Product Sales
  • Conversion Rate
  • Cost per Sale


Negative Keywords:

Because we’re using the auto-targeting as an information gathering tool in this example, it’s best to let your campaign run until you have a significant amount of information (a “significant amount” will vary from product to product, and seller to seller). However, after running for a short period, you can begin to add negative keywords. In the beginning, you can identify the obvious mistaken keywords (“Chicago Bears” turns up for your Teddy Bear). As your campaign runs for a longer period, you can begin to get more serious about weeding out negative search terms and try to get a positive return from the auto targeting campaign (This is not always the best strategy, or even possible, but if it’s making you money it’s making you money).

Adding negative search terms is another simple process in Seller Central. After identifying search terms that don’t relate to your product with the search term report, you simply click into the auto ad campaign > campaign settings >negative keywords > add keywords. Note that Amazon has an Exact Match and Phrase Match option for negative keywords. Be sure to choose the correct match type – in most cases you’ll want to choose Exact Match to avoid losing relevant search terms.
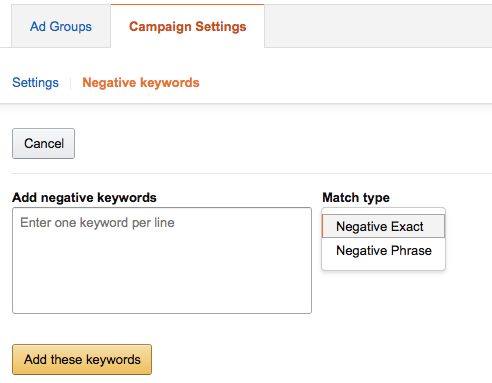
amazon negative keywords auto campaign


Adding negative keywords on a regular basis is good practice if you’re trying to hone a keyword list but still want to collect Amazon Auto Campaign data or, of course, if you’re running an auto ad campaign with the expectation of a ROI.


Ultimately, Amazon’s auto-targeting campaigns have the potential to be profitable to sellers. However, they can also be a worthwhile investment in data for broader use in optimizing manual PPC campaigns and creating product detail pages that rank for the correct search terms.
Improving CPC through Google Adwords

Both removing negative search terms and channeling others onto your website’s most relevant landing pages are fundamental to the maintenance of a healthy CPC (cost-per-click) ad campaign. In this instance, we’ll go through the brief steps necessary to both make sure that you’re not paying for unwanted ads, and that you have created the most effective ads possible by best meeting the intent of the consumer.

Firstly, in order to do a comprehensive review of which search terms you are paying google to advertise for, one ought to make sure that they’re looking at a time frame that goes back at least as far as the last time they really scrutinized the key word terms for which ads had been run. In the example below, you can see that I’m on the keywords tab, and have selected the entire time-span of this particular campaign

Google Adwords

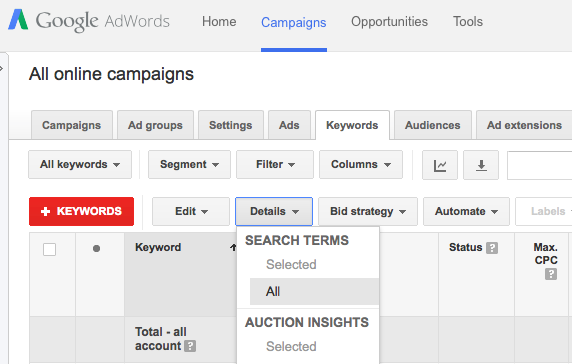
Secondly, click the keywords tab, then Details drop-down, and select All in order to have a look at all of the keywords in your campaign.

Google Adwords

Alternatively, you can select a specific ad campaign, or narrow by a number of criteria, but in this case we’re looking at all of the keywords that we’ve run in order to do a thorough check of what is and isn’t running.

Once we’ve done this, we can start to consider the most important factor in CPC, which is what the intent of the consumer is, and how relevant the page that we’re paying to send them to is.

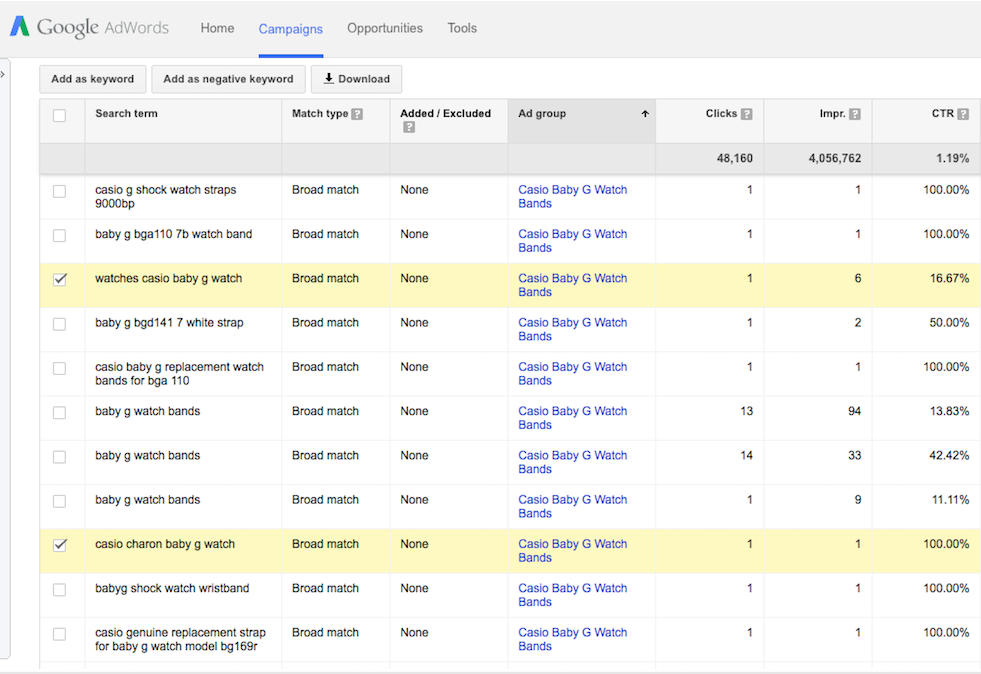
In the case illustrated below, we’re looking at an ad group that’s marketing watch bands (in this case, the ad group is sending them to a page that is specific to bands for a type of watch) As can be seen, I’ve already selected two search entries for which I don’t believe it’s worth paying to have my watch band page exposed.

google adwords

In this case, both of the search queries end with the word watch, which suggests that these searchers will not be content with viewing straps alone. The clicks and click-through-rate are very subjective, but nonetheless one can see that there is Moreover, let’s say in this case that my site does actually sell this entire watch, the fact is that the average internet shopper will not take the time to navigate through my site to find this page.

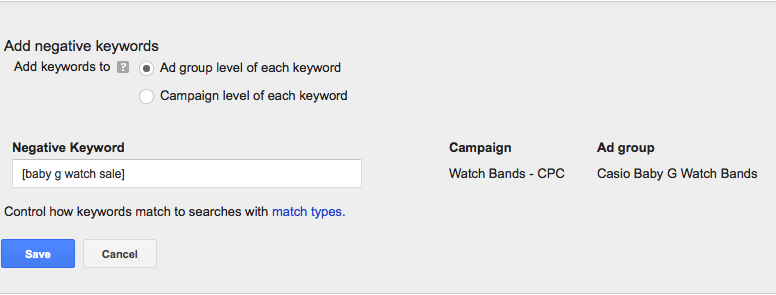
In order to address this issue I select the keywords watches casio baby g watch and baby g watch sale. By clicking on add as a negative keywords, I’m given the option to remove these search terms from either my ad group or my ad campaign. The difference being that selecting campaign level, I will exclude any of my ad groups within this campaign from showing ads.

google adwords


My second consideration is whether or not I do, in fact, sell this watch model. For the purposes of illustration, let’s say that I do sell this watch model, and thus have a page that meets the likely intention of this searcher- to purchase a watch. Therefore it’s worth my while to create an ad group that links these queries to the intentions of searchers

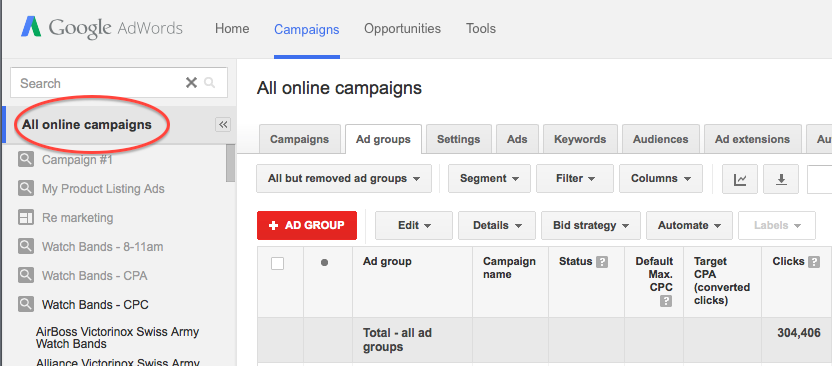
By going to All Online Campaigns, and selecting the Ad groups tab, I’ve determined that no such Ad group exists.

google adwords

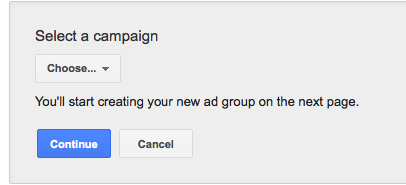
Making sure that I am in the appropriate campaign, in this case we’ll say I have one campaign for anything watch related—listed on the left or under the campaigns tab—I click the red + AD GROUP button. Then I am prompted to assign my new Ad group to a campaign.

adwords6

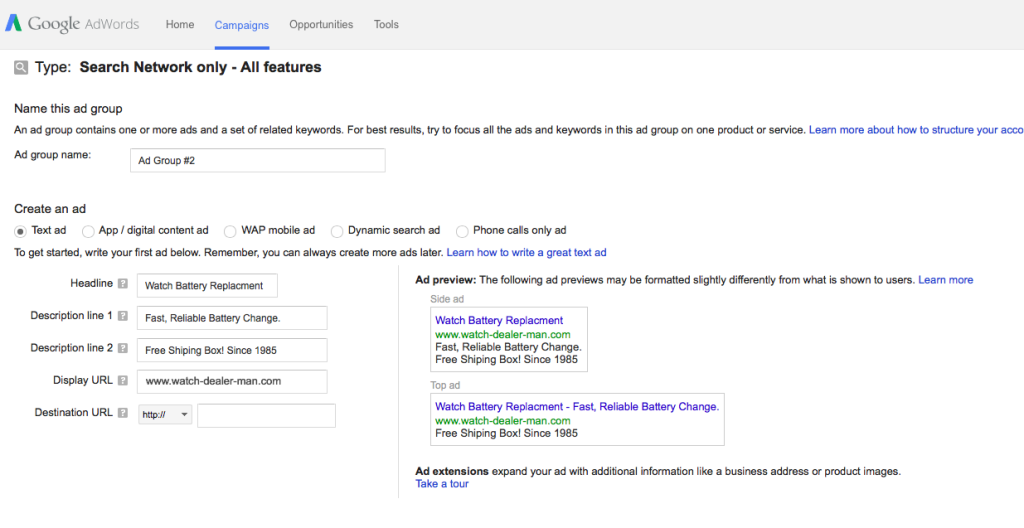
As can be seen below, Google provides an easy template for creating new ads, in this case filled in for previous ads I’ve run.

Google Adwords

This part is fairly self-explanatory, with Google’s instructions on “how to write a great ad” readily available with the link above the ad-preview. The most important consideration in the construction of this ad group is the connection between my specific watch page and the key words that I believe represent the intention of purchasing that specific model.

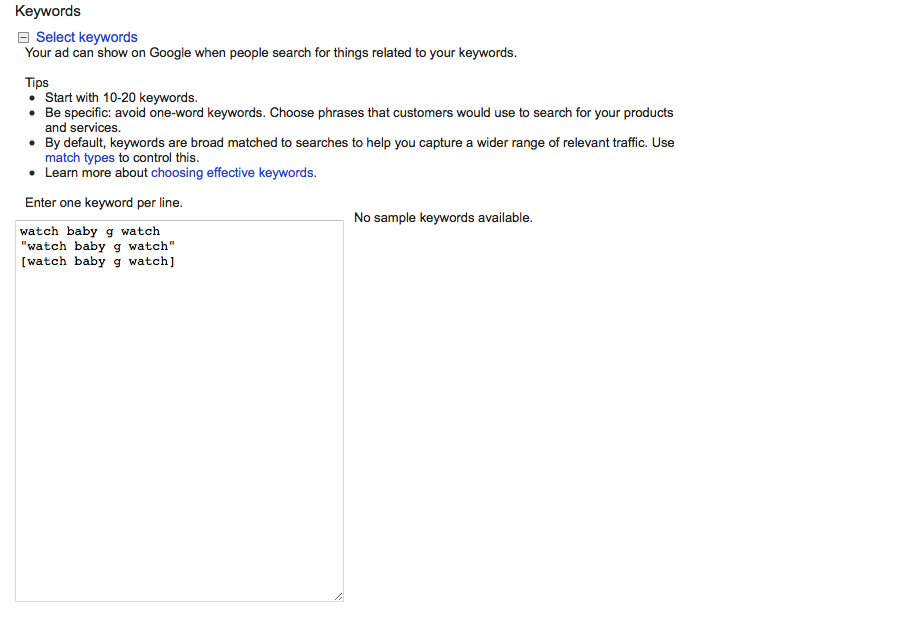
One of the final steps is reached by scrolling down the page: entering the keywords that you would like to trigger this particular ad. In this case, it would be wise of me to enter as many common variations on the target keywords as possible, perhaps even misspellings. However, in this case, I’ve entered the search term we first identified three times to illustrate the importance of defining what types of matches one wants to trigger their ad:

adwords 8

In this case I’ve decided that I want broad match- searches containing the words in my listed keyword; phrase match– searches containing these keywords in this order anywhere within a search query; and finally exact match- a search of exactly the keywords listed, no more, no less (accordingly denoted by no punctuation, quotation marks, and brackets). One can imagine how a broad match watch would technically meet the search criteria of millions of queries, most of which would likely have to do with entertainment, not the watches I want to sell ads for.

The final step involved is to set the Maximum CPC you’re willing to pay for you’re ad to appear. This is a very subjective step as well, and involves factors that cannot be touched on here, but finding a sustainable level is recommended.

google adwords

After clicking the blue button, you’ve created you’re new ad campaign!

In my case, I’ve made sure that I don’t pay to send any more searchers who want to see a watch to a page full of watch straps by adding a search query to the negative keyword list in one ad group. Furthermore, I’ve identified a page of mine that meets the intentions of the searcher, suggesting that the creation of an ad to meet that need will likely be a positive decision.


Important Analytics Data (multi-channel funnel & ecommerce conversion data)

Most internet marketers can easily get lost in Analytics Data (including ourselves sometimes). We would love to share a few quick data views that we like to look at.


Point 1 – Tracking information for goals and ecommerce transactions

a. ecommerce and goals – analytics typically gives the last visitor traffic source the conversion UNLESS the last source is “direct”  and “direct” has a prior traffic source.

b. multi-channel funnels – gives tracking of goals and ecommerce the exact traffic sources


Point 2 – How to look into multi-channel funnels and get true (not overlaping) assisted conversion (that were not the final conversion)


Step 1 – Login to Analytics and click on multi-channel funnels

Step 2 – Click on top of page on conversion segments and create new

Step 3 – Setup new custom segment

Include -> assisting interaction + medium + matching regexp -> cpc

AND

Exclude -> last interaction + medium + matching regexp -> cpc

AND

Exclued -> last interaction + basic channel grouping -> Direct

in regular ecommerce conversion data, the “direct” visit if last in turn, will not show direct as the conversion but the one before. ofcourse it will be direct if only visited as direct

Step 4 – Select New Conversion Segment and click on Apply

Step 5 – For ecommerce, make sure you unclick goals and only select ecommerce

Step 6 – Explore your data

Assisted Conversions

&
Top Conversion Paths


Enjoy!

Google Base Change and More Ads

Ever since we heard the Google announcement 2 weeks ago about paid inclusion for base products, we were a little shocked.

Today is the first day that we can see even more ads with the base sponsored ads section. Now all organic results are hidden before the scroll on my laptop. WHAT!!!!

Welcome to Google Trusted Stores

At our company we always try to encourage our clients to include “trust logos” on their sites to help with visitor confidence and higher conversion rates.

As of today, June 7th, 2012 Google just released the Google Trusted Store program for all merchants in the United States.

We wanted to include initial information about the program:

You will have to make sure that:
– You are an online business in the United States
– You are incorporated
– You have all customer service pages onsite (privacy, contact, shipping, terms, clear phone number and email)
You feel free to submit your shipping and cancellation information to Google
– You have a Google merchant account (Google Base/Shopping Account & Feeds)

Also Google Specifies that you will NOT be able to apply if:
– They are part of marketplace sites and other sites where different stores share a common domain for their store and checkout pages.
– They are unable to add JavaScript to their confirmation pages.
– They are unable to provide daily feeds of shipped and canceled orders.
– They have greater than 50% of total orders shipped without tracking.
– They offer custom and made-to-order products in which average time to ship is greater than 14 days.
– They offer subscription services or future deliveries in which payment is taken in advance.
– They offer direct to store shipments in which customers are not direct recipients of shipment.

Visit Site Google Trusted Store for more information