Shopping Cart Price Rules Fields Overview

magento promotions shopping cart price rules overview bannerTo accompany our example of a multi-tiered (spend more, save more) promotion set up in Magento, we’ve created this brief description of the Shopping Cart Price Rules fields and their functions. When setting up promotions, or making any changes for that matter, be sure to test thoroughly before you leave it to run on its own. If you don’t have a test site to do so, try creating first creating promotions that are not very drastic and setting them Active during hours of the day when you’re least likely to have site traffic.

Fields Overview:

Tab: Rule Information

This tab contains general rules including timeline, groups that the promotion will apply to, internal description, and other broad rules.

It includes the following fields (mandatory magento fields always marked with asterisk):

Rule Name: This is for internal use only (i.e. 30% off Labor Day Sale). Rule Name will appear on your Promotions list so include enough detail to distinguish promotions as the list number increases.

Description: Not a mandatory field, but this is your opportunity to spell out the rules of the promotion in plain English for future reference for yourself or others.

Status: Active or Inactive, determines whether your promotion is applied on your site.

Customer Groups: If you have different customer groups and access set up on your site, this field allows you to limit a promotion to only specific groups (e.g. Members Only Sale).

Coupon: Magento offers you the option to choose No Coupon or Specific Coupon

  • No Coupon: Select this option to apply the promotion to all eligible site users (e.g. general sales)
  • Specific Coupon: Allows you to enter the coupon code of your choice. Use this option for targeted promotions, reachout, or any discount you’d like to provide to a limited number of customers.
    • If you choose Specific Coupon option, you’ll have the further option to Use Auto Generation. If selected, Magento will auto generate codes which you can then manage and distribute.

Uses Per Coupon- Depending on your business and the scope of your promotion, use this field to limit uses per your wishes or set to an arbitrarily high number to–in effect–have no limit until the promotion expires or is manually ended

Uses Per Customer: Again, this very much depends on the manner of the promotion you are running. Set according to your wishes.

  • Note: This will be tracked according to customer accounts. If you are trying to limit a coupon to say, only one use, do not use this field. Not only can the coupon be shared but multiple accounts can be created by customers.

From Date: Allows you to specify start date of your promotion. Note that whether a promotion is Active or not is independent of this field. If you plan to set a future start date, set your promotion to Active AND enter a From Date.

To Date: Allows you to specify the end date of your promotion (ending a minute before midnight on the date entered).

Priority: This field is important when running multiple promotions, and essential to creating Multi-Tiered spending promotions (i.e. spend X, get Y% off; spend 2X, get 2Y% off).

The lower the number entered here the higher the precedence/priority in the application of your promotion.

In our three-tiered example we choose an arbitrarily high number (low priority)  to begin with and assign decreasing numbers to each tier

  • Spend 100 get 10% off: Priority- 33
  • Spend 200 get 20% off: Priority- 32
  • Spend 300 get 30% off: Priority- 31

The Priority number you assign promotions will depend on the size and nature of your business and promotions. As a general rule, the less your promotion is limited in scope, the lower number you can assign to it.

See related field Stop Further Rules Processing


Tab: Conditions

This tab contains the essential rules or criteria that must be met in order for your promotion to apply.

The rules are fairly easy to set up, and allow for a virtually endless list of conditions.

Generally, by selecting If All conditions Are True you can endlessly narrow down the promotion by product # /products / product attributes / total cost / and so on.

By selecting If Any Conditions are True (or False) you can cast a wider net, allowing you to choose multiple products or price ranges.

In our example, we have a very simple rule set up for the 2nd rule in our three-tiered Spend X, Save X example: the promotion will apply if the customer’s subtotal is equal to or greater than $200.

magento manage promotions conditions tab


Tab: Actions

In the Actions tab, you are able to define what happens IF the rules in the Conditions tab are met. It further contains a section that allows you to apply extra conditions to items in the cart, narrowing to specific categories, prices, and more as needed. In our example, we leave this section blank as we have no need to further narrow the application of the promotion.

Section- Apply: Has four, relatively self-explanatory options for what kind of discount is applied in your promotion:

  • Percentage of Price Discount: Allows you to enter a percentage that will be taken off of the subtotal in the Discount Amount field below. In our example, we use this field to create 20% Off
  • Fixed Amount Discount: Allows you to enter a fixed monetary amount (in the next field) to be taken off of products that you define in the second section of this page. If left blank, it will apply to all products that have met the criteria in the Conditions tab.
  • Fixed Amount Discount for the Whole Cart: Allows you to enter a fixed monetary amount to be taken off of products that you define in the second section of this page. As stated, this rule applies to the entire cart.
  • Buy X get Y free (discount amount is Y): Allows you to set up a rule specifying number of item(s) X purchased in order to receive number of items(s) Y free.

Discount Amount: This field is the percentage or fixed amount discounted depending on the Apply action you selected in the step before. In our example, this is where we specify 20 for 20% off purchases over $200.

Maximum Quantity Discount is Applied to: Allows you to limit the number of products that can are discounted if stock or margins are low.

Discount Qty Step (Buy X): This section is where you specify the amount of product X purchased in order to receive product Y if you’ve selected the Buy X get Y free (discount amount is Y) Apply action.

Apply to Shipping Amount: Determines whether the price rule, if a percentage or a fixed number that exceeds subtotal will apply to shipping costs.

Free Shipping: Simple yes/no option to offer free shipping with your promotion (or as your promotion).

Stop Further Rules Processing: This is an important field when running simultaneous or complimentary promotions. Selecting Yes  prevents any further promotions from applying on top of the one you’re creating. When this is the case, it is the Priority  numbers assigned to each promotion that will determine which one ultimately applies. 

In our multi-tiered example, we set this to Yes. Otherwise, using three separate promotions for one “Buy 100 get 10%, Buy 200 get 20%, Buy 300 get 30%,” each rule would apply to a purchase of over $300 dollars, effectively becoming %50 Off.

The second section under this tab is “Apply the rule only to cart items matching the following conditions (leave blank for all items)” – This is where you you specify what items the promotion will actually apply to, as opposed to the Conditions tab, which specifies which items (amounts, etc.) activate the promotion in the first place. It has essentially the same logic rules available as the Conditions tab, and can be used exclusively or in combination with Conditions depending on the specific  promotion you would like to create.
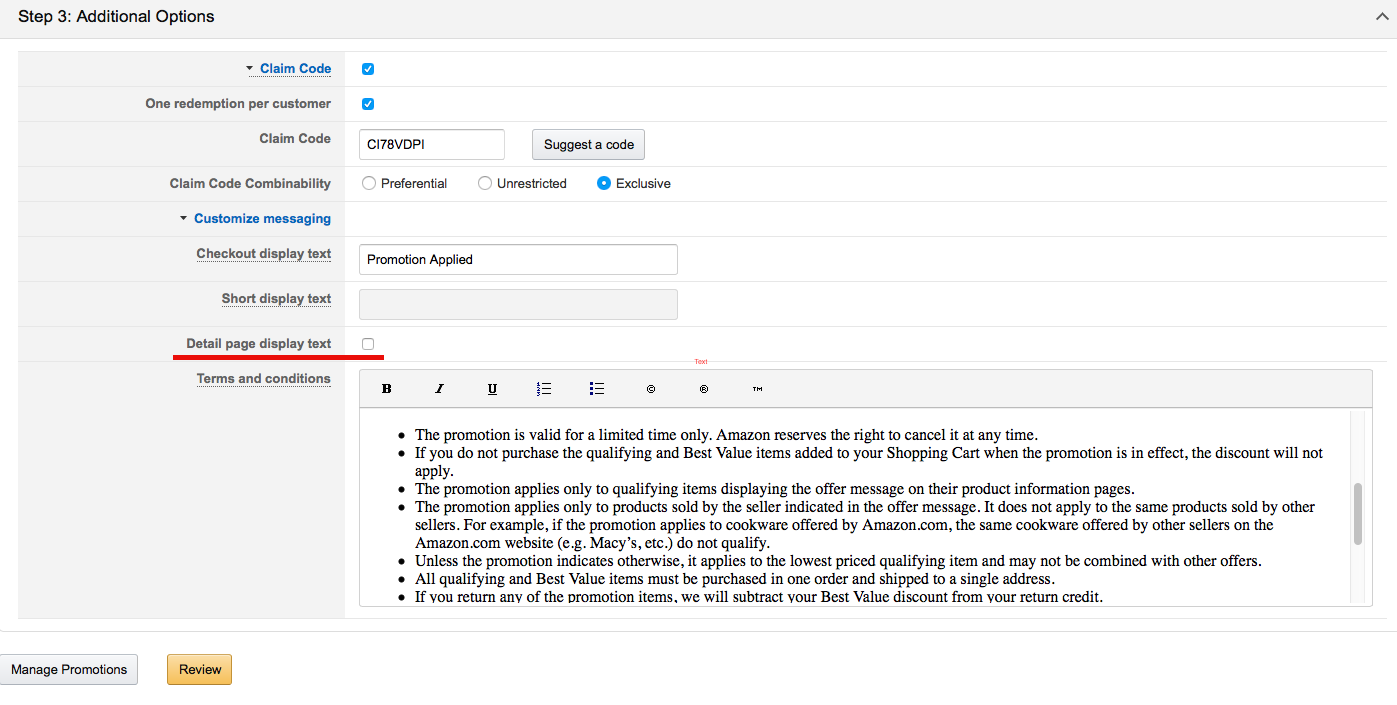
shopping cart price rules actions tab shopping cart rules

Tab: Labels

This section is where you give your promotion the title that you would like site users to see. Whether and where it shows up will depend on the way your site is constructed, but will usually appear on the checkout page.


Tab: Manage Coupon Codes

This section is fairly self-explanatory and, of course, only applies if you’re using a promotion that requires a coupon. It is primarily for coupons that you want to closely manage. E.G. a small number of unique coupons to provide to a few exclusive reviewer, in most cases it’s easier and more manageable to enter a single coupon code under the Rule Information tab.

Coupon Quantity: Determines how many coupons will be created.

Code Length: Length of the coupon to be generated.

Code Format: Alphanumeric, Alphabetical, or Numeric.

Code Prefix / Code Suffix: Manually add a set prefix or suffix for organization and management of multiple unique codes.

Dash every X characters: Insert a dash in order to make your coupons uniform with another system or extra unique

Providing Exclusive Discounts on Amazon

Banner for amazon promotions article

Many vendors on Amazon find themselves needing to provide a discount on one or more of their products to a specific person or group of people. A prime example of this would be when a vendor would like to offer a discounted or free product in exchange for increasing product exposure and getting reviews. Not only can using a promotion such as this allow you to increase your reviews but, those reviews will be “verified purchases.” As an added bonus, your products will likely receive a bump in sales which is always valuable, no matter how small.

Offering this discount is a pretty simple process with your Seller Central account. Below is a short step by step guide to creating a basic discount that you can share with a select group of customers:

Once logged into Seller Central, go to Advertising > Promotions:

Amazon Seller Central Promotions Page

On this page, you’ll select the “Money Off” option, which will take you to the promotion details page:


Amazon Money Off Promotion Page

Most of these fields are pretty self explanatory. For this example lets say we want to offer one newly-released products for free.

Step 1: Conditions


  • Buyer Purchases – in this case I will select “At least this quantity of items” and “1,” as I want the recipients of this promotion to receive it without buying multiple products.
  • Purchased Items – for our purposes I will create a product selection that includes only the product I want to offer. After clicking on the link “Create a new product selection” to the right of this field you’re able to create a selection based on SKU, ASIN, and more.
    • If you add multiple items to your selection, based on these conditions, anyone purchasing any one of the items in your product selection will be eligible for the discount.

Amazon Promotion Product Selection Creation


  • Buyer gets – gives you the option to discount by either a percentage or fixed amount. The simplest way to offer a product for free is to simply select “Amount off (in$)” and input the full price of the product.
  • Applies to – for our purposes we will select “purchased items,” meaning that it will apply to item(s) we set up in the purchased items field.
  • Advanced Options – gives you the option to exclude subsets of your catalog, but is not relevant for our purposes of offering a promotion on one item.

Step 2: Scheduling:

This section is also very clear in terms of filling out conditions, offering you a time span with a start and end date and time.

  • It’s a good idea to set the time span to a period that you know you’ll be able to easily monitor, particularly because Amazon requires that discounts be set up at least four hours in advance. You should plan ahead to be sure that you can check that the discount is active when it should be.
  • Internal Description is solely for you. A simple description will do. i.e. “Product X Review Giveaway.”
  • Tracking ID – Again this is for tracking purposes, and may not be very important unless you have large scale sales and promotions on Amazon. This field is automatically filled out by Amazon with a default ID.

Step 3: Additional Options:

This is the section where you are able to confine the discount to only a select number of people that you’ve shared it with.

Click the checkbox next to Claim Code to see the following options:

discount code for amazon coupon

  •  One redemption per customer – be sure to select this checkbox to avoid giving one customer hundreds of free products.
  • Claim Code – Amazon will give you a randomly generated. You will need to go to “Manage Claim Codes” to generate a specific number of one-time use codes (See step 4). Otherwise, if you choose to use this code, it will be restricted to one user but users will be able to make the code public.
  • Claim Code Combinability – in this case we will select “exclusive,” due to the fact that we are offering a free product. This is generally a safe selection unless you have multiple promotions running which you want to combine in custom ways.
  • Customize messaging – This field can generally be left in the default format. However, be sure to UNCHECK Detail page display text if you do not want anyone who views your product to take advantage of the discount.

amazon promotion private claim code setup

After reviewing and submitting, you’ve set up a promotion with a private claim code. As stated before, particularly with the delay in Amazon’s system, be sure to test your promotion when it is set to go into effect – both to make sure that it works in the checkout process and that you’ve set it up correctly and is not appearing publicly.

Step 4: Exclusive Claim Codes

At this point you can create a specific number of claim codes that can only be used once, rather than being restricted only by one use per user.

Click the tab Promotions > Manage Your Promotions  and select the promotion you’ve just created (be sure to check “pending” promotions).

Once you’re viewing the desired promotion, click on Manage Claim Codes. Here you have the opportunity to Generate Claim Codes which you can download from Amazon to provide to reviewers or other customers. As long as you’ve followed the proper steps when setting up your promotion, this will allow you to rest easy knowing that your codes are truly exclusive.

Good luck!

Magento: Importing CSVs

magento csv import article banner image

Importing products into Magento with a .csv file can be an incredibly time consuming and sometimes frustrating experience. One can be faced with one hundred columns of product attributes, only some of which seem to match up with the product information that you have on hand. However, uploading via .csv is the best option for uploading multiple products in one batch, and can be made a little easier by following a process and having a little understanding of how to match the cryptic information seen on a magento excel sheet with what you’re seeing or want to see on the front end of your website.

Mandatory Attributes:
When you’re uploading products to Magento, not every variable that is listed in your exported template is necessary to fill out (or include at all). However, in order to successfully upload a .csv, you’ll need to include the mandatory attributes. These include attributes that are, by default, mandatory for any Magento product, as well as attributes that are mandatory to your site exclusively, according to its design and specific needs. If you are only uploading the minimum mandatory fields for products that don’t yet exist, you will need to upload further further information before the products are live.

Magento’s mandatory attributes are:
sku
_attribute_set
_type
price
name
status
visibility
description
tax_class_id
short_description
weight

These attributes are listed in their “attribute code” form as they will appear on a spreadsheet for Magento. Even if some of these field have been altered by site developers, the majority will be mandatory on any Magento site:

sku – your products’ unique alphanumeric identifier.

_attribute_set – refers to a default attribute set that each type of product has. for example “shoes” _attribute_set would likely include a single number representing shoe size and color attribute, whereas “pants” _attribute_set would automatically include a number for both waist and inseam as well as color. _attribute_set defines the attributes that apply to categories of products.
Attribute sets will be defined by the sites developers, so they will vary from site to site, and it’s best to speak with the person who set them up in order to get a good grasp of what they are on your site.

_type – refers to whether your product is simple or configurable. In other words whether it is a stand alone product, a variation, or the parent of variations
price – Self explanatory, the price of the products

name – The title of your product

status – whether or not the product is active on the website. Shown in the back end product page as “Enabled” or “Disabled,” and represented in a .csv by a 1 (enabled) or 2 (disabled)

visibility – Refers to visibility of product on site: Search and Catalog. Most simple products that belong to a parent configurable will not be visible individually. Represented numerically in a .csv.

description – Self explanatory, this is a text field for you to enter a product description. Where this appears on the front end of your site depends on its design.
Note- this field can be changed to non-mandatory by site developers

tax_class_id – Refers to what, if any, taxes will be applied to your products. Found in a dropdown menu under “Price” on the Manage Product page and represented numerically in a .csv. Refer to below tip to find out numerical values associated with dropdown menues

short_description – Similar to description, this text field will display in different ways depending on your site’s design. Also, like description, short_description can me made not mandatory by site developers.

weight – self explanatory. Like other fields, if it has no bearing on your site’s business you can enter a dummy number in order to successfully upload files.
TIP – For variables with numerical values, there’s a relatively simple way to “cheat” and find out what number is associated with each option. Using Chrome, Firebug, or any other application that allows you to view the page source:

  • Find the field in the magento product page
  • Select the variable field (dropdown or text) and inspect the source code – the values and their associated options will be displayed

magento attribute code source code inspection


Best practice for uploading products via CSV:

1) Export a representative of each Type of product to use as a template.

If you do not already have products uploaded to your site, manually add a product of each type and make sure that they are all displaying correctly on the front end.

The most important part of exporting a .csv that will be useful to you as a template is that you export one representative of type of product that will be carried on your site. The most important variations will be type–simple or configurable–and _attribute_set–defined by your site developers.

It’s important to briefly define Simple and Configurable products as understanding their relationship and different characteristics has an impact on the necessary fields in an import:

Configurable Products: Configurable products represent the “face” of a product that exists in different variations. On ecommerce sites these variations will most often be “size,” “color,” or other such variations. The configurable product is what will show on a website’s front end, allowing consumers to add simple products that have been associated with the configurable product to their cart. Examples of fields that may be required of configurable but not simple products are: associated products, multiple images, product descriptions, and much more.

Simple Products: A simple product will be created for each variation of a configurable product. For example, if you are selling a shirt that comes in three different sizes, you will upload three individual simple products in addition to the configurable product. Fields such as weight, price, and others that are dependent on which variation a consumer chooses may be required of simple products where they are left blank on a configurable.

Due to these differences, it’s very important that you find a representative of each type of product so that later you can see the differences on a magento .csv.

Once you have found the products that represent everything in your catalog, you’ll export your .csv which will give you all the information under attribute code column titles (for identifying attribute codes see below).

This is done through System > Import/Export > Export.

magento csv export navigation


Select Products:

export magento csv screenshot

Note – the simplest way to pull out your sample products for a template is simply to download all existing products and copy and paste your selected samples onto a new template page. However, if you have identified the products that you want for your template, you can limit your export to only the products you want by checkboxing them ( search by sku, name, etc.).

See example:

select attributes for export magento screenshot


To export click Continue at the bottom-right of the page and open the .csv file in Excel or Google Sheets.

2) Create your template:

When you are faced with the full range of data that is exported by Magento for each product it can be incredibly difficult to view easily. In this case using the Hide Columns feature for attributes that are non mandatory and are not necessary for the information you’re uploading is a massive help.

If the spreadsheet is being filled out by a client for you to upload, providing them with a clear template such as this will simplify the upload process for both parties.

If you are only updating a small number of attributes for many products, you can actually delete all but the mandatory columns, leaving you with a much cleaner spreadsheet.

3) Enter one product from each category into your spreadsheet for a trial upload:

One thing that you want to avoid is spending hours on entering your entire catalog into an excel sheet only to find that you’ve made a mistake and need to go through the entire thing and modify every product. For this reason it’s worth your time to experiment with an upload.

At this point you should have a list of several products, with the unnecessary columns either hidden or deleted for simplicity. When adding to an excel sheet for upload pay close attention to detail:

  • fill out fields in the exact format that your example has shown.
  • pay attention that you do not include any spaces in your entries – it’s particularly easy to accidentally add a space at the end of an entry when copying and pasting.
  • Use caution when using search and replace. Although using spreadsheet shortcuts is a massive help when creating a .csv you need to exercise caution. Never forget about hidden columns.

Once you’ve filled out your sample spreadsheet, you’re able to check the data for errors. After this, you’ll upload. This is a fairly simple process: Go to  System > Imports / Exports > Import. Select “products” just like when exporting, and choose file (be sure that your spreadsheet is saved in .csv).

Note- Occasionally you may run into issues if you save your spreadsheet with MS Excel due to its unique encoding. As a result, some recommend using an alternative to Excel to avoid a possible error after completing your sheet.

If you’re lucky, you’ve encountered no errors and your products have been successfully uploaded however, more likely, you’ll get a screen like the following:

magento import error screenshot

As can be seen here Magento gives you an attribute code (meta_description in this case) followed by the lines on which it was entered incorrectly (or not at all). In this case “invalid value” tells us that it was an error with the format that we entered.

If the error messages do not specify rows you can often inspect the source code of the error message to identify the row with an error.

Just because Magento accepts your spreadsheet does not mean that everything is correct. Be sure to check how your products are appearing on the front end, particularly images, text, and any other information that is may be entered in several different attribute columns in the same format.

When you encounter errors, some of the attribute codes will make sense to you, but others may be a bit vague, and in this case it’s useful to know how to find what the attribute code represents in the backend of your site:

To Identify an Attribute Code (Or the column title on exported excel sheet)

Assuming that you did not develop the Magento site yourself (or even if you did) the column headers on your exported Excel sheet can be cryptic at times, making it hard to know what, if any, information you should enter into the column.

To identify an attribute code:

  • Copy the attribute code (column header) and paste it into Attributes in the Magento Back end.
    • To do this, navigate from the menu bar: Catalog > Attributes > Manage Attributes:

manage attributes magento screenshot

  • Once in Manage Attributes, paste the attribute code into the left-hand “Attribute Code” search box:

magento attribute codes screenshot

  • The “Attribute Label” is listed to the right of your search results, and is also displayed when you click into a specific attribute’s details. In most cases this should be enough to understand the Attribute that the code refers to. For more information, you can look at a specific product in the back end (Catalog > Manage Products > Select a product) to see if and how the attribute has been filled out for the pre existing product.
  • Many titles and section headings on front end product pages will directly correspond to their Attribute Label in the back end. Thus you can reverse this process by finding the field you’re looking for on the front end and finding the Attribute Code that corresponds to the Attribute Label, allowing you to find the appropriate column on your spreadsheet.


4) Upload your entire .csv

After you’ve uploaded a sample and identified any errors, you’ll go ahead and fill out all of your products for upload.

Most Common Errors- 

Incorrect Case Entry- Entering headers or fields in a case that does not match that of your export is an easy mistake that will cause Magento to be unable to upload. These can occur in unexpected places such as file extensions depending on the setup of your site.

Incorrect Column Headers – As with everything in the .csv upload process, there is no room for error in your variable names. Make sure that your upload .csv has exactly the same field names as the sample that you exported, paying particular attention to capitalization, spacing, and underscores.

Incorrect CSV File Encoding –  As mentioned before, this can be due to the program you’re using to save your .csv but can also be a result of differences in location (countries). Be sure that you’re using Unicode UTF-8 when you’re saving your file as this is the only format that Magento will accept.

Incorrect Characters – Some fields may use html code, in which case you’ll need to be sure that you don’t have characters that require special code (for example “<”).

Image Import Errors – Make sure that all of your images are uploaded to the /media/import folder and that your spreadsheet image names are identical to the names in the media folder.


Using URL Builder to Improve Analytics Reporting

When using Analytics, Google itself has access to enough information to feed you a lot of data in terms of users’ interactions with your website, as well as where they originated from. However, there are a couple types of marketing efforts efforts that can lead to users accessing your site from sources that Google either can’t identify or can’t segment enough to be useful to you.

The two prominent examples are email marketing campaigns and running multiple ads on a single domain. In the case of email campaigns, google doesn’t have control over your email client, and thus doesn’t know where the email link originated. As a result, without using URL builder, one’s email campaign traffic will likely end up showing up under Acquisition Channels as Direct traffic. When running multiple ads on one website– you may have one banner ad, header, footer, plain text, etc.– google will not be able to differentiate which traffic came from which ad, preventing you from assessing their performance and adjusting accordingly.

In these cases, Google offers a simple tool to feed it the information it needs in order to give you this useful data- URL builder. Using URL builder allows you to create a custom url for your destination page and attribute the desired source information, in turn allowing Google Analytics to better display the exact behavior of users.


To access URL Builder click here or search for “URL builder” and ,if you’re logged into analytics, you should see a page like the following:


URL builder homepage


Taking the example of an email marketing campaign, what you’ll want to do is enter the url of the page that you are linking to in your emails. In this case lets say that I’m sending links to Astral Web’s content page:


URL Builder Landing page

I then fill out the boxes as required below:

URL Builder Demonstration image

*when copying and pasting destination URLs, be sure that they do not contain any excess coding or characters- you’ll end up with a non-functional link.

After clicking Submit, we’re given a long link that includes all of the information that has just been entered into URL Builder.

Unique URL from URL builder

This is the link that I’ll want to put into my emails (or ads, etc.) in order to identify them in analytics.

In order to ensure that the link is functional and visible in analytics, paste this link into a separate browser window while you’ve got your viewing your Real Time > Traffic Sources. As you can see below, if the link is functioning properly, you’ll be able to see it almost immediately in Analytics. Furthermore, all the information you’ve input to distinguish the medium, campaign, and target are now identified by Google, and Analytics can give you the kind of information that is really crucial to optimizing your marketing campaigns.

Checking URL builder with Real Time view

If you’d like more information, please check out Ori’s video tutorial on using URL Builder.


Outsourcing Online Content

online content outsourcing article banner

How can I find good web content writers- a guide to using textbroker.com to find the right writers to work with.

When your job is to create regular online content, it’s easy to sink all of your time into writing the actual copy, leaving little or no room to keep an eye on the bigger picture of where you are and where you’re trying to go with your content. Outsourcing allows you to continue to produce content while focusing more on the overall direction of your marketing strategy and execution.

There are, of course, many avenues that one can take to find freelance writers. If the scale of your project is relatively large and long-term, it’s likely worth your while to post a proper job listing, or actively browse freelance writers’ individual websites to ensure that whomever you choose meets project-specific criteria.

If you’re budget doesn’t permit hiring a dedicated freelancer, or you’re unsure of the amount of work you’d like to outsource, the most common avenue for finding content is through an intermediary website that connects thousands of writers with clients looking for content- finding a suitable writer through such a website can appear to be both daunting and a bit of a gamble.

Luckily, with the right approach, one can often develop a relationship with a writer that meets your needs just as well as a contracted freelancer if approached correctly.

Below are some key points  to consider when using such sites. In this case we’ll discuss using textbroker.com, but the same principles apply to many similar sites.

When searching for a writer through such a website you’ll face the following considerations:

  • Knowledge– This, of course, is usually a crucial factor in outsourcing writing. Although some content can be written by anyone with writing skills, one will often find themselves in need of someone with a familiarity, if not an intimate knowledge of, a particular subject or field. A writer’s knowledge of a particular subject can also be difficult to asses through their resume, particularly if it’s not an established, professional field. Readers, of course, can tell if a writer knows what they’re talking about- less knowledge and experience means less engagement.
  • Voice. Outside of technical writing, one of the main considerations for those in search of online content is a consistent, engaging voice that represents their company or organization through their content. Voice, though, is something that is difficult to assess through a resume, and writing samples will often not represent the range that a writer is capable of.
  • Commitment- Due to the ease with which a writer can create a profile on textbroker, as well as the fact that some writer’s may have gone months without receiving an order through the site, it’s possible that their enthusiasm for writing through the website has dropped since they initially created their profile. Also possible is that a writer has a large volume of freelance work, and that they’re unable to prioritize your needs, even if they’d like to.

Below are suggestions for finding the right writer among the faceless thousands available to choose from:

Search Keywords- This is the first step in narrowing your search for the appropriate writer. One has the option to search for keywords as they appear in author’s profiles or in their texts. Be sure to look through the entire profile for your keywords. Your keyword may very well be under the author’s Interests section rather than in their resume. Taking this into consideration, don’t be afraid to be creative with your keyword searches. You may end up finding a suitable writing candidate circuitously.

Research profiles- Similar to other websites, textbroker offers many ways in which you can assess writers before contacting them with an order. On Textbroker.com, these include a resume, writing samples, and author’s interests. Furthermore, one can view the number of pieces that the author has completed, their rejection rate (number of pieces rejected / pieces written), and an average star rating as given by previous clients (1 to 5). These profiles are great for identifying potential writers, but are no substitute for an actual job done on your behalf. Thus the following two step

Make Initial Contact with the Authors- Using the messaging system is the first step in assessing potential writers. Not only does their response itself, or lack of one, give you an initial idea as to their level of commitment, but it also gives you an initial opportunity to begin to feel out their voice, writing skills, and familiarity with specific subjects. However, an enthusiastic response is not enough to rely on, so it’s important to:

Cast a Wide Net… Twice- Content on sites like textbroker is often offered at a very reasonable price (each author’s cost is listed per word). By being willing to send successive direct orders to several of writers that you’ve identified as potentially suitable, you’ll find it’s worth your while in several key areas:

  • Many authors will immediately weed themselves out by not fulfilling the direct order– Textbroker allows you to set a time frame for article completion after acceptance, set a timeframe that is realistic and that represents what your needs will be if you plan on requesting articles on a regular basis. By sending a second order to an author who met your initial request you can further gauge their reliability (ensuring that their first article was not just fueled by a one time burst of enthusiasm).
    • Additionally, the speed of the response to both your order and to any revision requests are telling factors.
  • The most obvious benefit of these initial orders is to assess the actual quality of the writing- style, voice, and level of familiarity/experience regarding the topic. Thus it’s important that you…
    • Create an order that represents what you will be looking for in the future.
    • Be as specific as you can in your instructions, particularly in giving style and voice guidelines. If you have a preexisting body of content that the author will be adding to,  sharing this with the author will give them a better chance to create content that fits in with your style.

Build a Relationship- Once you’ve found one (or more) authors who’ve satisfied you throughout the first few steps, building a true relationship with an author is beneficial to both parties. By doing so you can be more productive, communicate more effectively, and foster greater commitment. This can be done by putting in a little extra effort to directly express appreciation for jobs particularly well done in messages or, one can also take the option to give authors a bonus for a fulfilled order. By making this effort your working relationship becomes much more effective, and it also allows you to transcend the constraints of sending out orders to unknown quantities. You can even begin to outsource creativity and concepts to authors with whom you’ve developed a quality relationship as they better understand your project’s goals, and requirements.


Preventing Youtube from Sending Away Traffic

They started out on your site, and they ended up here:

Youtube screenshot of cat video suggestions

When you create video content, and embed it on your website’s homepage, the last thing you want is to send the viewer away from your site- three hours later they’re watching cat videos and have completely forgotten your content.

The simplest solution to this issue is to prevent Youtube from suggesting related videos at the end of the content. Although Youtube has gotten rid of its option to automatically disable this function, it is a simple matter of adding a short piece of code to the embed: ?rel=0

A youtube embed code will look something like:

<iframe width=”560″ height=”315″ src=”//www.youtube.com/embed/tntOCGkgt98″ frameborder=”0″ allowfullscreen></iframe>

All one has to do is insert ?rel=0

<iframe width=”560″ height=”315″ src=”//www.youtube.com/embed/tntOCGkgt98?rel=0” frameborder=”0″ allowfullscreen></iframe>

After inserting this code, your embedded will simply end, rather than suggesting that viewers immediately leave your site after just having engaged with your content. Keeping someone engaged is key, and it’s an easier task without kittens tempting their attention away from you.


Improving CPC through Google Adwords

Both removing negative search terms and channeling others onto your website’s most relevant landing pages are fundamental to the maintenance of a healthy CPC (cost-per-click) ad campaign. In this instance, we’ll go through the brief steps necessary to both make sure that you’re not paying for unwanted ads, and that you have created the most effective ads possible by best meeting the intent of the consumer.

Firstly, in order to do a comprehensive review of which search terms you are paying google to advertise for, one ought to make sure that they’re looking at a time frame that goes back at least as far as the last time they really scrutinized the key word terms for which ads had been run. In the example below, you can see that I’m on the keywords tab, and have selected the entire time-span of this particular campaign

Google Adwords

Secondly, click the keywords tab, then Details drop-down, and select All in order to have a look at all of the keywords in your campaign.

Google Adwords

Alternatively, you can select a specific ad campaign, or narrow by a number of criteria, but in this case we’re looking at all of the keywords that we’ve run in order to do a thorough check of what is and isn’t running.

Once we’ve done this, we can start to consider the most important factor in CPC, which is what the intent of the consumer is, and how relevant the page that we’re paying to send them to is.

In the case illustrated below, we’re looking at an ad group that’s marketing watch bands (in this case, the ad group is sending them to a page that is specific to bands for a type of watch) As can be seen, I’ve already selected two search entries for which I don’t believe it’s worth paying to have my watch band page exposed.

google adwords

In this case, both of the search queries end with the word watch, which suggests that these searchers will not be content with viewing straps alone. The clicks and click-through-rate are very subjective, but nonetheless one can see that there is Moreover, let’s say in this case that my site does actually sell this entire watch, the fact is that the average internet shopper will not take the time to navigate through my site to find this page.

In order to address this issue I select the keywords watches casio baby g watch and baby g watch sale. By clicking on add as a negative keywords, I’m given the option to remove these search terms from either my ad group or my ad campaign. The difference being that selecting campaign level, I will exclude any of my ad groups within this campaign from showing ads.

google adwords


My second consideration is whether or not I do, in fact, sell this watch model. For the purposes of illustration, let’s say that I do sell this watch model, and thus have a page that meets the likely intention of this searcher- to purchase a watch. Therefore it’s worth my while to create an ad group that links these queries to the intentions of searchers

By going to All Online Campaigns, and selecting the Ad groups tab, I’ve determined that no such Ad group exists.

google adwords

Making sure that I am in the appropriate campaign, in this case we’ll say I have one campaign for anything watch related—listed on the left or under the campaigns tab—I click the red + AD GROUP button. Then I am prompted to assign my new Ad group to a campaign.

adwords6

As can be seen below, Google provides an easy template for creating new ads, in this case filled in for previous ads I’ve run.

Google Adwords

This part is fairly self-explanatory, with Google’s instructions on “how to write a great ad” readily available with the link above the ad-preview. The most important consideration in the construction of this ad group is the connection between my specific watch page and the key words that I believe represent the intention of purchasing that specific model.

One of the final steps is reached by scrolling down the page: entering the keywords that you would like to trigger this particular ad. In this case, it would be wise of me to enter as many common variations on the target keywords as possible, perhaps even misspellings. However, in this case, I’ve entered the search term we first identified three times to illustrate the importance of defining what types of matches one wants to trigger their ad:

adwords 8

In this case I’ve decided that I want broad match- searches containing the words in my listed keyword; phrase match– searches containing these keywords in this order anywhere within a search query; and finally exact match- a search of exactly the keywords listed, no more, no less (accordingly denoted by no punctuation, quotation marks, and brackets). One can imagine how a broad match watch would technically meet the search criteria of millions of queries, most of which would likely have to do with entertainment, not the watches I want to sell ads for.

The final step involved is to set the Maximum CPC you’re willing to pay for you’re ad to appear. This is a very subjective step as well, and involves factors that cannot be touched on here, but finding a sustainable level is recommended.

google adwords

After clicking the blue button, you’ve created you’re new ad campaign!

In my case, I’ve made sure that I don’t pay to send any more searchers who want to see a watch to a page full of watch straps by adding a search query to the negative keyword list in one ad group. Furthermore, I’ve identified a page of mine that meets the intentions of the searcher, suggesting that the creation of an ad to meet that need will likely be a positive decision.


Use of autosuggest in a marketing strategy

Anyone who’s searched a major search engine has seen the auto suggestions pop up as you enter even the first few characters of your intended query. In marketing, the information provided by these most popular search terms can be extremely valuable. Luckily, there is a free tool that collects this data for easy analysis: keywordtool.io . This can be a means of identifying potential customers intent, as well as how your competition might be showing up in places that give them an advantage over you.

Through the use of keywordtool.io, a couple simple strategies can provide you with useful information.


Firstly, a search of a keyword you already know is highly relevant to your business or organization will show you how that word (or words) is used in internet searches. For example, if I owned a sailboat manufacturer, by plugging in the somewhat obvious term with, “sailboats,” I will see what people are really looking for when that word is plugged into a search engine. My “sailboats” search turns up the following results:


sailboats better


As can be seen, keywordtool returns the top ten searches containing the word sailboats, and then the top searches containing each letter of the alphabet (A thru Z) and numbers as well. As a Sailboat manufacturer I’ve likely already targeted the search terms “Sailboats,” and Sailboats for Sale, but as I scroll through the most common searches, I may be able to find new keywords and search terms that my company can target. For example, it may turn out that  “42 ft sailboat” is an extremely common search term, and I consider my 42 ft. model to be the best in the business, yet didn’t know how to identify and access a market for it.

Secondly, a quick look at the top searches will allow me to identify new competition. For example, a new manufacturer may have been written up in last month’s sailing magazine, giving them a lot of buzz.

Third, by plugging in one’s own website, one can find out people’s most common queries in relation to your business or organization. It may turn out that the most common query about my company is whether we sell sails, which we don’t at the moment. This, of course, is an excellent discovery, but all kinds of information reflecting on one’s business/organization through using keywordtool.

Finally, when optimizing one’s online presence, the creation of content that truly meets the needs, desires, or curiosity of the searcher is key. A tip suggested to me was to add the five W’s (who, what, when, why, where) to the search term that most closely relates to your company’s product or service. It may be that many people are curious about “whensailboat yields,” suggesting that the “rules of right-of-way at sea and in harbor” would be an informative, engaging piece of content for many on the internet. Although reders of type of content may be indirect to sales, establishing oneself as a long-term authority within your industry is crucial to optimization.

As a last small tip, you’ll notice that Keywordtool provides options to search not only multiple search engines and youtube, but also allows for narrowing by country and language– useful if your company has an international presence and needs to optimize locally.


Beginners link maintenance / Monitoring 404 errors

Your website’s links represent fundamental building blocks of your online presence and visibility. Both routing traffic in from outside, as well as internally within your site, a non-functional link can be extremely harmful to one’s business—Just as one who seeks out a physical address only to find an empty lot, so a 404 file-not-found page is likely to turn away someone who had the intention of engaging with your web site. By accessing your website through Webmaster tools and Google Analytics, one can identify and begin to resolve such errors.
Firstly, by accessing one’s site through Webmaster Tools (in this case Astral Web), one can see the links that google has been unable to find as it crawls the web. Below, one can see that this information is accessed by selecting Crawl > Crawl Errors and entering 404 in the drop-down box above and to the right of the list of errors.
webmaster tools
This is your first list of non-functional links that may need to be addressed.
Google Analytics offers a more detailed, customizable display of link errors. Following the steps outlined below, one is able to access a list of 404 errors that have been encountered through external links, which can be particularly undesirable to a websites effective presence.
Once in Analytics, select Behaviors > Site ContentLanding Pages:
.Google Analytics Menu
This results in a list of landing pages for your website, which are ranked by frequency. Secondly, you’ll want to add a Secondary Dimension defined by Page Title:
analytics secondary dimension
Once this is done, click on the advanced search option:
advanced search
Enter 404 to delineate your search to instances of 404 errors:

404 advanced search

At this point you should be left with a comprehensive list of all 404 errors that have occurred within your domain, appearing something like this:

analytics list 404

By identifying these non-functioning  external links, you have the opportunity to resolve potentially significant numbers of 404s that each represent someone’s intention to access your site’s services or content. Addressing such issues has equally significant potential to affect your site positively. Utilizing Webmaster Tools and Google Analytics, you can maintain your link functionality, taking a significant step in the maintenance of an effective web presence.