Magento 2 Types of Profiling (for optimization of site)

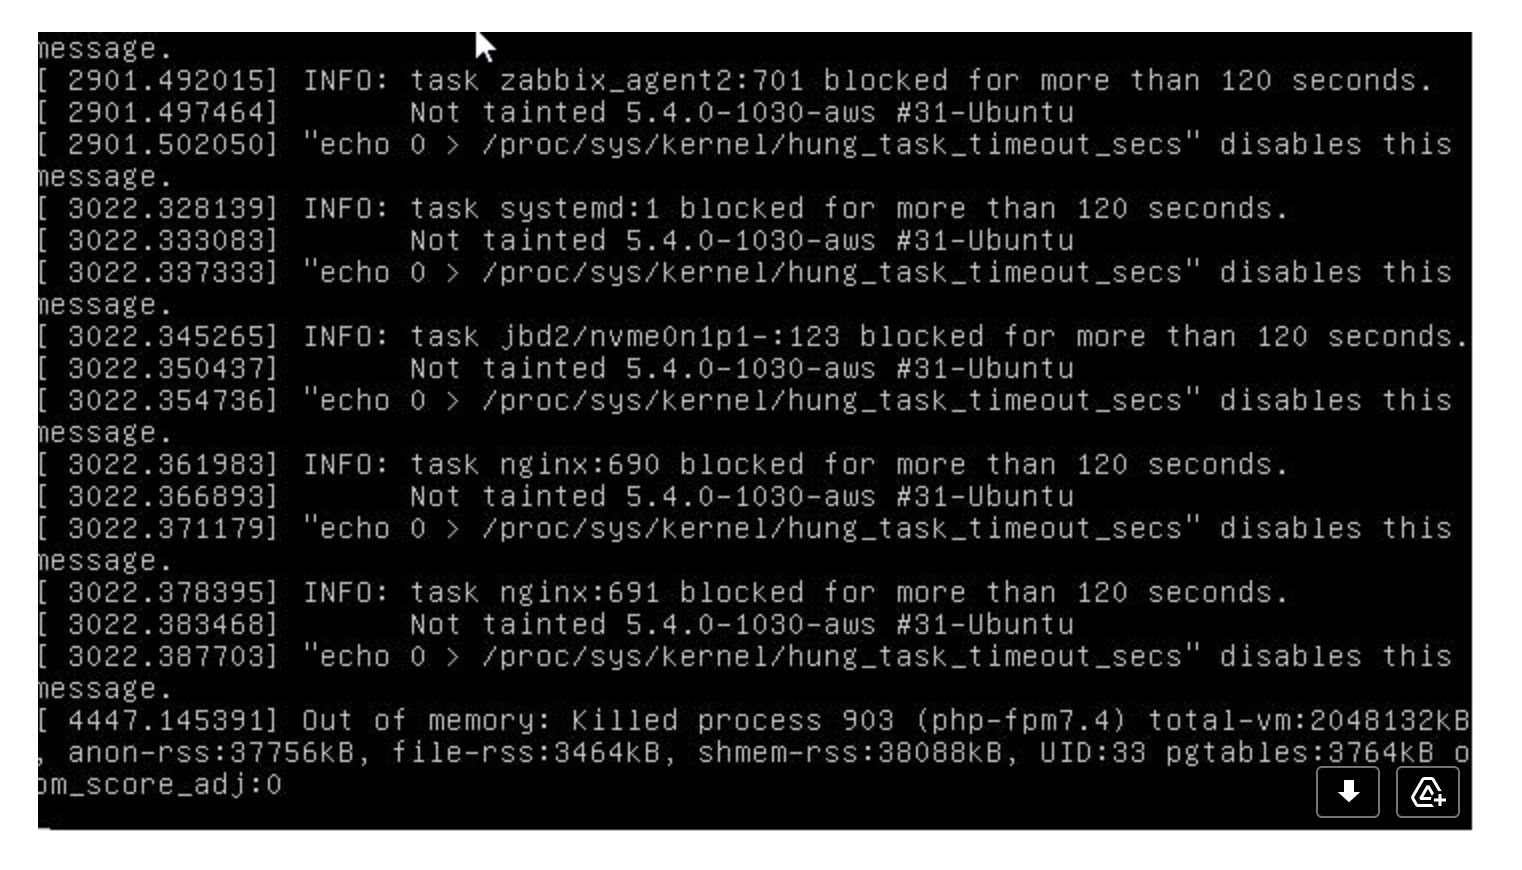
Benchmarking and performance analysis is a very common task when developing a web site, especially if the website is ment to sell services or products. A fast website will add a powerful value to customer experience in general; increasing also the chances of building loyalty and trust.

Magento provides two tools for helping with benchmarking a particular site: MAGE_PROFILER for code and database profiler.

MAGE_PROFILER

This profiling will display the processes and class resources involved with the specific url path being analyzed; listed as a dependency list at the bottom of the screen.

This profiling will allow developers to determine what classes or functions are taking too much time to execute, helping in filtering out the sections or coding that requires some improvement.

For enabling MAGE_PROFILER using type html it is required to execute the following commands:    

bin/magento dev:profiler:enable html

bin/magento cache:flush

For disabling MAGE_PROFILER:

bin/magento dev:profiler:disable
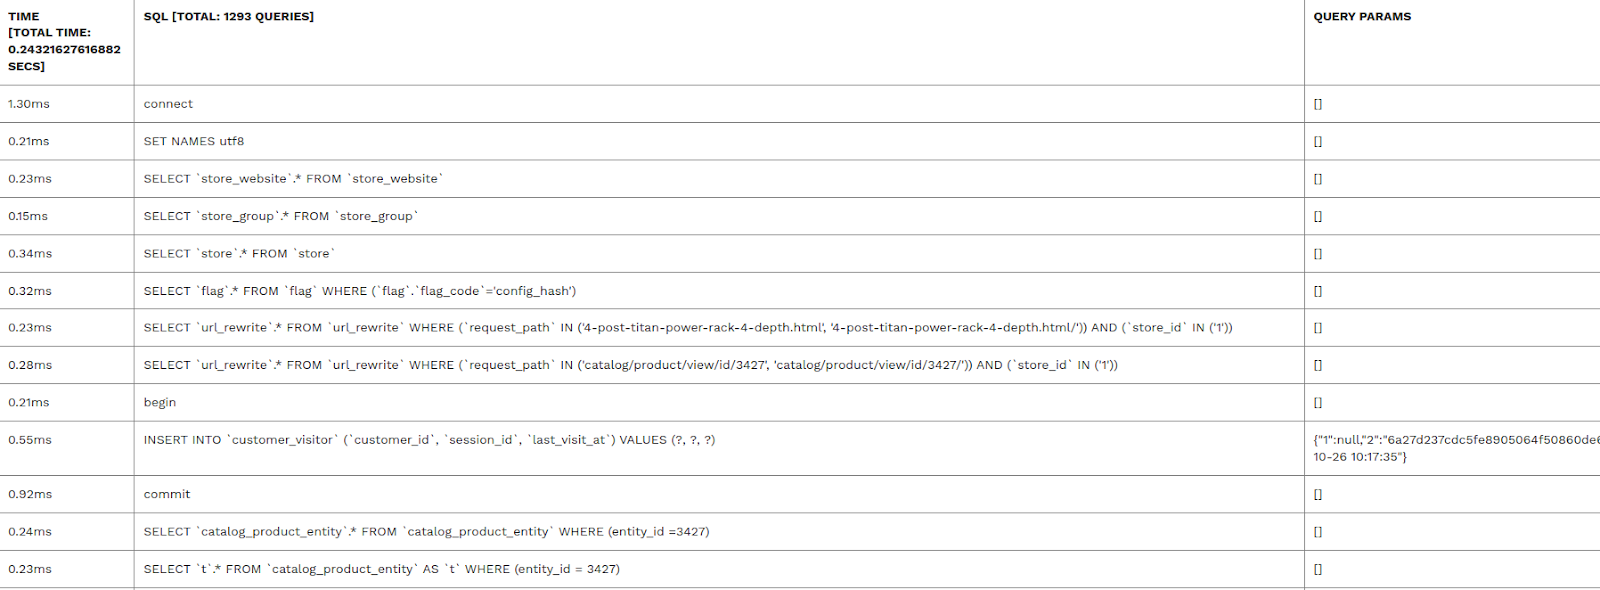
 

Database profiler

The database profiler is similar to the MAGE_PROFILER but is focused on database queries performance. 

For enabling this profiling the following steps are required:

Step 1: Add a reference class to env.php

On  <magento_root>/app/etc/env.php to add the following class reference:

‘db’ =>

  …

      ‘default’ =>

      array (

        ‘host’ => ‘localhost’,

        ‘dbname’ => ‘magento’,

        ‘…

        ‘active’ => ‘1’,

        ‘profiler’ => [

            ‘class’ => ‘\Magento\Framework\DB\Profiler’,

            ‘enabled’ => true,

        ],

      ),

    ),

  ),

Step 2 Modify the index.php file

On <magento_root>/index.php add the following after the $bootstrap->run($app); line in your bootstrap file:

/** @var \Magento\Framework\App\ResourceConnection $res */

$res = \Magento\Framework\App\ObjectManager::getInstance()->get(‘Magento\Framework\App\ResourceConnection’);

/** @var Magento\Framework\DB\Profiler $profiler */

$profiler = $res->getConnection(‘read’)->getProfiler();

echo “<table cellpadding=’0′ cellspacing=’0′ border=’1′>”;

echo “<tr>”;

echo “<th>Time <br/>[Total Time: “.$profiler->getTotalElapsedSecs().” secs]</th>”;

echo “<th>SQL [Total: “.$profiler->getTotalNumQueries().” queries]</th>”;

echo “<th>Query Params</th>”;

echo “</tr>”;

foreach ($profiler->getQueryProfiles() as $query) {

    /** @var Zend_Db_Profiler_Query $query*/

    echo ‘<tr>’;

    echo ‘<td>’, number_format(1000 * $query->getElapsedSecs(), 2), ‘ms’, ‘</td>’;

    echo ‘<td>’, $query->getQuery(), ‘</td>’;

    echo ‘<td>’, json_encode($query->getQueryParams()), ‘</td>’;

    echo ‘</tr>’;

}

echo “</table>”;

Step 3: Clean cache

bin/magento cache:flush

Finally, removing the database profiler is just as simple as rolling back the changes above.

There is no need to say that these profiling tools are beneficial for developers that want to understand a little more better the general user experience and to fix any hidden performance issue that is only noticeable  at code or system level.

Magento API’s – SOAP, REST, and GraphQ – A Brief Explanation

The main purpose of Magento is to allow merchants and clients to perform purchasing-related operations, but Magento also provides mechanisms for allowing external applications to communicate with it. 

SOAP

This protocol is the least popular among all the protocols provided by Magento due to its complex learning curve. It is also the least flexible, because it only works with XML; not ideal for speed performance because the payload sizes tend to be big. 

However, the lack of flexibility ensures great security and tends to enforce a clear business flow when interacting with the API.

When to use it?

  • The project requires a very strict request logic.
  • Performance speed is not critical.
  • There is plenty of time for studying the protocol.
  • No need to scale in the future.

REST

At the moment of writing this article this is the most popular API protocol; so it is the most documented API, converting it into the entry point of many new developers into API development. 

Its messaging format is very flexible, allowing many formats such as JSON, XML, objects, Simple Text, etc.

Since it is the most popular API protocol, it is cache friendly in almost all web browsers and HTTP protocols; however, storing huge amounts of unnecessary data is the biggest flaw.

When to use it?

  • The project requires a simple API protocol that follows standard conventions.
  • Performance speed is not critical.
  • Very little time left in the project.
  • More suitable for complex database querying.
  • Scalability is required in the future.

Graph QL

The newest of the API provided by Magento, improves speed performance by only returning the info required; however, the learning curve is very steep; also, not suitable for complex querying, because it will reduce its original performance speed for handling nested queries.

When to use it?

  • Performance speed is critical.
  • No need for performing nested queries.
  • Need to update the project with the newest GraphQL technology.
  • There is plenty of time for learning/studying. 
  • Scalability is required in the future.

According to the documentation, Magento supports SOAP, REST, and GraphQL protocols, allowing almost any external system to communicate with its database/entities; however, when developing a new Magento API, the developer must understand how to choose the correct protocol for the right situation; at the end this will help a project to run smoothly.

Vuestorefront + Magento Implementation

Magento is cool and it has almost everything that you need for your online shops. But, many people complain about its speed, resource intensive, difficulty to maintain, etc. If you want to make your magento experience faster, you might need to burn more money for the server resources. But if you don’t want to do that, Vue Storefront might be an alternative.

“Vue Storefront is a headless and backend-agnostic eCommerce Progressive Web App (PWA) written in Vue.js” – quoted from their site. In theory, you can transform your magento to a PWA which should be able to perform like a native mobile app. So, if you want to make your Magento (especially, Magento 1) faster without spending too much money for the server upgrade, or; spending too much time upgrading to Magento 2, likely this is the answer.

We got a chance to help our major client to implement Vue Storefront to their existing Magento 1. The implementation is not that difficult and we’re on our way to make it happen. This article is gonna talk more about architectural implementations of it. 

AWS has a good reference on how to implement Magento on its cloud service (see pict above). It’s pretty standard architecture for Magento, though: load balancer (with optional autoscaling group), and the load balancer has several availability zone with its own independent services (multiple web servers, one single database, and one redis instance).

However, when you look at Vue Storefront architecture, there’s not so much difference. Vue Storefront will still use Magento to get what it needs via Magento API, then store the information in its own data storage (in this case it can be Elasticsearch or Redis).

This way, Vue Storefront will be the first server behind your load balancer that will process requests from the website’s visitors. Then, it will check on its storage (which is a lot faster because it uses no SQL) of the information that it needs, and return it back to your visitors. If the information doesn’t exist, it will finally request that information via Magento API. Behind the scene, Vue Storefront also does something cool to grab store info such as products, carts, orders, and others via Magento API regularly and store it on its own fast data storage. 

See that you will literally only need at least one additional server for Vue Storefront, one Elasticsearch, one Redis, and you are good to go!

In short, if you want to make your Magento 1 faster without spending too much time and money, Vue Storefront might be good for you. 😉 

Configuring Let’s Encrypt to reload Nginx / Apache2 after successful certificate auto-renewal

Let’s Encrypt is cool. It is more than enough for most of your SSL needs. Not only because it’s free, it can also automatically renew the SSL certificate for you (so theoretically you don’t need to do anything). You can always use Let’s Encrypt for your Nginx, Apache2, or anything else. One thing that you need to be aware of is that by default, it won’t reload / restart your web server after successful renewal. Then eventually, you will realize that your site is running under an expired SSL certificate while you see on the server that your certificate is still valid.

This problem isn’t a Let’s Encrypt bug nor the webserver’s. What you really need to do is just simply reloading / restarting your web server so it will load the newly renewed certificate. Otherwise, your web server will keep serving with the old expired certificate.

For Nginx, you can always do /etc/init.d/nginx reload, but you can automate it after successful Let’s encrypt renewal by using post_hook renewal parameter in your Let’s Encrypt domain renewal config. This way you can configure the post_hook configuration for each domain. Edit the file located at /etc/letsencrypt/renewal/yourdomain.com.conf and append post_hook parameter as below:

The second method, you can setup the renewal hook action for all domain by writing a simple script under /etc/letsencrypt/renewal-hooks/deploy/ and let’s name it with 01-reload-nginx. The full path is /etc/letsencrypt/renewal-hooks/deploy/01-reload-nginx.

Put this inside the file:

#! /bin/sh

set -e

/etc/init.d/nginx configtest

/etc/init.d/nginx reload

Then, save, and run the following command to make it executable:

chmod a+x /etc/letsencrypt/renewal-hooks/deploy/01-reload-nginx

Voila!

Fundamental VPS Security: SSH

In the previous article, we have listed some of the important things that you need to know about VPS security. In this second part, we’d like to dig a little bit deeper for securing your SSH.

SSH (secure shell) is a protocol to securely connect to your VPS over a non-secure network. Means, even if you are on a public wifi, your connection to the server will always be encrypted. We always put SSH security on the top of our security checklist because it is the most important thing to secure. If an intruder can gain access to your SSH, then he most likely will be able to read your files, put some malware, execute some commands, even use your computer resources for bitcoin mining or downloading illegal contents.

There are some prerequisites before we can change the config. All of the commands below need to be executed as root / sudo user.

First, you need to make a new user that we can allow them to SSH to the server, then we can disable root user login. So, let’s create a new user:

adduser john #adding user called John, follow the step and set the password

Then, generate a new SSH keypair for that new user. Remember that we’re gonna disable password-based SSH login. The SSH user needs to use the SSH key to login to the server.

su john     #login as the new user John

ssh-keygen  #and follow the prompts

Now you have the user and his keypair. Next, we’re gonna change the SSH config to secure it. There are at least three things that we normally do to ensure SSH security. What we’re really gonna do in this article is to edit /etc/ssh/sshd_config. Pretty simple.

So you can edit the config file:

vim /etc/ssh/sshd_config (or use any other text editor that you love) then, add these configurations below, or replace the existing ones (if any).

PermitRootLogin no         #disabling SSH login for root user

PasswordAuthentication no  #disable password-based authentication

Port 23232                 #you can change port number to anything here

Lastly, restart the SSHD service and you’re done!

systemctl restart sshd.service

Now you can test SSH login. Copy the private key that you generated on the server to your local machine. The file is usually located at /home/username/.ssh/id_rsa, so in this tutorial it should be /home/john/.ssh/id_rsa. Copy the content and put it somewhere in your local machine.

Then, try to login via ssh:

ssh john@your_domain_or_ip_address -p 23232 -i /path/to/your/copied/private/key

Now your SSH should have better security! Keep in mind not to share your private key to anyone.

Fundamental VPS Security Best Practices

Imagine that you are running a super busy physical store right in the middle of the city, who doesn’t want your money? Robbers and burglars are famous from the old age, that’s why you always have your security camera on 24/7 at your stores.

We are all now living in a world where everything is online, including your business (burglars are now online, too!). You already have your business running on the web, then what? Doing online business is not just about developing your site, conducting promotion for your products, and paying all the bills that you receive from the hosting company. The one important thing is also maintaining your website so no one will ruin your business.

Normally when you run an e-commerce website, you will either host your site under a shared hosting service, a VPS, or cloud. If you are on a shared hosting plan, you probably won’t worry too much about server security as it’s mostly gonna be done by the hosting company. But for VPS and cloud-based service (such as AWS), you will need to do everything by yourself.

This article will only cover security best practices for VPS / dedicated servers. As for cloud-based service, it’s gonna be a completely different article to write. 🙂

There are several things that you need to know about securing your servers. These are what we can think of at the moment. We won’t cover the details in this article, but we will tell you how to do it in the next articles.

  1. Securing SSH login
    SSH login is the first thing to secure because once an intruder gains access to SSH, then likely he can do whatever he wants. To secure it, we would always suggest this checklist:
    1. Disable password authentication for SSH, and use only key-based authentication
    2. Disable root login
    3. Change SSH login port from the default port 22
  2. Firewall

Firewall is also super important. We had a chance when someone said that his database server is completely empty. Later we found out that mysql port 3306 was publicly open and allowed public access. This was then likely the entry point of the hacker ransom bot by guessing username and password of mysql, removing all the database, then asking a certain amount of money to restore the database. If you don’t want this to happen, here’s what we suggest, all is done via iptables:

  1. Allow only specific IP addresses to SSH to the server
  2. Only open access to the services that you need, and close everything else
    For example if you only need a webserver on that server, then literally just allow port 80 and 443 (plus your SSH port if needed), and close everything else.
  3. Setup user access

Limit your user access. This is important because if someone gains access to your server by hijacking one of your server’s users, then he wouldn’t be able to do anything other than what you allowed him to. Some precautions that you can do are:

  1. Create login for each user that need to access the server
  2. Never do “sudo for everybody”
  3. Get rid of bad habit “chmod 777”
  4. Limit access for the services

Apart from the firewall, it is also a good habit that you also secure the server on its service / application level. For example, never add a mysql user for any host, never allow redis and elasticsearch connection from the webserver, and others.

  1. Do regular software update

Clear enough, and plus “unattended upgrade” would be very useful!

  1. Backup regularly!
    Pro tip: don’t rely on your hosting provider’s automated backup especially for your database. When your provider makes a backup of your server, the database service might be in an unstable state, and restoring it probably won’t work. Instead, make a backup script that will dump your database to a file daily, then you can restore from it when needed.

Plus, make sure that your backup is reliable and restorable!

  1. Relax and monitor your server

Zabbix, nodeping, grafana, htop, lnav are your friends! Set them up properly and set alerts for what you like.

That’s mainly it for now, we will cover the details in the coming articles.

Tutorial: allowing SSH to docker container

We all must have heard about docker. It was built to make development, testing, and delivery easier and faster than ever, while not sacrificing security and performance. Here at Astral Web, we use docker pretty often and we really love it.

Normally, when we’re building apps in a docker environment, we only allow incoming connections to services that we need. For a magento app, we usually only have port 443 exposed to the host machine (or internet if needed), and everything else (database, redis, elasticsearch) will never be available on the internet. However, there might be some cases where you will need to add some additional services and connect to it via the internet.

Last week we got a request to allow SSH connections to one of our dockerized magento applications in our shared development server so that some third-party developer can help with some debugging. 

I personally don’t like to provide access to third party developers. So, when I really need to, I will do it super carefully. My other article will explain how to restrict SSH access on a traditional server environment.

Unlike in a traditional server, docker makes things easier. I can just add a few lines to docker-compose.yml file so I can enable SSH only for that specific docker container. Enjoy!

Via docker-compose.yml:

version: “2.1”

services:

  openssh-server:

    image: ghcr.io/linuxserver/openssh-server

    container_name: openssh-server

    hostname: openssh-server #optional

    environment:

      – PUID=1000

      – PGID=1000

      – TZ=Europe/London

      – PUBLIC_KEY=yourpublickey #optional

      – PUBLIC_KEY_FILE=/path/to/file #optional

      – SUDO_ACCESS=false #optional

      – PASSWORD_ACCESS=false #optional

      – USER_PASSWORD=password #optional

      – USER_PASSWORD_FILE=/path/to/file #optional

      – USER_NAME=linuxserver.io #optional

    volumes:

      – /path/to/appdata/config:/config

    ports:

      – 2222:2222

    restart: unless-stopped

Or, docker CLI:

docker run -d \

  –name=openssh-server \

  –hostname=openssh-server `#optional` \

  -e PUID=1000 \

  -e PGID=1000 \

  -e TZ=Europe/London \

  -e PUBLIC_KEY=yourpublickey `#optional` \

  -e PUBLIC_KEY_FILE=/path/to/file `#optional` \

  -e SUDO_ACCESS=false `#optional` \

  -e PASSWORD_ACCESS=false `#optional` \

  -e USER_PASSWORD=password `#optional` \

  -e USER_PASSWORD_FILE=/path/to/file `#optional` \

  -e USER_NAME=linuxserver.io `#optional` \

  -p 2222:2222 \

  -v /path/to/appdata/config:/config \

  –restart unless-stopped \

  ghcr.io/linuxserver/openssh-server

Main reference: https://github.com/linuxserver/docker-openssh-server

Dealing With Cloudflare’s False Positives

Cloudflare is a very powerful tool. You can use it to manage your DNS entries, adding an additional layer of security to your site, improving your site’s speed, and many other things. However, as with any other man-made creations, cloudflare isn’t perfect. In this article we’re gonna explain one of the problems that might happen when you are using cloudflare on your site.

When you are enabling cloudflare proxy for your site (see above image), cloudflare by default will apply some firewall rules to your domain so that (hopefully) you won’t get hacked. This feature works fine most of the time. But, sometimes cloudflare blocks legitimate connection requests. We had several chances where cloudflare blocked our own connection. That’s mostly because of WAF (Web Application Firewall) false positives.

If you have similar situation, then here’s what you can do to deal with such situation:

  • Add the client’s IP address(es) to the IP Access Rules whitelist. This is what we have done in our case, because we always use the same IP address.
  • Disable the WAF rule(s). You can see which rule blocks your request by going to your firewall summary, then simply disable the corresponding WAF rule. This is not the best solution because your overall site security is reduced.
  • Bypass the WAF with a Firewall Rule. You will need to create a custom Firewall Rule for this.
  • Disable WAF completely for specific traffic to a URL. You can configure this via Page Rules, but this is not good practice because you will lose all the WAF benefits.

That’s what we know so far. You can read more about it on Cloudflare documentation here.

Fastly CDN With Any Magento (Including Open Source and Commerce On-Premise)

Introduction

Magento generally is not known for the fastest one on the block but this has now changed. Starting from a couple years ago Magento suggested the use of Varnish on production for caching storage and it will significantly increase the speed of your Magento site.

Fastly in addition to its CDN and firewall capabilities, it also includes Varnish functionality. Fastly does mention that it uses Varnish as its core, so it’s basically an advanced and distributed Varnish server. Fastly accelerates the website speed with its CDN networks and caching storage. If Cloudflare is famous for its (free and) fast CDN, Fastly also integrates pretty well with Magento’s full page caching.

We know that Magento Commerce Cloud includes Fastly on its bundle, but now your self-hosted Magento Open source and Magento Commerce sites can also have Fastly. Read more to see how easy it is to configure Fastly for Magento Open Source / Commerce on-premise.

Requirements

Here are the things that you will need to integrate Fastly into self-hosted Magento:

  1. A running Magento 2.3 / 2.4 of Open Source / Commerce On-Premise edition with composer installed
  2. A basic understanding of Magento admin configuration (including cache cleaning)
  3. A registered account on https://www.fastly.com (we tested both free developer trial and paid accounts)
  4. A working Magento 2 Access Key https://marketplace.magento.com/customer/accessKeys/ 
  5. A Fastly Personal API Token with global scope: https://manage.fastly.com/account/personal/tokens 

Extension installation

Installing Fastly’s Magento extension is a straightforward process. Just like any other Magento extensions, you can do the following steps:

  1. Go to https://marketplace.magento.com/fastly-magento2.html 
  2. Select your magento version and checkout:
  3. Now login to your server and go to the root directory of your Magento
  4. Paste the access key in your auth.json file inside your magento install:
  5. Now execute sudo -u www-data composer require fastly/magento (see that I’m using sudo -u www-data to avoid messing with file permission)
  6. Clean magento cache with sudo -u www-data bin/magento cache:flush

Finished! Now you should be able to see Fastly module in Magento admin under Stores – Configuration – Advanced – System – Full Page Cache and you will have a new option called Fastly CDN under Caching Application:

Fastly basic configuration

In order to get your site served by Fastly, you will need to add a new Fastly service and a host. To create a new service, follow these steps:

  1. Login to your Fastly account
  2. Click on Create Service button right on the top right of your dashboard
  3. Insert the domain that you want to use then click Add

To create a new host, do the following:

  1. Click on Origins link on the left sidebar
  2. Insert the host IP address or the hostname, then click Add. Once you have the host configured, then you are ready to do the Magento extension configuration.

Magento extension settings

Once you’ve configured service and host on Fastly, you can go to Stores – Configuration – Advanced – System – Full Page Cache of your Magento admin and you will have a new option called Fastly CDN under Caching Application.

  1. Copy the service ID from your newly-created Fastly service to Fastly Service ID field
  2. Do the same thing for the Fastly API Token (described in the requirement section at the top of this article)
  3. Verify the details by clicking on Test credentials
  4. Save Config – Flush Magento cache
  5. After save, go back to the previous Fastly configuration, then click on Upload VCL to Fastly, tick on Activate VCL after upload, then click Upload
  6. Once again Save Config and Flush Magento cache

Fastly uses VCL for its service configuration. You can always write it by hand, but this Magento extension will do it for you. The only thing that you need to do is make sure to upload VCL after changing any Fastly Configuration.

At this point, Magento should be ready to work with Fastly but you won’t be able to test it until you update your DNS record as explained below.

DNS Configuration

Fastly acts as a proxy for your server. All web requests going to your domain will go through Fastly before actually reaching your server. This way, Fastly can apply firewalls, manipulate requests, filter traffic, and others. In order to do that, you will need to point the domain to Fastly hostname instead of your server directly. 

Fastly has several different hostnames that you can choose depending on your SSL/TLS configuration and/or whether you choose to limit your traffic to a certain network. More details here: https://docs.fastly.com/en/guides/adding-cname-records#choosing-the-right-fastly-hostname-for-your-cname-record

Friendly warning reminder: once you change the DNS, it literally means the traffic will start flowing through the new Fastly service. If you are on production, make sure that everything is good before you switch the DNS.

In short, if you don’t want to use Fastly TLS, then use nonssl.global.fastly.net.

If you need to try Fastly TLS without paying anything, use [name].global.ssl.fastly.net.

And if you already enabled paid account and want to use fully-working fastly TLS, use j.sni.global.fastly.net or k.sni.global.fastly.net.

More details here: https://docs.fastly.com/en/guides/adding-cname-records#tls-enabled-hostnames

Please note that once you change the DNS, it might take some time for the whole internet to propagate your new domain configuration.

If everything goes well, you will be able to start seeing live traffic statistics on your Fastly dashboard. Also, don’t forget that your Magento site is now blazing fast!

Fastly X Magento overview

Overall, we love Fastly. We have been using Cloudflare for our clients and we will also offer Fastly integration for our clients soon. Fastly offers something that Cloudflare doesn’t: seamless Magento integration. Based on our test, Magento running Luma theme can be fully loaded in nearly the blink of an eye. Magento has never been this fast.

Using Fastly is also a timesaver rather than configuring and maintaining your own Varnish server. You probably need to pay at least USD 50 / month for a Fastly paid account while you can build a Varnish server under USD 10 / month, but remember the maintenance cost and all the hassle that you will need to do in the future.

That cost consideration also come in to play when you need to enable something like Image Optimizer. Fastly has it, too and we have confirmed that it is integrated with the Magento extension pretty well.

If you have a need for speed for your high-traffic Magento, go with Fastly. Contact us for assistance and we’re ready to help.

Magento 2.4 CSP Module Issue

Recently we experienced a production project that We have one client that reported their production Magento site keeps having problems with random downtime that lasts for several weeks. Our client runs Magento 2.4.0 open source edition. 

In order to fix the issue, initially we checked everything and nothing seems strange with the server, nor with the Magento itself. There was only one small error complaining about PHP memory limit so we decided to increase PHP memory limit (slowly but we did it several times) up to 2G. This 2G is considerably too big for a Magento application, given how relatively small the site is.

At that point we already know that it is the Magento_Csp module that has been complaining about the PHP memory limit but we didn’t know that the fix needs something more than just increasing the PHP memory limit. Plus, the timestamps of the error log isn’t always 100% matched with the actual downtimes.

Our attempt to fix the problem isn’t over yet. After a few days the site keeps crashing randomly with similar errors. Same as previous occurrence, when downtime happens, Zabbix records that CPU and memory consumption goes high thus triggering out-of-memory (OOM) error and Linux system will start killing processes randomly. In this case, PHP-FPM is always in the kill list.

The strangest thing that we realized during the most recent downtime is that the disk usage was growing very quickly. In our case, about 15G of disk space was eaten in less than 2 hours, causing high IO and server collapsed.

We knew that the disk was being eaten by something, but we didn’t know what’s doing it. This then leads to a theory: something in Magento is writing something into the disk. This theory was supported by the PHP-FPM error log related to the Magento_Csp module which mentioned something about cache. Also we couldn’t think about anything else but the Magento cache.

A quick research gave us this: https://github.com/magento/magento2/issues/29964 and it turned out to be the exact same thing that we experienced. However, most people only complain about the OOM issue but there’s one guy who mentioned that the disk also got eaten.

If you are too lazy to read that whole github issue for the solution, here’s the summary of the solutions offered by the people there. Best if you can upgrade to the newer Magento version, at least 2.4.2. I know upgrading may not be easy for most merchants because you will need to make sure that all integrations are still functioning, so…. Fortunately if you have the Magento_Csp module sitting there from the default installation (and you’ve never done anything to it), you should be safe to disable the Magento_Csp completely

bin/magento module:disable Magento_Csp

bin/magento cache:flush

After disabling the module, we can now have a good sleep at night. Server is super quiet:

This solution works as a quick fix for that CSP problem, but probably scheduling a time for a Magento upgrade isn’t a bad idea either.