There are many articles on the web regarding how to configure cron job groups in Magento; however, it is very hard to express the concepts by using just words; leading to confusion among developers when dealing with such an important task on any merchant website, for this reason this article is aiming to explain in a more graphical way the key concepts of setting a cron job in Magento.
Assuming that the one more cron jobs are already defined under a cron job group, the next step is to create the cron_groups.xml file for that specific cron group.
We might take the following configuration as example:
<group id=”astralweb”>
<schedule_generate_every>10</schedule_generate_every>
<schedule_ahead_for>40</schedule_ahead_for>
<schedule_lifetime>2</schedule_lifetime>
<history_cleanup_every>10</history_cleanup_every>
<history_success_lifetime>60</history_success_lifetime>
<history_failure_lifetime>600</history_failure_lifetime>
<use_separate_process>1</use_separate_process>
</group>
The group id is the name of the group to be configures, “astralweb” in this case; the following couple of lines are the most confusing for most of developers.
<schedule_generate_every>10</schedule_generate_every>
<schedule_ahead_for>40</schedule_ahead_for>
Schedule generate every: In minutes, specifying how often the cron jobs will be triggered. Meaning in this case that every 10 minutes a new job will be executed.
Schedule ahead for: In minutes, specifying the max range in time to run/schedule the max amount of cron jobs.
What does all of these mean? The above description can be considered as a division as follows:

By following the same example we can check how many consecutive jobs (of a single job) we can run:

In the timeline, this batch can be represented as follows:
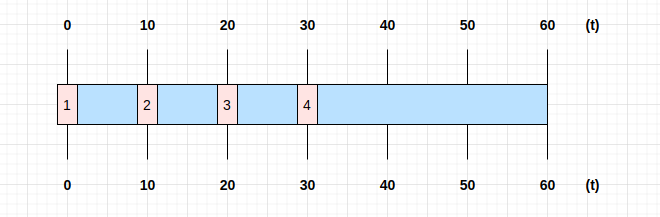
What happened here?
- The first cron job is executed immediately.
- Jobs 2,3,4 are scheduled to be run.
- 1 executed + 3 scheduled = 4 jobs in total.
- This will be the same behavior for all jobs running in the same group.
However, Magento will wait for the last job of this batch (job 4) before creating another batch, so in timeline the behavior would be something like this:


After executing the last job (job 4), a new batch will be created as follows:

After watching the timelines above you must be sure that “schedule ahead for” is always greater than “schedule generate every”, otherwise, the cron job will run only once, since the ratio would not be enough for scheduling more than one job.
Finally, after explaining the relationship between “schedule generate every” and “schedule ahead for”, the the rest of the settings are self explanatory:
<schedule_lifetime>2</schedule_lifetime>
<history_cleanup_every>10</history_cleanup_every>
<history_success_lifetime>60</history_success_lifetime>
<history_failure_lifetime>600</history_failure_lifetime>
<use_separate_process>1</use_separate_process>
Schedule Lifetime: In minutes. This is the time for the job to start running. Meaning in this case that our cron jobs will have 1:59 minutes to start running when the time reaches. If after this time the job has not started to run it will be considered as missed.
History Cleanup Every: In minutes; configuring the time the cron job will be recorded in the database.
History Success Lifetime: In minutes; configuring the time the cron job will be recorded in the database after a successful execution.
History Failure Lifetime: In minutes; configuring the time the cron job will be recorded in the database after a failed execution.
Use separate process: 1 for running in a separate PHP process; 0 otherwise. In theory, running in separate processes would avoid the need to accidentally consume unresponsive or idle processes.
As we can see the key for running a successful cron group is the correct relationship between “schedule generate every” and “schedule ahead for”; by fully understanding how affects the cron behavior the developers would reduce any issue caused by misunderstandings on setting any particular cron group.


