Cannot resolve reCaptcha Parameter Error on Magento Admin Login

How to fix it?

ReCaptcha is a Google service that can be utilized in Magento as part of the features provided by Magento, in which and Administrator can protect a site from abuse and spam.

Since security risks are getting more challenging, this service is being constantly updated by both Google and Magento; reducing the changes for any risk or attack.

However, an upgrade between Magento versions 2.4.3 and 2.4.4 caused a bug that will not allow the Administrator to normally login into the backend site. The Administrator sometimes could be able to login only after several attempts but the issue will re-occur after logout or the session is expired.

How to reproduce it?

If one needs to make sure the issue exists in the current page, the following steps are necessary to reproduce the issue:

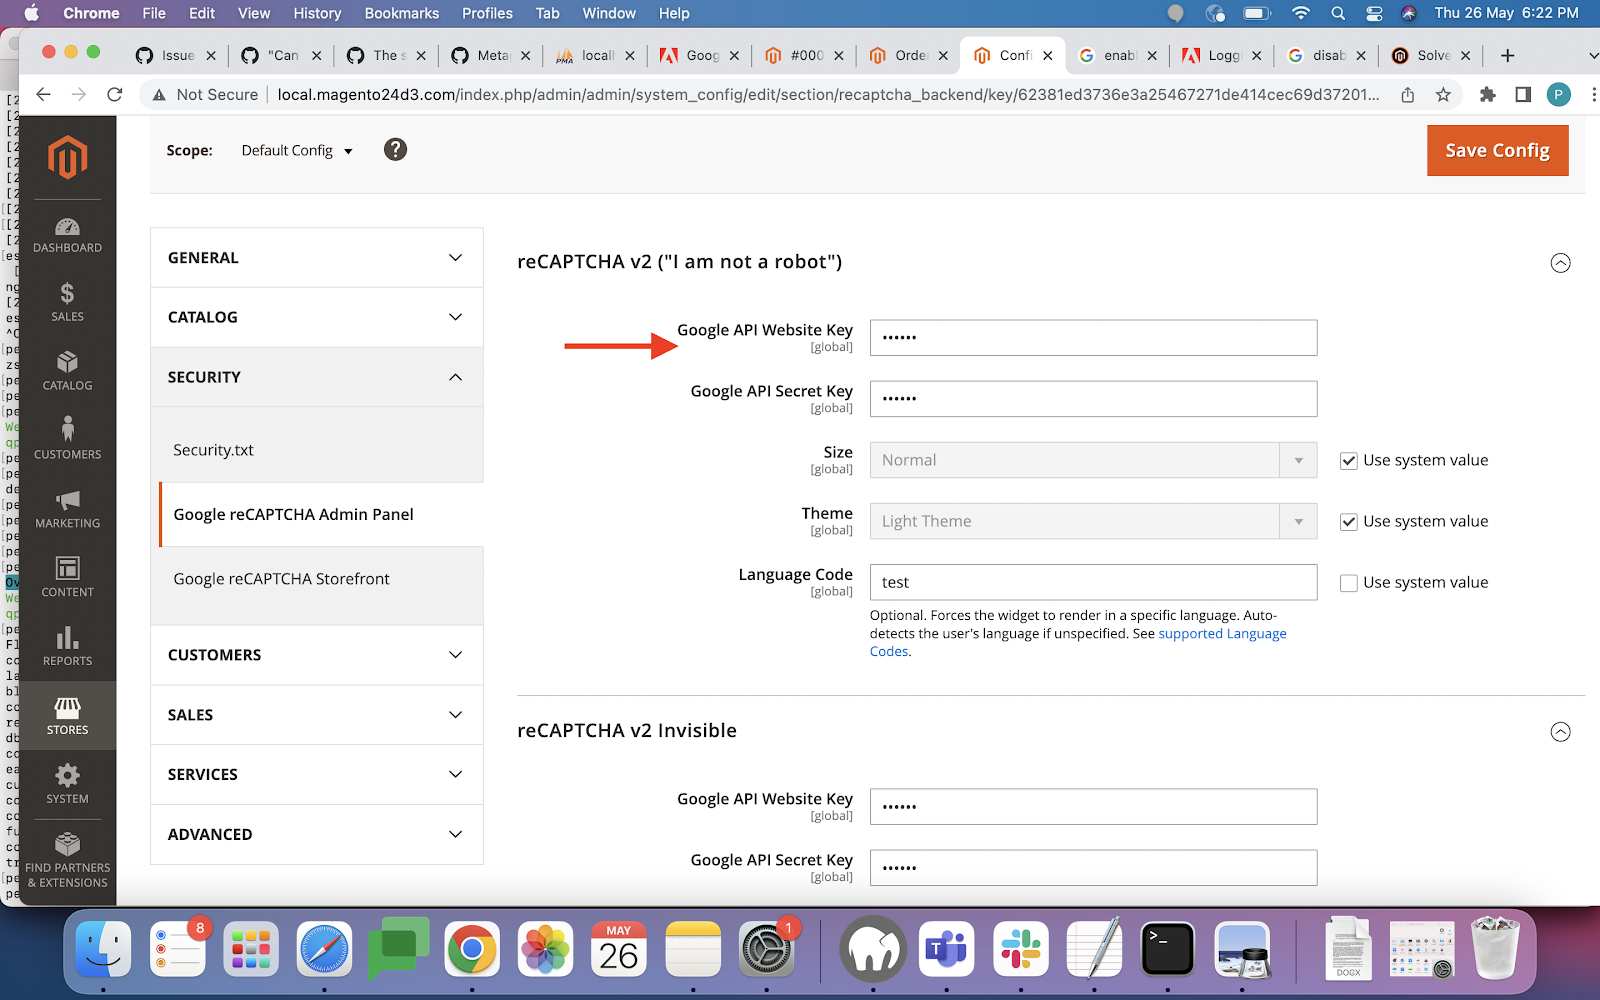
  1. Go to Configuration > Security > Google reCAPTCHA Admin Panel

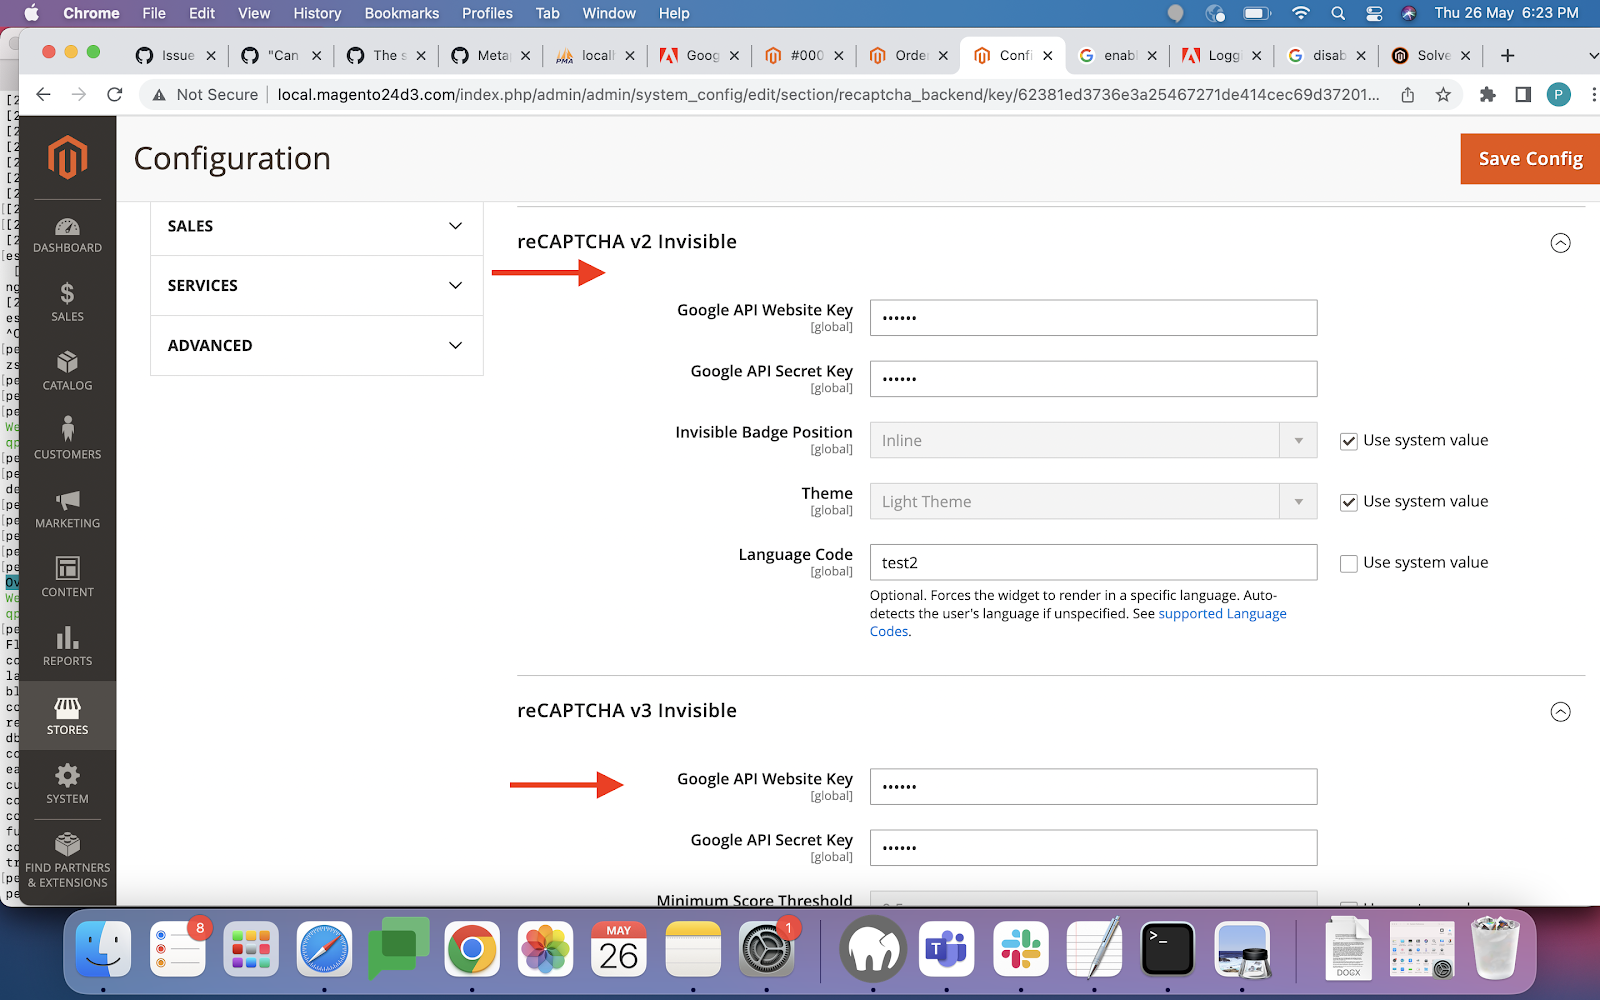
  2. Add your Google API Website Key & Google API Secret Key to any reCAPTCHA below:

reCAPTCHA v2 (“I am not a robot”)

reCAPTCHA v2 Invisible

reCAPTCHA v3 Invisible

Screenshot 2022-05-26 at 6 22 19 PM
Screenshot 2022-05-26 at 6 23 11 PM
Screenshot 2022-05-26 at 6 30 15 PM
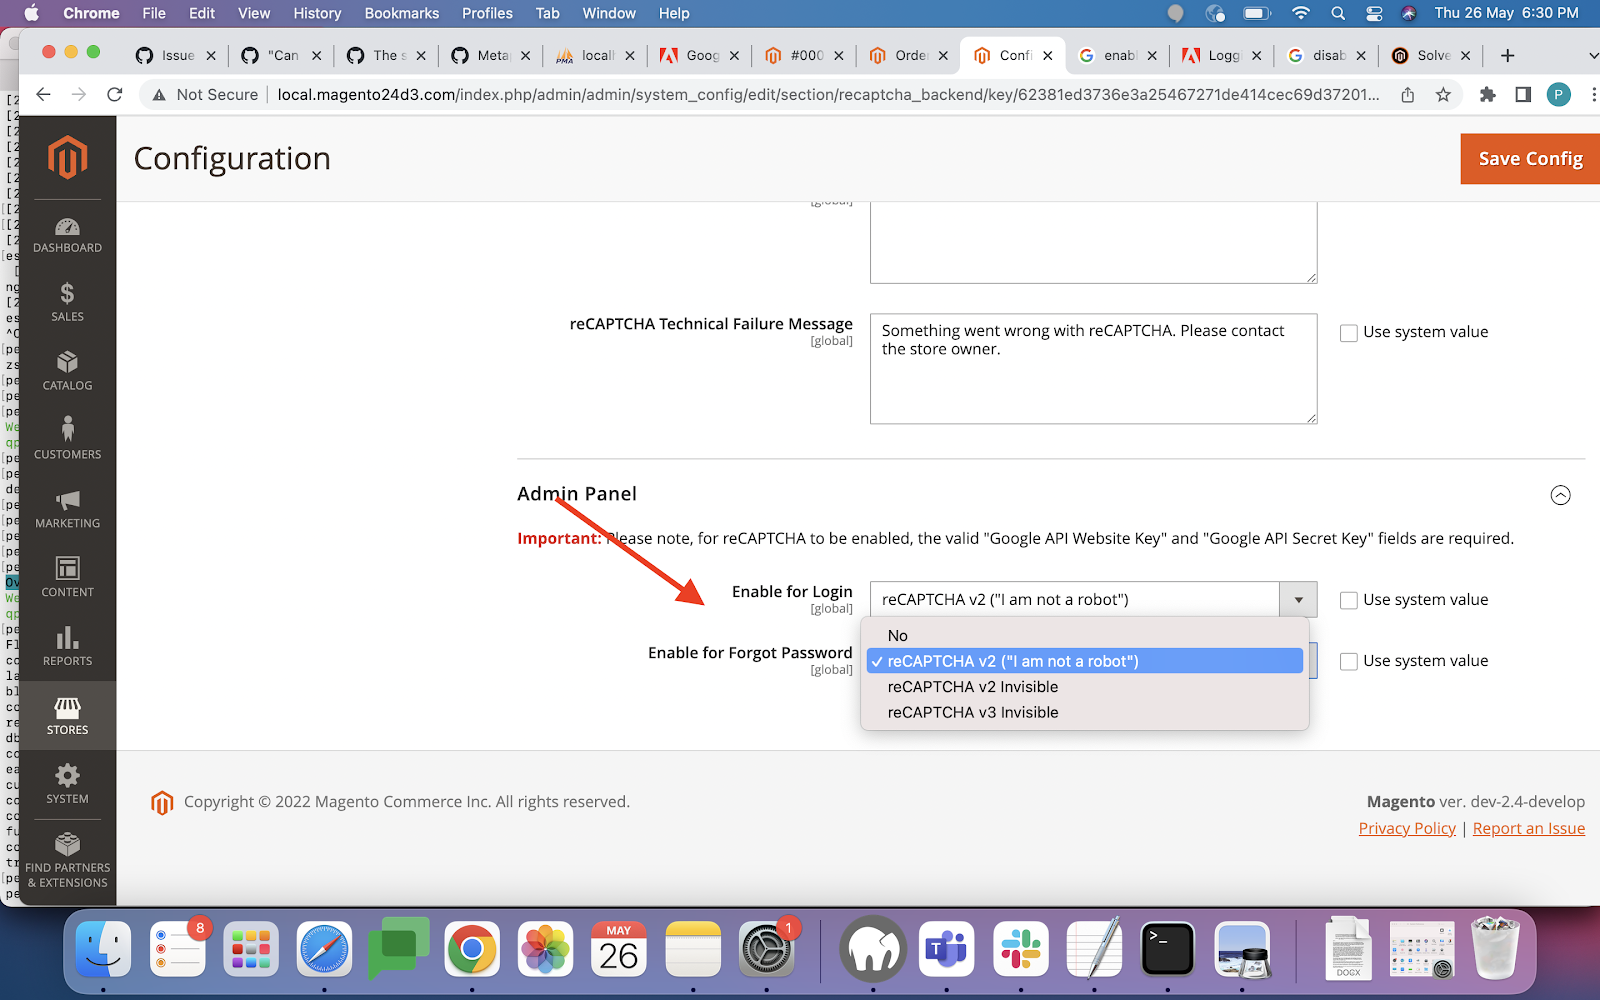
  1. Select your reCAPTCHA version (with API keys above) for either below:
    Enable for Login
    Enable for Forgot Password

  2. Save config

  3. Flush cache

  4. Logout from admin backend.

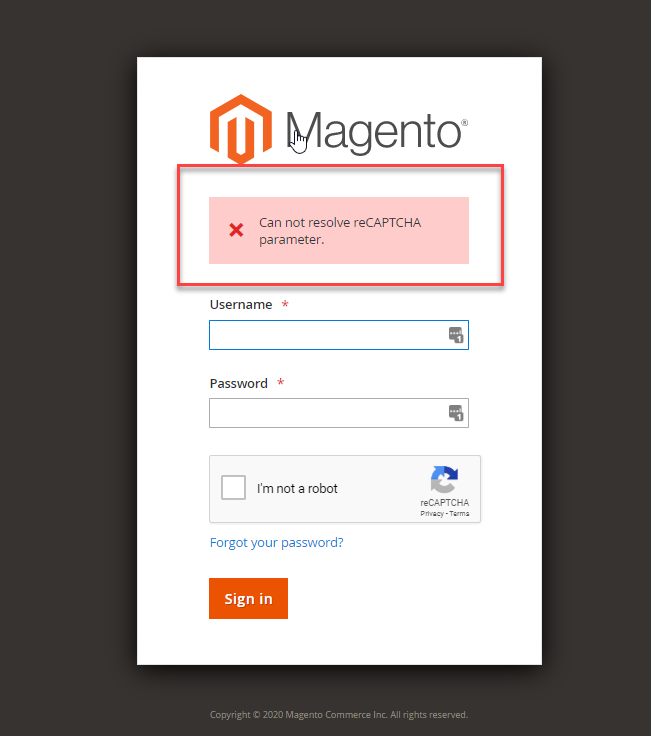
After these steps, besides not being able to login back as Administrator, the following log line will be generated in your log files:

main.ERROR: Can not resolve reCAPTCHA parameter. {“exception”:”[object] (Magento\\Framework\\Exception\\InputException(code: 0): Can not resolve reCAPTCHA parameter. at /var/www/html/magento/vendor/magento/module-re-captcha-ui/Model/CaptchaResponseResolver.php:25)”} []

What is the root cause?

The reason for this is that the JavaScript client isn’t getting the token on submission. So the ReCaptcha param it is looking for is empty.

The client isn’t resolving correctly, because it’s being loaded asynchronously and the way it’s coded, will only activate the form interception after the the file

vendor/magento/module-re-captcha-user/view/adminhtml/templates/recaptcha.phtml

More specifically in the following lines:

const element = document.createElement(‘script’);

const scriptTag = document.getElementsByTagName(‘script’)[0];

element.async = true;

element.src = ‘https://www.google.com/recaptcha/api.js

        + ‘?onload=globalOnRecaptchaOnLoadCallback&render=explicit’;

Solution

In order to solve the issue the whole file recaptcha.phtml from above needs to be refactored as follows in order to resolved the captcha correctly.

Step 1 

Create a new module (not covered in this article)

Step 2

Create a new template at the folder YourModel/YourCompany/view/adminhtml/templates with any name you want, being in this case recaptcha html

Step 3

Copy and paste the following content in the new template:

<?php

/**

* Copyright © Magento, Inc. All rights reserved.

* See COPYING.txt for license details.

*/

/** @var $block Magento\ReCaptchaUi\Block\ReCaptcha */

$config = $block->getCaptchaUiConfig();

$renderingOptions = $config[‘rendering’] ?? [];

$isInvisible = !empty($config[‘invisible’]);

?>

<div class=”admin__field <?= /* @noEscape */ $isInvisible ? ‘field-invisible-recaptcha’ : ‘field-recaptcha’ ?>”>

   <div

       id=”admin-recaptcha”

       class=”admin-recaptcha-content<?= /* @noEscape */ !empty($renderingOptions[‘size’]) ?

           ‘ size-‘ . $renderingOptions[‘size’] : ” ?>”>

   </div>

</div>

<script>

   require([

       ‘jquery’

   ], function (

       $

   ) {

       const element = document.createElement(‘script’);

       const scriptTag = document.getElementsByTagName(‘script’)[0];

       element.async = true;

       element.src = ‘https://www.google.com/recaptcha/api.js’

           + ‘?onload=globalOnRecaptchaOnLoadCallback&render=explicit’;

       let isRecaptchaLoaded = false;

       let token = ”;

       let maxRetryAttempts = 5;

       let attempts = 0;

       let widgetId = 0;

       <?php if ($isInvisible): ?>

           $(‘#login-form’).submit(function (event) {

               if (!token) {

                   event.preventDefault(event);

                   event.stopImmediatePropagation();

                   event.stopPropagation();

                   let attemptRecaptcha = () => {

                       attempts++;

                       if (attempts > maxRetryAttempts){

                           console.error(“Could not fetch invisible ReCaptcha token. ” +

                               “Please refresh the page and try again.”);

                           return;

                       }

                       if (!isRecaptchaLoaded) {

                           setTimeout(() => {

                               attemptRecaptcha()

                           }, 1000);

                           return;

                       }

                       grecaptcha.execute(widgetId)

                           .then( () => {

                               event.preventDefault(event);

                               event.stopImmediatePropagation();

                               event.stopPropagation();

                           }, (reason) => { })

                           .catch(err => { console.error(err); });

                   }

                   attemptRecaptcha();

               }

           });

       <?php endif; ?>

       window.globalOnRecaptchaOnLoadCallback = function () {

           isRecaptchaLoaded = true;

           widgetId = grecaptcha.render(‘admin-recaptcha’, {

               <?php foreach ($renderingOptions as $key => $value): ?>

                   ‘<?= $block->escapeJs($key) ?>’: ‘<?= $block->escapeJs($value) ?>’,

               <?php endforeach; ?> ‘callback’: function (_token) {

                       <?php if ($isInvisible): ?>

                       token = _token;

                       $(‘#login-form’).unbind(‘submit’);

                       $(‘#login-form’).submit();

                   <?php endif; ?> }

           });

       }

       scriptTag.parentNode.insertBefore(element, scriptTag);

   });

</script>

Step 4

Create two new layout files called adminhtml_auth_forgotpassword.xml and adminhtml_auth_login.xml inside the folder YourModule/YouCompanyNamer/view/adminhtml/layout

Step 5

Copy and paste the original content from those files located at vendor/magento/module-re-captcha-user/view/adminhtml/layout

Step 6

Change the template name for the one you created in step 3 in both new layouts.

After this, the reCaptcha login issue will be solved and the Administrator will be able to login back successfully at first attempt.

Before implementing the solution please be sure to double check the issue is reproducible in your environment in order to avoid adding unnecessary modules or extensions to your project.

Loading a Magento’s custom product form field from the database (Without creating product attributes)

Assuming that you already understand how to save a custom field value to a database, the next step in order to provide a complete saving/loading solution to any custom field, without creating product attributes, is to develop a mechanism for reading the value from the database and displaying it to our custom form field every time the product form is being loaded.

In Magento we can develop our own data provider that will help us modify the product form; for this, we need to add new arguments to the Magento’s modifier pool in the /etc/adminhtml/di.xml file as follows:

<virtualTypename=”Magento\Catalog\Ui\DataProvider\Product\Form\Modifier\Pool“>

   <arguments>

       <argument name=”modifiers” xsi:type=”array”>

           <item name=”advancedCustomOptions” xsi:type=”array”>

               <item name=”class” xsi:type=”string”>Module\Vendor\Ui\DataProvider\ProductForm</item>

               <item name=”sortOrder” xsi:type=”number”>20</item>

           </item>

       </argument>

   </arguments>

</virtualType>

And inside the AstralWeb\DirectCheckout\Ui\DataProvider file, we need to create our data provider, in this case, the data provider will be called ProductForm:

<?php

namespace Module\Vendor\Ui\DataProvider;

use Magento\Catalog\Ui\DataProvider\Product\Form\Modifier\AbstractModifier;

use Magento\Catalog\Model\Locator\LocatorInterface;

use Magento\Framework\App\RequestInterface;

use Magento\Store\Model\StoreManagerInterface;

use Magento\Framework\Exception\NoSuchEntityException;

class ProductForm extends AbstractModifier

{

    protected $locator;

    protected $request;

   public function __construct(

       LocatorInterface $locator,

       RequestInterface $request) 

{

       $this->locator = $locator;

       $this->request = $request;

}

 /**

  * {@inheritdoc}

  */

 // This function modifies the form fields before being rendered.

 public function modifyMeta(array $meta)

 {

        return $meta;

 }

   /**

    * {@inheritdoc}

    */

   // This function requires to be imported but we don’t need it.

   public function modifyData(array $data)

   {

       return $data;

   }

}

After declaring our data provider we will be able not only to inject our custom value into the form but also help in conditionally displaying the field according to the data being read from the database.

Conditional rendering

Some merchants would require us to display the custom field for only some specific products, let’s say that we only want to show the custom field when opening any configurable product form only, so it means that for any other non-configurable product form the field will not be displayed.

For defining the above behavior we can add the following lines to the modifyMeta function in order to override the arguments for the amounts container:

public function modifyMeta(array $meta)

   {

       $product = $this->locator->getProduct();

      if ($productType != “configurable”)

       {

           $meta[“amounts”] = [

               “arguments” => [

                   “data” => [

                       “config” => [

                           “collapsible” => false,

                           ‘opened’ => false,

                           ‘canShow’ => false,

                           ‘visible’ => false

                       ]

                   ]

               ]

           ];

       }

Please take note of the index amounts, previously declared when extending the product form:

<argument name=”data” xsi:type=”array”>

   <item name=”config” xsi:type=”array”>

      <item name=”label” xsi:type=”string”>

         Min. Amount of Products

      </item>

      <item name=”collapsible” xsi:type=”boolean”>true</item>

      <item name=”dataScope” xsi:type=”string”>data.amounts</item>

      <item name=”sortOrder” xsi:type=”number”>10</item>

   </item>

 </argument>

In the data provider, we are overriding the display characteristics for the whole container when the product’s type is not configurable. When opening a non-configurable product form, the whole field container in this case will not be displayed, just like it is shown below after overriding the container properties.

Injecting the custom value

In the same way, we override the whole container display for any non-configurable product, we can also do the same for any element inside the container when we need to inject a custom value into the product form; we just need to go down one to the children index and override the field we need to, in this case, the qty field, so, following the same example, we can add an else statement as follow:

public function modifyMeta(array $meta)

   {

       $product = $this->locator->getProduct();

      if ($productType != “configurable”)

       {

         …

       }else{

       // Any logic for loading the qty value from database goes here

      //  $qty = …

           $meta[“amounts”] = [

               “arguments” => [

                   “data” => [

                       “config” => [

                           “sortOrder” => 1,

                       ]

                   ]

               ],

               ‘children’ => [

                   ‘qty’ => [

                       ‘arguments’ => [

                           ‘data’ => [

                               ‘config’ => [

                                   ‘value’ => (string)$qty

                               ]

                           ]

                       ]

                   ]

               ]

           ];

       }

       return $meta;

   }

In the above example, we are just overriding the value sample, in this way the value we get from the database will be displayed in the product form.

This will finally finish the most basic saving/loading flow for any custom field in the product form without creating product attributes. You are welcome to experiment with any other field types rather than text input, but for most of them, the steps are very similar, just being different in the elements needed to be overridden for a particular project.

In the next article, we will describe how to customize the style of any field from the product form, allowing us to make it distinctive from others.

Saving a custom Magento’s product form field to database (Without creating product attributes)

Following our last example on how to extend the product form with a custom text input, the next step to follow is to save the custom value of it everything the form is saved; when the product form is extended by using attributes created manually, Magento will deal with all saving process, but since we are extending the product form programmatically we need to save the value ourselves.

For this let’s suppose we already created the database tables and a whole model repository/interface structure for saving and retrieving data to retrieve/save data into it (these topics will not be covered in this article).

The big mistake!!!

The most common mistake when saving a custom field in the product form is to implement an observer for catalog_product_save_before or catalog_product_save_after or a plugin to intercept the saving method of the product repository. 

Unfortunately, by doing any of these methods there are high chances of accidentally creating an infinite loop, especially if you need to save any data to the product model itself; because saving the product will trigger another save event, and that event will be continually intercepted by the observer or plugin that will save again… and will keep doing this over and over again.

For avoiding an infinite loop, it is much safer to implement an aroundPlugin to the controller Magento\Catalog\Controller\Adminhtml\Product\Save, because by intercepting the controller we can have access to the form’s data before being saved, not having to perform a “double save” action compared to other methods.

Declare the plugin

Add the plugin declaration in your CustomModule/Vendor/etc/adminhtml/di.xml

<type 

   name=”Magento\Catalog\Controller\Adminhtml\Product\Save”>

      <plugin 

         name=”check_direct_qty_plugin”

         type=”AstralWeb\Quantity\Plugin\SaveProductPlugin”

         sortOrder=”50″ />

</type>

Name your plugin with any name you want and write your plugin file inside the Plugin folder. In this particular case, the filename is SaveProductPlugin.

In the file, we will inject any class we require and declare a beforeDispatch or an aroundDispatch function for having access to the request parameters:

public function aroundDispatch(Save $subject, $proceed, $request)

{

   $params = $request->getParams();

At this point, we should go back to our previous field definition to check for the scope defined for our custom input text.

<argument name=”data” xsi:type=”array”>

   <item name=”config” xsi:type=”array”>

      <item name=”label” xsi:type=”string” translate=”true”>

         Product Qty

      </item>

      <item name=”dataScope” xsi:type=”string”>qty</item>

      <item name=”sortOrder” xsi:type=”number”>500</item>

      <item name=”componentType” xsi:type=”string”>field</item>

      <item name=”dataType” xsi:type=”string”>text</item>

      <item name=”formElement” xsi:type=”string”>input</item>

      <item name=”additionalClasses” xsi:type=”string”>qty</item>

   </item>

</argument>

Since we declare qty as our dataScope it means we must access the value as follows:

public function aroundDispatch(Save $subject, $proceed, $request)

{

   $params = $request->getParams();

   echo $params[‘qty’];

// All your logic for saving the value into the database

return $proceed($request);

}

Applying the changes

After developing the code, execute the followings commands for applying our changes to the environment:

bin/magento setup:upgrade;

bin/magento setup:di:compile;

bin/magento setup:static-content:deploy en_US es_MX;

bin/magento index:reindex;

bin/magento cache:flush;

bin/magento cache:clean;

After executing the above commands, edit any product and enter any integer in the custom text input and save it; you will see immediately that the custom value is saved into the database.

What’s next?

After making sure our custom value is being saved into our database we can start to retrieve it and display it every time the product form is being open. The next article will cover the steps for loading the data back after saving it successfully.

Extending the Magento’s product form (Without creating product attributes)

For merchants, adding very uniques properties or characteristics to their stores will allow them to stand up in front of the competition, and luckily for them, Magento allows a high customization level out of the box; but still, some projects might require very specific customizations that are not 100% customized in the admin panel, such as for example: requesting to purchase a minimum quantity of a particular product before checking, changing the checkout flow when a product doesn’t meet specific criteria or conditions, enabling/disabling the product on frontend after some custom attribute previously defined, etc; and for these customizations, we usually require to extend the product form.

In Magento, adding new fields to the product form is one of the most powerful features of its framework, the development flow is quite simple; the official documentation provides many examples; however, it lacks a proper explanation of the elements involved in the whole process; for this reason, the purpose of this document is to ease a little bit the understanding of this customization task.

Let’s assume that a merchant requires to add a new text input into the product form, allowing the store to set a minimum amount of one single product in the cart before letting customers checkout.

Usually what you would do as a developer is to programmatically create a new product attribute and assign it to one or more attribute sets, or instead, manually create a new attribute in the administrator backend and assign it to any attribute set that fits the project’s requirement.

By doing any of the methods described above the new field will be displayed, saved, and loaded out of the box anytime a product form is used, very conveniently; however, there are a couple of limitations that would require us to add the field programmatically:

  • The attribute sets will vary over time and when creating/editing a new attribute set, the administrator might forget to add the new attribute into the new set.
  • The merchant might require to display the new field in only the products that meet specific conditions, something that clearly cannot be achieved out of the box at the moment of writing this article. 

When adding a new field programmatically, in the most basic form, it will require extending the original product_form.xml and including the following components: 

  • Form: The basic form declaration.
  • Fieldset: A component-like header that is able to collapse and contains as many fields as possible.
  • Field: The actual input.

The most basic xml structure will look something like this:

<form>

<fieldset>

<field>

</field>

….

<field>

</field>

</fieldset>

</form>

Going back to our example, let’s go step by step more deeply into how to extend the product_form.xml.

First of all, we need to create a product_form.xml file in the module, inside the path   CompanyName/ModuleName/view/adminhtml/ui_component/ and keep following the basic structure with some extra configuration data

<form xmlns:xsi=”http://www.w3.org/2001/XMLSchema-instance” xsi:noNamespaceSchemaLocation=”urn:magento:module:Magento_Ui:etc/ui_configuration.xsd”>

</form>

There is nothing mysterious about the code above, we are just adding the necessary configuration for Magento to recognize our new form elements, something very similar needs to be done with the fieldset:

<fieldset name=”amounts”>

</fieldset>

The name attribute will allow us the identify the fieldset programmatically, and must be unique among all of the components in the form. Furthermore, the fieldset will also require an extra child named argument for defining specific configuration for the fieldset:

<argument name=”data” xsi:type=”array”>

   <item name=”config” xsi:type=”array”>

      <item name=”label” xsi:type=”string”>

         Min. Amount of Products

      </item>

      <item name=”collapsible” xsi:type=”boolean”>true</item>

      <item name=”dataScope” xsi:type=”string”>data.amounts</item>

      <item name=”sortOrder” xsi:type=”number”>10</item>

   </item>

 </argument>

Most of the lines can be copied and pasted, but need to pay attention to the following ones inside the config array:

  • label: This is very self-explanatory, it is what the administrator will see on the UI. 
  • dataScope: This is how the data will be accessible inside the form array when need to save and retrieve the data, and it is very important to follow the convention ‘data.index’, otherwise the data would be inaccessible; in this case, our index inside the form array will be ‘amounts’.  

Following our basic structure the field element would look like this:

<field name=”qty”>

</field>

Just as the fieldset element, the name attribute will allow us the identify the field programmatically, and must be unique among all of the components in the form. Also, the field will also require an extra child named argument for defining the specific configuration for it:

<argument name=”data” xsi:type=”array”>

   <item name=”config” xsi:type=”array”>

      <item name=”label” xsi:type=”string” translate=”true”>

         Product Qty

      </item>

      <item name=”dataScope” xsi:type=”string”>qty</item>

      <item name=”sortOrder” xsi:type=”number”>500</item>

      <item name=”componentType” xsi:type=”string”>field</item>

      <item name=”dataType” xsi:type=”string”>text</item>

      <item name=”formElement” xsi:type=”string”>input</item>

      <item name=”additionalClasses” xsi:type=”string”>qty</item>

   </item>

</argument>

Most of the lines above are critical for our text input definition, but need to pay attention to the following ones:

  • label: This is very self-explanatory, it is what the administrator will see on the UI. 
  • dataScope: This is how the data will be accessible inside the form array when need to save and retrieve the data; in this case, our index inside the form array will be ‘qty’.  
  • componentType: in our case, it needs to be a field.
  • dataType: The datatype that will be used in our text input; in this string is just fine, we can cast to string or int if needed, this will avoid conversion issues between our Magento application and the database.
  • formElement: input type.
  • adiddionatinalClasses: Any additional CSS class that will be required in order to modify the UI of the component, in this case, we are using a CSS class named ‘qty’.

By following all these steps our complete form should look like this:

<form xmlns:xsi=”http://www.w3.org/2001/XMLSchema-instance” xsi:noNamespaceSchemaLocation=”urn:magento:module:Magento_Ui:etc/ui_configuration.xsd”>

   <fieldset name=”amounts”>

       <argument name=”data” xsi:type=”array”>

           <item name=”config” xsi:type=”array”>

               <item name=”label” xsi:type=”string”>Min. Amount of Products</item>

               <item name=”collapsible” xsi:type=”boolean”>true</item>

               <item name=”dataScope” xsi:type=”string”>data.amounts</item>

               <item name=”sortOrder” xsi:type=”number”>10</item>

           </item>

       </argument>

       <field name=”qty”>

           <argument name=”data” xsi:type=”array”>

               <item name=”config” xsi:type=”array”>

                   <item name=”label” xsi:type=”string” translate=”true”>Product Qty</item>

                   <item name=”dataScope” xsi:type=”string”>qty</item>

                   <item name=”sortOrder” xsi:type=”number”>500</item>

                   <item name=”componentType” xsi:type=”string”>field</item>

                   <item name=”dataType” xsi:type=”string”>text</item>

                   <item name=”formElement” xsi:type=”string”>input</item>

                   <item name=”additionalClasses” xsi:type=”string”>qty</item>

               </item>

           </argument>

       </field>

   </fieldset>

</form>

And finally, if you open any product form in the admin backend you will find a new title “Min. Amount of Products”, including a new text input “Product Qty”.

The next article will explain the steps for loading the data back any time the administrator is saving or opening a form, but understanding the basics concepts explained in this article is the key to truly having a good perception and enhancing full control of the product form.

How to troubleshoot Magento in Chrome? Brief Review on MSP DevTools for Magento

It is a common practice among Web developers to use Chrome’s Developer tools to test, debug and troubleshoot on any website; however, none of them provide enough resources to deal with Magento, especially for backend developers, relying on more unorthodox methods, like printing messages on the UI or the Developer’s tools’ console.

Luckily, MageSpecialist DevTools is a free module, that can be found on Github at https://github.com/magespecialist/m2-MSP_DevTools , that reduces considerably those headaches by providing powerful analysis and data totally aimed to work with Magento.

Advantages of using MageSpecialist DevTools:

  • Magento’s layout debug functionality is very confusing and does not display enough information for troubleshooting; being also very intrusive.
  • It will help you to determine if there is any load observer being executed; easing the decision to replace them by writing a plugin instead.
  • You might detect what blocks or layouts are taking a long time to load.
  • The tool will also allow you to detect any heavy and unused code being unnecessary rendered.

Installation

Install the MageSpecialist Chrome Toolbar

First, install the MageSpecialist Chrome Toolbar in order to install a new Magento tab in Chrome’s Developer tool

https://chrome.google.com/webstore/detail/magespecialist-devtools-f/odbnbnenehdodpnebgldhhmicbnlmapj

After installing the above extension you will see a new Magento tab after right-clicking and selecting “Inspect” on the page.

After installing the MageSpecialist Chrome Toolbar you are ready for the next step.

Install the PhpStorm Remote Call plugin

The PhPStorm Remote Call will allow you to directly open a file in PhpStorm just by clicking on the link or the icon associated with it. Go to File → Settings →Plugins, and make sure the “Marketplace” is being selected.

Then inside the text input type “Remote Call” and proceed with the installation. The plugin will be ready to use after restarting the IDE.

Install the MSP DevTools module by composer

Inside your Magento root please execute the following command in order to install the MSP DevTools module

# composer require msp/devtools

Enable the profiler

Setting the profiler on MSP DevTools is composed of three steps:

a. Edit the bootstrap file

The pub/bootsrap.php file contains a basic configuration that is loaded on boot time by the Magento App, so we need to set the Magento profiler on boot time as by making the following changes:

Original

$profilerConfig = isset($_SERVER[‘MAGE_PROFILER’]) && strlen($_SERVER[‘MAGE_PROFILER’])

    ? $_SERVER[‘MAGE_PROFILER’]

    : trim(file_get_contents(BP . ‘/var/profiler.flag’));

if ($profilerConfig) {

    $profilerConfig = json_decode($profilerConfig, true) ?: $profilerConfig;

}

After modification:

$profilerConfig = $_SERVER[‘MAGE_PROFILER’] = [ ‘drivers’ => [[‘output’ => ‘MSP\DevTools\Profiler\Driver\Standard\Output\DevTools’]] ];

//Comment the following lines

/*$profilerConfig = isset($_SERVER[‘MAGE_PROFILER’]) && strlen($_SERVER[‘MAGE_PROFILER’])

    ? $_SERVER[‘MAGE_PROFILER’]

    : trim(file_get_contents(BP . ‘/var/profiler.flag’));

if ($profilerConfig) {

    $profilerConfig = json_decode($profilerConfig, true) ?: $profilerConfig;

}*/

b. Enable the SQL query feature.

Edit the app/etc/env.php file and add the following line to the default db connection:

  ),

  ‘db’ => 

  array (

    ‘table_prefix’ => ”,

    ‘connection’ => 

    array (

      ‘default’ => 

      array (

        ‘host’ => ‘localhost’,

        …

        ‘profiler’ => ‘1’,

      ),

    ),

  ),

  ‘resource’ => 

  array (

  1. Enable the Magento profiler

The Magento profiler can be enabled by simply executing the following command:

# dev:profiler:enable html

  1. Enabling the  MSP DevTools
  1. Flush your cache.
  2. Turn OFF Full Page Cache while you are using DevTools.
  3. Upgrade database data & schema: php bin/magento setup:upgrade
  4. Open Magento backend and go to Stores > Settings > Configuration > MageSpecialist > DevTools
  5. Enable devtools and set IP restrictions.

Features

The most powerful features include the following:

  • General tab

The General tab information will display information as the Magento version, and the configured locale.

  • Observers tab

The Observers tab will display the observers being used in the current URL and the total time spent in executing. Any high number would mean there is a performance issue in the observer and would require troubleshooting or redesign.

Clicking on any of them will display the file path of the file in your local project, and will allow you to open it directly into PhpStorm.

  • Blocks tab

The Blocks tab will display the layout blocks being rendered in the current URL and the total time spent in rendering them. Any high number would mean there is a performance issue in the block and would require troubleshooting or redesign.

Clicking on any of them will display the file path of the file in your local project, and will allow you to open it directly into PhpStorm.

It is important to note that the MSP DevTool module will add a data-mspdevtools attribute to most HTML tags, that can be used in the search box for listing the specific element.

  • UI tab

The Ui tab will display the Ui components being used in the current URL and the total time spent in executing. Also, clicking on any of them will display more specific info about any of them.

  • Magento’s profiler can be configured to be displayed inside Chrome’s Developer tools instead of being displayed at the bottom of the page.

Conclusion

The MSP DevTools module will save you a lot of time developing and troubleshooting on both the front end and back end; also will help you how to detect any performance issue that requires to be addressed, which is a “must to have” module on your development environment.

Magento – Saving Data Directly into Magento Cache

Magento uses many cache types out of the box; being very convenient for both administrators and developers, due to its decentralized design that provides specialized caching for different purposes.

When using Magento, its architecture will manage and determine the best cache type and policy to use for every particular situation; providing a more powerful solution compared with other frameworks that only provide single cache storage.

Magento is also flexible enough to allow you as a developer to implement and utilize a custom cache for any specific purpose. The process is very simple for any developer; in the following examples let’s suppose that we are working with an existent module called Astralweb_Cache. The basic procedure for using Magento cache would include the following procedures:

  1. Create a cache XML file

Create a new file in AstralWeb/Cache/etc/cache.xml with the following content:

<?xml version=”1.0″?>

<config xmlns:xsi=”http://www.w3.org/2001/XMLSchema-instance” xsi:noNamespaceSchemaLocation=”urn:magento:framework:Cache/etc/cache.xsd”>

    <type name=”astralweb_cache” translate=”label,description” instance=”AstralWeb\Cache\Model\Cache\AstralWebCache”>

        <label>AstralWeb Cache</label>

        <description>AstralWeb Custom Cache</description>

    </type>

</config>

In which:

name: This is the unique and internal cache code to be used for identifying the cache. 

instance: The PHP class will be responsible for constructing the custom cache type.

  1. Create the class AstralWen\Cache\Model\Cache\AstralWebCache

<?php

namespace AstralWeb\Cache\Model\Cache;

use Magento\Framework\App\Cache\Type\FrontendPool;

use Magento\Framework\Cache\Frontend\Decorator\TagScope;

/**

 * System / Cache Management / Cache “Label”

 */

class AstralWebCache extends TagScope

{

    /**

     * The unique and internal code to be used for identifying the cache.

     */

    const TYPE_IDENTIFIER = ‘astralweb_cache’;

    /**

     * The tag name used for identifying the cache scope

     */

    const CACHE_TAG = ‘ASTRALWEB_CACHE_TAG’;

    /**

     * @param FrontendPool $cacheFrontendPool

     */

    public function __construct(FrontendPool $cacheFrontendPool)

    {

        parent::__construct(

            $cacheFrontendPool->get(self::TYPE_IDENTIFIER),

            self::CACHE_TAG

        );

    }

}

After that you will be able to see AstralWeb Cache in System → Cache Management, meaning that the cache has been successfully created.

  1. Using the custom cache

After creating the custom cache the most common way to insert data into it is by injection into almost any class that requires inserting data.

use Magento\Framework\App\CacheInterface;

use Magento\Framework\Serialize\SerializerInterface;

use Magento\Framework\App\Cache\TypeListInterface 

use AstralWeb\Cache\Model\Cache\AstralWebCache;

….

….

….

protected $_cache;

protected $_serializer;

protected $_cacheTypeList;

/**

 * @param CacheInterface $_cache

 * @param SerializerInterface $_serializer

 */

public function __construct(

CacheInterface $cache, 

SerializerInterface $serializer,

CacheTypeList $cacheTypeList

)

{

    $this->_cache = $cache;

    $this->_serializer = $serializer;

    $this->_cacheTypeList = $cacheTypeList;

}

….

….

….

  1. Saving data into the custom cache

The following example illustrates how to insert custom data into the cache. You should notice that the data, or object, to be saved is serialized into a string.

public function saveToCache($dataToSave)

{

    $cacheKey  = AstralWebCache::TYPE_IDENTIFIER;

    $cacheTag  = AstralWebCache::CACHE_TAG;

    $storeData = $this->_cache->save(

        $this->_serializer->serialize($dataToSave), // Serialization

        $cacheKey,

        [$cacheTag],

        86400 // lifetime of the cached data (seconds)

    );

}

  1. Reading data from the custom cache

Reading data from custom cache is exactly the opposite process. You should note that the data or object will be unserialized.

public function readFromCache()

{

    $cacheKey  = AstralWebCache::TYPE_IDENTIFIER;

    $data = $this->_serializer->unserialize($this->_cache->load($cacheKey));

}

Please note that the data from the custom cache will be accessible until it reaches lifetime and before the Administrator flushes the cache. Also, if the saved data has been re-saved with different data, it will not be retrieved correctly until the cache is flushed.

  1. Invalidating the custom cache

If after re-saving the cache with different data you would like to display the cache as “invalid” to the Administrator you need to execute the following code.

public function invalidateCache()

{

    $this->_cacheTypeList->invalidate(AstralWebCache::TYPE_IDENTIFIER);

}

  1. Flushing the custom cache type

You can flush the cache manually on System → Cache Management, but you can also flush the cache programmatically as this:

public function flushCache()

{

    $this->_cacheTypeList->cleanType(AstralWebCache::TYPE_IDENTIFIER);

}

The only disadvantage of using Magento cache for your own cache is that you will not be able to configure it according to your needs, or you might not be able to reduce the abstraction layers you would like for simplifying the process even more.

However, the above approach will allow you to provide a faster response by using Magento internal cache mechanism. Instead of fetching from the databases, the requested data will be returned from the cache.

A Simple Explanation of Cache

If this is the first article you read about Cache, congratulations, you are lucky you find this simple and straightforward information about it, more specifically about Web caching.

Cache can be implemented by Software or Hardware, it doesn’t matter, it is an optimized storage for delivering fast content between you PC and the Internet content you are browsing. 

When you visit your favorite page, most of the content is not coming from the server, it is coming from the cache, because the cache is already stored from the remote server the first time you visit the page.  

If the page loads from the server every time you visit your page, it will cause bottlenecks somewhere in the “road”, especially if the page is visited at the same time by many people.  This is why it is more likely you will have the impression that your favorite page loads faster. Nobody likes slow websites, and this is why cache is necessary.

During every connection between a device and a server more than one cache can be used during the connectivity, even your browser implements a cache, sometimes called proxy.

But how does a basic cache work? Assuming the most basic scenario, a cache might works as follows:

When you visit a page for the first time, the response time will always be the slowest one, because the response is being served directly by the server; however a copy of the response data is stored in the cache.

After the first time the page is visited the client request will be served primarily from the cache. If there is data needed to be updated it will be brought directly from the server and a copy of it will be stored in cache. This approach will provide a faster response and reduce server traffic.

However, you might be asking yourself some questions: how does the cache determine when to refresh a specific content?  How to assure that the data display is always the most accurate data?

The above is being determined by cache policies; that are basically rules-algorithms that manage a cache; usually being a combination of several rules as for example: last written time, last access time, less access data, etc. Only the browser itself utilices a combination of very complex policies, aiming to provide faster page loads.  

As a general conclusion, it can be assumed that your devices accessing and requesting info from the Internet utilize a cache mechanism. Most of the time you don’t need to take it, it is being implemented out of the box; however in some complex scenarios this cache implementation and/or policies would require to be adjusted in order to provide a better customer experience; being this task more complex every day since technology trends are evolving constantly.

Configuring Cron Job Groups for Magento

There are many articles on the web regarding how to configure cron job groups in Magento; however, it is very hard to express the concepts by using just words; leading to confusion among developers when dealing with such an important task on any merchant website, for this reason this article is aiming to explain in a more graphical way the key concepts of setting a cron job in Magento

Assuming that the one more cron jobs are already defined under a cron job group, the next step is to create the cron_groups.xml file for that specific cron group. 

We might take the following configuration as example:

<group id=”astralweb”>

   <schedule_generate_every>10</schedule_generate_every>

   <schedule_ahead_for>40</schedule_ahead_for>

   <schedule_lifetime>2</schedule_lifetime>

   <history_cleanup_every>10</history_cleanup_every>

   <history_success_lifetime>60</history_success_lifetime>

   <history_failure_lifetime>600</history_failure_lifetime>

   <use_separate_process>1</use_separate_process>

</group>

The group id is the name of the group to be configures, “astralweb” in this case; the following couple of lines are the most confusing for most of developers.

<schedule_generate_every>10</schedule_generate_every>

<schedule_ahead_for>40</schedule_ahead_for>

Schedule generate every: In minutes, specifying how often the cron jobs will be triggered. Meaning in this case that every 10 minutes a new job will be executed.

Schedule ahead for: In minutes, specifying the max range in time to run/schedule the max amount of cron jobs.

What does all of these mean? The above description can be considered as a division as follows:

By following the same example we can check how many consecutive jobs (of a single job) we can run:

In the timeline, this batch can be represented as follows:

What happened here?

  • The first cron job is executed immediately.
  • Jobs 2,3,4 are scheduled to be run.
  • 1 executed + 3 scheduled = 4 jobs in total.
  • This will be the same behavior for all jobs running in the same group.

However, Magento will wait for the last job of this batch (job 4) before creating another batch, so in timeline the behavior would be something like this:

After executing the last job (job 4), a new batch will be created as follows:

After watching the timelines above you must be sure that “schedule ahead for” is always greater than “schedule generate every”, otherwise, the cron job will run only once, since the ratio would not be enough for scheduling more than one job.   

Finally, after explaining the relationship between “schedule generate every” and “schedule ahead for”, the the rest of the settings are self explanatory:

<schedule_lifetime>2</schedule_lifetime>

<history_cleanup_every>10</history_cleanup_every>

<history_success_lifetime>60</history_success_lifetime>

<history_failure_lifetime>600</history_failure_lifetime>

<use_separate_process>1</use_separate_process>

Schedule Lifetime: In minutes. This is the time for the job to start running. Meaning in this case that our cron jobs will have 1:59 minutes to start running when the time reaches. If after this time the job has not started to run it will be considered as missed.

History Cleanup Every: In minutes; configuring the time the cron job will be recorded in the database.

History Success Lifetime: In minutes; configuring the time the cron job will be recorded in the database after a successful execution.

History Failure Lifetime: In minutes; configuring the time the cron job will be recorded in the database after a failed execution.

Use separate process: 1 for running in a separate PHP process; 0 otherwise. In theory, running in separate processes would avoid the need to accidentally consume unresponsive or idle processes.

As we can see the key for running a successful cron group is the correct relationship between “schedule generate every” and “schedule ahead for”; by fully understanding how affects the cron behavior the developers would reduce any issue caused by misunderstandings on setting any particular cron group.

Magento – Bypassing Fastly cache on specific page

The most important feature of any CDN/Cache server/provider is to reduce loading speed by delivering the requested content to a particular user, in a closer location; instead of serving the content from the original server, at a larger distance.

This is exactly one of the main goals of Fastly, that is specially optimized to be used with Magento; however there might be certain requirements, on a certain page, in which you are forced to bring all the newest data from the original server (remote server), for ensuring only the new data is served. Unfortunately, disabling Fastly Cache/CDN is not an option, because the server speed will be downgraded; so how to serve non-cacheable data only without affecting performance? 

Luckily, Magento and Fastly provide a way for bypassing Fastly cache for only specific pages. This means that Fastly will still work normally for the whole site except for the pages you decide not to cache.

The above is easily configured in

Stores->Configuration->Advanced->System->Full Page Cache

If Fastly is configured in your server you should see “Fastly CDN” after expanding “Full Page Cache”. Then on Fastly Configuration->Custom VCL Snippets, click on Create Custom Snippet and create a similar snippet as follows:

Set the Name, Type and Priority as your own discretion. The key field is the VCL, in which in this example we set it as follows:

if (req.url ~ “redeximp/import/redimport”) {  return (pass);}

The above snippet means that in case the user is accessing the web path redeximp/import/redimport Fastly cache should be bypassed (skipped). 

Finally, after saving, in Automatic Upload & Service Activation click on Upload VCL to Fastly for applying the changes.

And that will be all; you will have more control on how Faslty behaves in your store, providing more tools for providing a better developer/user experience.

Magento Page Builder – Fix Warning on Save

Since version 2.4.3, Magento includes the Page Builder module in both Commerce and Community Editions, empowering merchants to create rich content by themselves or allowing them to quickly design quick mockups for testing before escalating to any development team.

By making Page Builder open to all editions Magento is encouraging developers to extend the Page Builder functions, sometimes forcing developers to explore deeper into the code when the extended function or behavior differs from the original.

It might be possible that after working with Page Builder the following message is displayed after saving some element that contains a Page Builder content:

This message of “Temporarily allowed to save HTML value that contains restricted elements. Allowed HTML tags are:…” represents a warning message, not an error. The Page Builder is working normally, but the validator is telling us to be careful with content that is not expected by the validator, located in Magento\Cms\Model\Wysiwyg\Validator in the following line

$this->config->isSetFlag(self::CONFIG_PATH_THROW_EXCEPTION);

try {

   $this->validator->validate($content);

} catch (ValidationException $exception) {

How to fix the warning message?

Step 1:

Log the $content variable, check what kind of html content is saving and take note of all the div and attributes elements being used.

Step 2:

On your module vendor/module/etc/di.xml create a Virtual Type called DefaultWYSIWYGValidator and provide all the allowed tags and attributes used by your Magento app:

<virtualType name=”DefaultWYSIWYGValidator” type=”Magento\Framework\Validator\HTML\ConfigurableWYSIWYGValidator”>

   <arguments>

       <argument name=”allowedTags” xsi:type=”array”>

           <item name=”div” xsi:type=”string”>div</item>

           <item name=”a” xsi:type=”string”>a</item>

           …

           <item name=”b” xsi:type=”string”>b</item>

       </argument>

       <argument name=”allowedAttributes” xsi:type=”array”>

           <item name=”class” xsi:type=”string”>class</item>

           …

           <item name=”id” xsi:type=”string”>id</item>

       </argument>

       <argument name=“attributesAllowedByTags” xsi:type=”array”>

           <item name=”div” xsi:type=”array”>

               <item name=”data-content-type” xsi:type=”string”>data-content-type</item>

              …

               <item name=”data-content” xsi:type=”string”>data-content</item>

           </item>

           <item name=”ul” xsi:type=”array”>

               …

       <argument name=”attributeValidators” xsi:type=”array”>

           <item name=”style” xsi:type=”object”>Magento\Framework\Validator\HTML\StyleAttributeValidator</item>

       </argument>

   </arguments>

</virtualType>

Step 3:

Refresh cache

bin/magento cache:flush

After this the warning message will not be displayed anymore because the validator is already recognizing all the possible html elements introduced by the new changes. Improving the general experience of using Page Builder.