Spend More Save More Magento Coupon Creation

Spend more save more magento coupon tutorial banner

In this article, we’ll briefly go over the method and concept of setting up a multi-tiered promotion using Magento’s Shopping Cart Price Rules promotion creation. In this case, the desired promotion is:

  • Spend $100, get 10% Off
  • Spend $200, get 20% Off
  • Spend $300, get 30% Off

For this set up, we will only go over the necessary fields. Please see our Overview of Shopping Cart Price Rules, for a more detailed explanation of all the available fields and their functions.

Unfortunately, Magento doesn’t offer a simple option for such a multi-tiered discount, so we need to create three separate coupons. Using the rules available to us we will set up three, exclusive shopping cart rules that apply 10% off orders over $100, 20% off  $200+, and 30% off $300+ orders. Theoretically you could also also apply non exclusive rules that add a fixed discount percentage each time someone reaches another amount (i.e. 10% off $100, $200, and $300 NON-exclusive), but this complicates the promotion unnecessarily in our case. Our method assumes that this is the sitewide promotion for the moment and that it cannot be combined with further promotions or coupons.

The actual set up for this promotion is relatively simple. The three rules we’ll create for this promotion are:

  1. 10% Off $100
  2. 20% Off $200
  3. 30% Off $300

Each rule will be set up nearly identically, with the obvious differences in spend / discount and a difference in priorities to prevent all three rules from applying at the same time.

To begin, go to Promotions > Shopping Cart Price Rules > Add New Rule

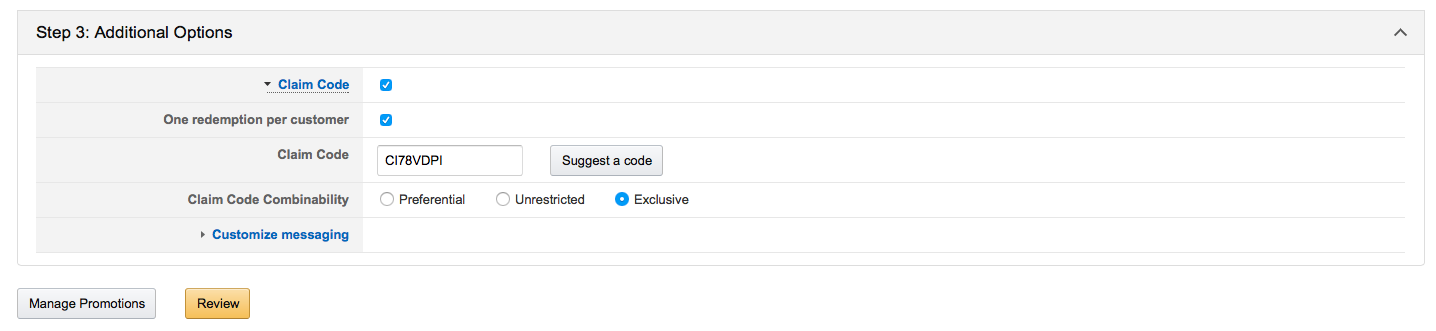
Rule Information Tab:

The screenshot below shows how we set up the Rule Information tab for the first rule. Most fields here are self explanatory. As this is a site-wide sale, we’re assuming that we have banners, emails, and/or other marketing that’s alerted our site users to the promotion, making a coupon unnecessary.

Note- the Priority Field. For our promotion it is important that we create a higher priority (lower number) for each successive amount of money spent. In our example we choose an arbitrarily high number (low priority)  to begin with and assign decreasing numbers to each tier:

  • Spend 100 get 10% off: Priority- 33
  • Spend 200 get 20% off: Priority- 32
  • Spend 300 get 30% off: Priority- 31


magento promotions rule information tab 10% off

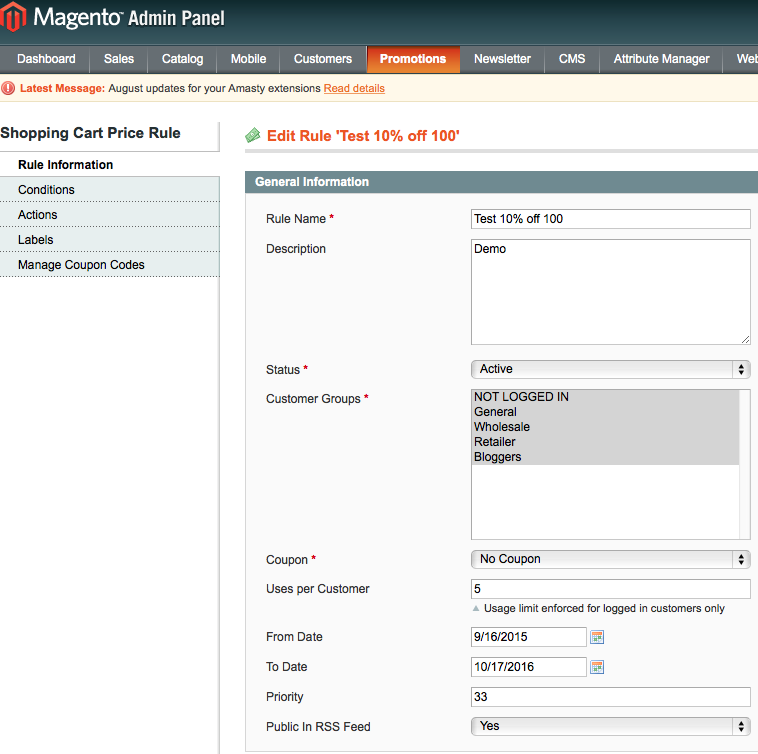
Priority is the only field that will vary in this tab between our three rules.
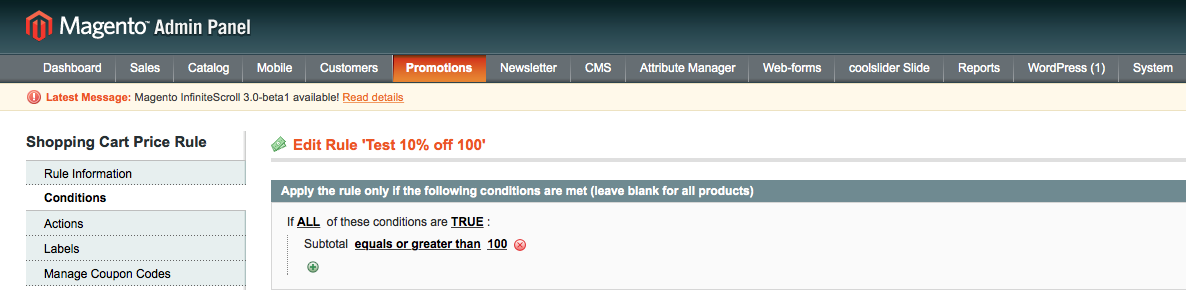
Conditions Tab:

In this tab we specify what conditions are necessary for each price reduction to go into effect. The three rules will be as follows on individual promotion rules:

If ALL of these conditions are TRUE

  1. Subtotal equals or greater than 100
  2. Subtotal equals or greater than 200
  3. Subtotal equals or greater than 300
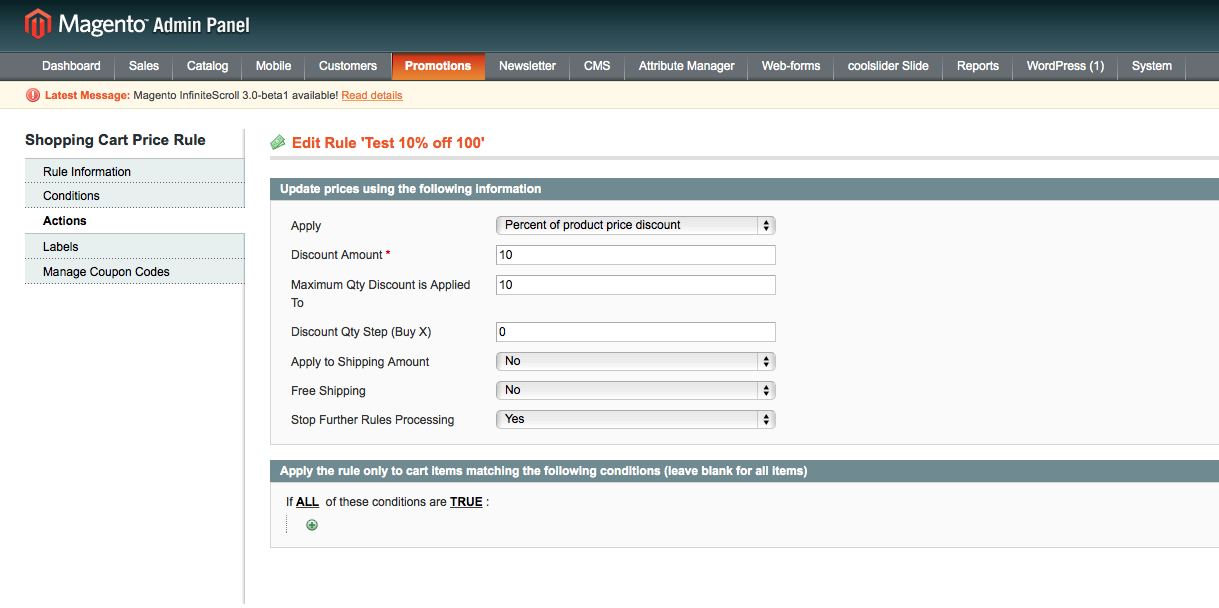
Magento Promotions Rule - Conditions tab

Actions Tab:

This tab defines what will occur if the conditions in the previous tab are met in the shopping cart. All three rules will be set up as Percent of Product Price discount under the Apply dropdown menu. After that we will fill out the Amount tab according to each tier (10, 20, and 30).

NOTE- in order to have the Priorities that we’ve set have any effect we need to set Stop Further Rules Processing to YES. If this were not done, a purchase of over $300 would have %10, %20, and %30 discounts all applied
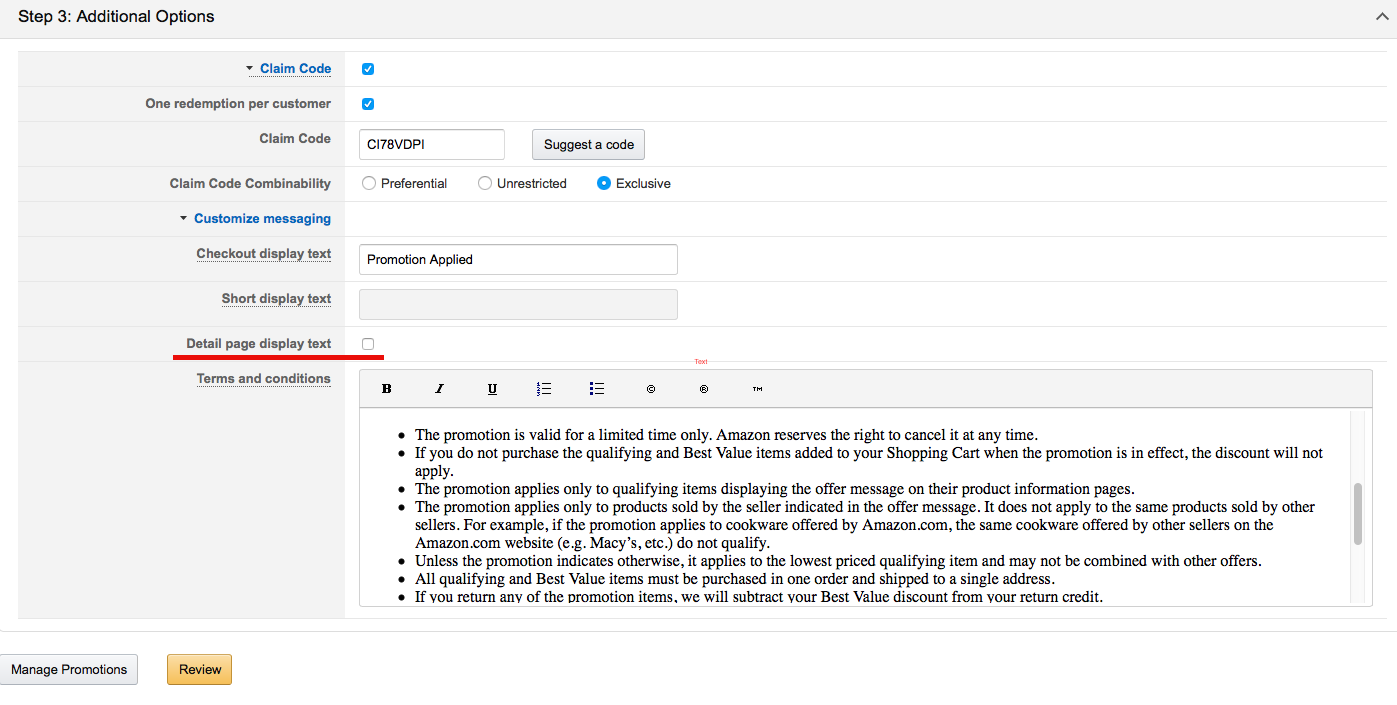
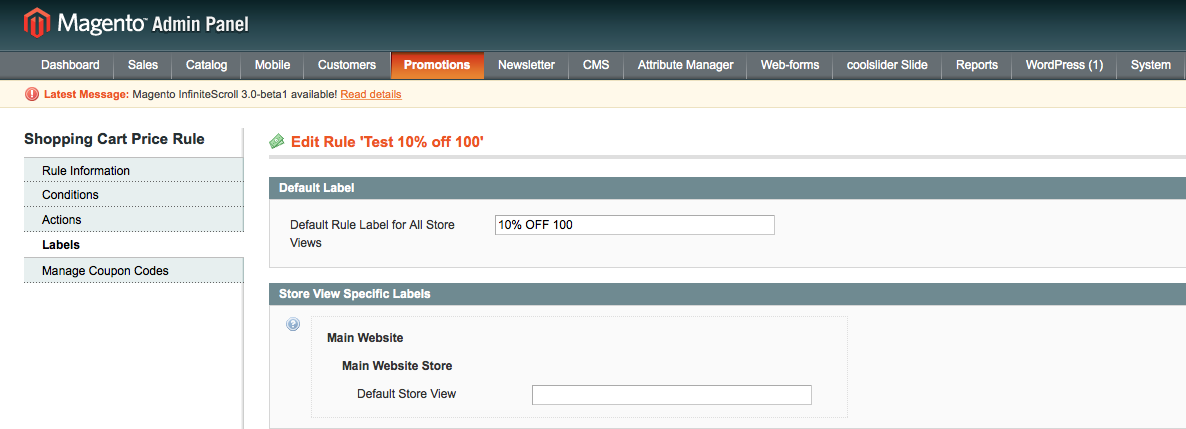
Magento Promotions - Actions Tab Demonstration


Labels Tab:

This tab allows you to name your promotion as it will appear on the front end. Note that exactly where and how this displays (or doesn’t) is dependent on the unique construction of each site. In our case we can give each rule a label describing it’s discount because the rules will not be applied simultaneously.


Magento Promotions Demostration - Labels Tab


Finally, the Manage Coupon Codes tab is unnecessary as we did not choose the coupon option under Rule Information.


Once you’ve set up these three rules you should have the desired promotion ready to go and advertise. As a recap, we’ve set up three separate rules with identical logic, but each with a marginally higher discount according to higher amounts spent. The key factors for this promotion are the Priority numbers assigned to each of the three rules and that Stop Rule Processing is set to YES in all three instances.

A final note: always be sure to test any promotions in the most safe manner possible. If you don’t have access to a test site, try out promotions with insignificant (but test-able) percentages or amounts, and test them at times when you know that your site traffic is lowest.

See more about Price Cart Shopping Rules Fields Here.

Shopping Cart Price Rules Fields Overview

magento promotions shopping cart price rules overview bannerTo accompany our example of a multi-tiered (spend more, save more) promotion set up in Magento, we’ve created this brief description of the Shopping Cart Price Rules fields and their functions. When setting up promotions, or making any changes for that matter, be sure to test thoroughly before you leave it to run on its own. If you don’t have a test site to do so, try creating first creating promotions that are not very drastic and setting them Active during hours of the day when you’re least likely to have site traffic.

Fields Overview:

Tab: Rule Information

This tab contains general rules including timeline, groups that the promotion will apply to, internal description, and other broad rules.

It includes the following fields (mandatory magento fields always marked with asterisk):

Rule Name: This is for internal use only (i.e. 30% off Labor Day Sale). Rule Name will appear on your Promotions list so include enough detail to distinguish promotions as the list number increases.

Description: Not a mandatory field, but this is your opportunity to spell out the rules of the promotion in plain English for future reference for yourself or others.

Status: Active or Inactive, determines whether your promotion is applied on your site.

Customer Groups: If you have different customer groups and access set up on your site, this field allows you to limit a promotion to only specific groups (e.g. Members Only Sale).

Coupon: Magento offers you the option to choose No Coupon or Specific Coupon

  • No Coupon: Select this option to apply the promotion to all eligible site users (e.g. general sales)
  • Specific Coupon: Allows you to enter the coupon code of your choice. Use this option for targeted promotions, reachout, or any discount you’d like to provide to a limited number of customers.
    • If you choose Specific Coupon option, you’ll have the further option to Use Auto Generation. If selected, Magento will auto generate codes which you can then manage and distribute.

Uses Per Coupon- Depending on your business and the scope of your promotion, use this field to limit uses per your wishes or set to an arbitrarily high number to–in effect–have no limit until the promotion expires or is manually ended

Uses Per Customer: Again, this very much depends on the manner of the promotion you are running. Set according to your wishes.

  • Note: This will be tracked according to customer accounts. If you are trying to limit a coupon to say, only one use, do not use this field. Not only can the coupon be shared but multiple accounts can be created by customers.

From Date: Allows you to specify start date of your promotion. Note that whether a promotion is Active or not is independent of this field. If you plan to set a future start date, set your promotion to Active AND enter a From Date.

To Date: Allows you to specify the end date of your promotion (ending a minute before midnight on the date entered).

Priority: This field is important when running multiple promotions, and essential to creating Multi-Tiered spending promotions (i.e. spend X, get Y% off; spend 2X, get 2Y% off).

The lower the number entered here the higher the precedence/priority in the application of your promotion.

In our three-tiered example we choose an arbitrarily high number (low priority)  to begin with and assign decreasing numbers to each tier

  • Spend 100 get 10% off: Priority- 33
  • Spend 200 get 20% off: Priority- 32
  • Spend 300 get 30% off: Priority- 31

The Priority number you assign promotions will depend on the size and nature of your business and promotions. As a general rule, the less your promotion is limited in scope, the lower number you can assign to it.

See related field Stop Further Rules Processing


Tab: Conditions

This tab contains the essential rules or criteria that must be met in order for your promotion to apply.

The rules are fairly easy to set up, and allow for a virtually endless list of conditions.

Generally, by selecting If All conditions Are True you can endlessly narrow down the promotion by product # /products / product attributes / total cost / and so on.

By selecting If Any Conditions are True (or False) you can cast a wider net, allowing you to choose multiple products or price ranges.

In our example, we have a very simple rule set up for the 2nd rule in our three-tiered Spend X, Save X example: the promotion will apply if the customer’s subtotal is equal to or greater than $200.

magento manage promotions conditions tab


Tab: Actions

In the Actions tab, you are able to define what happens IF the rules in the Conditions tab are met. It further contains a section that allows you to apply extra conditions to items in the cart, narrowing to specific categories, prices, and more as needed. In our example, we leave this section blank as we have no need to further narrow the application of the promotion.

Section- Apply: Has four, relatively self-explanatory options for what kind of discount is applied in your promotion:

  • Percentage of Price Discount: Allows you to enter a percentage that will be taken off of the subtotal in the Discount Amount field below. In our example, we use this field to create 20% Off
  • Fixed Amount Discount: Allows you to enter a fixed monetary amount (in the next field) to be taken off of products that you define in the second section of this page. If left blank, it will apply to all products that have met the criteria in the Conditions tab.
  • Fixed Amount Discount for the Whole Cart: Allows you to enter a fixed monetary amount to be taken off of products that you define in the second section of this page. As stated, this rule applies to the entire cart.
  • Buy X get Y free (discount amount is Y): Allows you to set up a rule specifying number of item(s) X purchased in order to receive number of items(s) Y free.

Discount Amount: This field is the percentage or fixed amount discounted depending on the Apply action you selected in the step before. In our example, this is where we specify 20 for 20% off purchases over $200.

Maximum Quantity Discount is Applied to: Allows you to limit the number of products that can are discounted if stock or margins are low.

Discount Qty Step (Buy X): This section is where you specify the amount of product X purchased in order to receive product Y if you’ve selected the Buy X get Y free (discount amount is Y) Apply action.

Apply to Shipping Amount: Determines whether the price rule, if a percentage or a fixed number that exceeds subtotal will apply to shipping costs.

Free Shipping: Simple yes/no option to offer free shipping with your promotion (or as your promotion).

Stop Further Rules Processing: This is an important field when running simultaneous or complimentary promotions. Selecting Yes  prevents any further promotions from applying on top of the one you’re creating. When this is the case, it is the Priority  numbers assigned to each promotion that will determine which one ultimately applies. 

In our multi-tiered example, we set this to Yes. Otherwise, using three separate promotions for one “Buy 100 get 10%, Buy 200 get 20%, Buy 300 get 30%,” each rule would apply to a purchase of over $300 dollars, effectively becoming %50 Off.

The second section under this tab is “Apply the rule only to cart items matching the following conditions (leave blank for all items)” – This is where you you specify what items the promotion will actually apply to, as opposed to the Conditions tab, which specifies which items (amounts, etc.) activate the promotion in the first place. It has essentially the same logic rules available as the Conditions tab, and can be used exclusively or in combination with Conditions depending on the specific  promotion you would like to create.

shopping cart price rules actions tab shopping cart rules

Tab: Labels

This section is where you give your promotion the title that you would like site users to see. Whether and where it shows up will depend on the way your site is constructed, but will usually appear on the checkout page.


Tab: Manage Coupon Codes

This section is fairly self-explanatory and, of course, only applies if you’re using a promotion that requires a coupon. It is primarily for coupons that you want to closely manage. E.G. a small number of unique coupons to provide to a few exclusive reviewer, in most cases it’s easier and more manageable to enter a single coupon code under the Rule Information tab.

Coupon Quantity: Determines how many coupons will be created.

Code Length: Length of the coupon to be generated.

Code Format: Alphanumeric, Alphabetical, or Numeric.

Code Prefix / Code Suffix: Manually add a set prefix or suffix for organization and management of multiple unique codes.

Dash every X characters: Insert a dash in order to make your coupons uniform with another system or extra unique

Providing Exclusive Discounts on Amazon

Banner for amazon promotions article

Many vendors on Amazon find themselves needing to provide a discount on one or more of their products to a specific person or group of people. A prime example of this would be when a vendor would like to offer a discounted or free product in exchange for increasing product exposure and getting reviews. Not only can using a promotion such as this allow you to increase your reviews but, those reviews will be “verified purchases.” As an added bonus, your products will likely receive a bump in sales which is always valuable, no matter how small.

Offering this discount is a pretty simple process with your Seller Central account. Below is a short step by step guide to creating a basic discount that you can share with a select group of customers:

Once logged into Seller Central, go to Advertising > Promotions:

Amazon Seller Central Promotions Page

On this page, you’ll select the “Money Off” option, which will take you to the promotion details page:


Amazon Money Off Promotion Page

Most of these fields are pretty self explanatory. For this example lets say we want to offer one newly-released products for free.

Step 1: Conditions


  • Buyer Purchases – in this case I will select “At least this quantity of items” and “1,” as I want the recipients of this promotion to receive it without buying multiple products.
  • Purchased Items – for our purposes I will create a product selection that includes only the product I want to offer. After clicking on the link “Create a new product selection” to the right of this field you’re able to create a selection based on SKU, ASIN, and more.
    • If you add multiple items to your selection, based on these conditions, anyone purchasing any one of the items in your product selection will be eligible for the discount.

Amazon Promotion Product Selection Creation


  • Buyer gets – gives you the option to discount by either a percentage or fixed amount. The simplest way to offer a product for free is to simply select “Amount off (in$)” and input the full price of the product.
  • Applies to – for our purposes we will select “purchased items,” meaning that it will apply to item(s) we set up in the purchased items field.
  • Advanced Options – gives you the option to exclude subsets of your catalog, but is not relevant for our purposes of offering a promotion on one item.

Step 2: Scheduling:

This section is also very clear in terms of filling out conditions, offering you a time span with a start and end date and time.

  • It’s a good idea to set the time span to a period that you know you’ll be able to easily monitor, particularly because Amazon requires that discounts be set up at least four hours in advance. You should plan ahead to be sure that you can check that the discount is active when it should be.
  • Internal Description is solely for you. A simple description will do. i.e. “Product X Review Giveaway.”
  • Tracking ID – Again this is for tracking purposes, and may not be very important unless you have large scale sales and promotions on Amazon. This field is automatically filled out by Amazon with a default ID.

Step 3: Additional Options:

This is the section where you are able to confine the discount to only a select number of people that you’ve shared it with.

Click the checkbox next to Claim Code to see the following options:

discount code for amazon coupon

  •  One redemption per customer – be sure to select this checkbox to avoid giving one customer hundreds of free products.
  • Claim Code – Amazon will give you a randomly generated. You will need to go to “Manage Claim Codes” to generate a specific number of one-time use codes (See step 4). Otherwise, if you choose to use this code, it will be restricted to one user but users will be able to make the code public.
  • Claim Code Combinability – in this case we will select “exclusive,” due to the fact that we are offering a free product. This is generally a safe selection unless you have multiple promotions running which you want to combine in custom ways.
  • Customize messaging – This field can generally be left in the default format. However, be sure to UNCHECK Detail page display text if you do not want anyone who views your product to take advantage of the discount.

amazon promotion private claim code setup

After reviewing and submitting, you’ve set up a promotion with a private claim code. As stated before, particularly with the delay in Amazon’s system, be sure to test your promotion when it is set to go into effect – both to make sure that it works in the checkout process and that you’ve set it up correctly and is not appearing publicly.

Step 4: Exclusive Claim Codes

At this point you can create a specific number of claim codes that can only be used once, rather than being restricted only by one use per user.

Click the tab Promotions > Manage Your Promotions  and select the promotion you’ve just created (be sure to check “pending” promotions).

Once you’re viewing the desired promotion, click on Manage Claim Codes. Here you have the opportunity to Generate Claim Codes which you can download from Amazon to provide to reviewers or other customers. As long as you’ve followed the proper steps when setting up your promotion, this will allow you to rest easy knowing that your codes are truly exclusive.

Good luck!