Amazon Headline Search Ads Overview

Headline Search Ads allow sellers to create banner ads that showcase up to three products and direct shoppers to a custom landing page built from your brand’s products. Keyword-targeted, these ads display prominently at the top of Amazon search result pages on both desktop and mobile.

Note that Banner Search Ads are only available to sellers who’ve been approved through Amazon’s Brand Registry.


At a Glance:

Pros:

  • Guarantee of best real estate when ad shows
  • Ability to showcase brand
  • Ability to showcase multiple products on landing page

Cons:

  • Higher cost per click than other ad formats
  • Not suited for product-specific, long tail keywords
  • Added click between first click and conversion


Amazon Headline Search Ads offer sellers a great opportunity to increase brand awareness, something that’s been difficult in the past for Amazon.

Where traditional search ads will likely be more effective at matching search intent to a specific product, Headline Search Ads allows sellers to showcase their brand (or a subset of its products) in a way that wasn’t available before. n opportunity to get a brand in front of people earlier in the conversion funnel.


How to Use Headline Search Ads

As we see it, most Headline Search Ad campaigns fall into two general categories:

The first strategy involves directing shoppers to a broader brand page–showcasing all or nearly all of your products–with a primary goal of building brand awareness earlier in the conversion funnel. Assisted conversions, rather than “last click,”  are the success metric here as shoppers view your ad’s creative content and begin to associate it with concepts or product attributes.

The second strategy is to create a product landing page with a cohesive set of products that all match the same set of search terms. This is useful if you have similar products which are not listed as variations, allowing you to get eyeballs on multiple product options at once. In this scenario,the ad campaign still aims to drive direct conversions as with traditional sponsored product ads, with a secondary benefit of better brand awareness.


Amazon Headline Search Ad Setup:

Similar to it’s Sponsored Product ads, Amazon makes Headline Search Ads very easy to get up and running. Instead of a step by step, it’s more useful to consider the elements that are available to the average third party or brand page owner:

1) Landing Page Products: Amazon allows you to select the products which will display on your campaign’s landing page (minimum of 3). Regardless of whether you’re pursuing a broader branding strategy or a more direct conversion strategy, cohesion is key to both in order to build a landing page that’s more effective. However, if pursuing the latter strategy of last click-type conversions, similarity among your chosen products becomes more important as each one needs to be able to meet one set of keywords/search terms.

Amazon Headline search ads landing page product selection

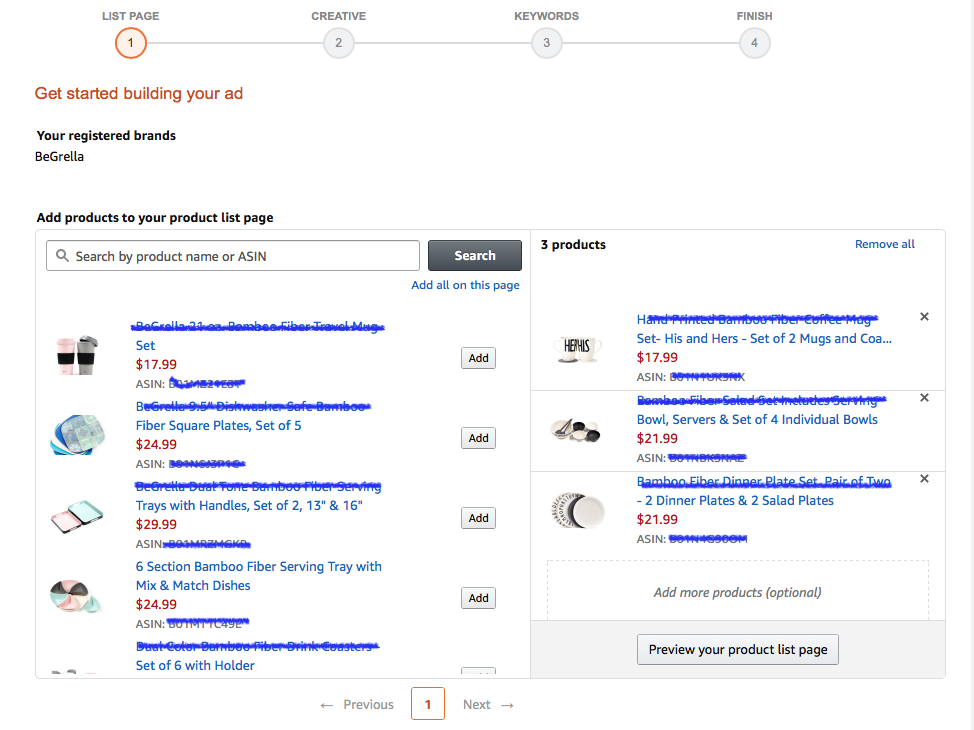
Build a cohesive product section for your campaign’s landing page.


2) Displayed Product Images: Amazon allows you to display 3 products as well as  a “Main Image” which displays to the left of your ad copy. The three products’ main product images will display as thumbnails along with the first 18 characters of their Amazon product name.

The Main Image, slightly larger than the product thumbnails can display either:

– The thumbnail of one of your three chosen products

– The thumbnail of a 4th product belonging to the same brand

– A custom image – a great opportunity to escape Amazon’s restrictive image requirements and get creative!

Keep in mind that only the Main Image and your ad copy will display on mobile.

3) Headline / Ad Copy: Sellers are given 50 characters for their Headline Ad’s copy. Your style here depends on your goal, but it’s good practice to include the primary search terms that you’re using for your ad (just as we all work to get those relevant keywords into our product titles).

In addition, you also have the option to edit your brand’s display name.

Product image selection Amazon Headline Search Ads

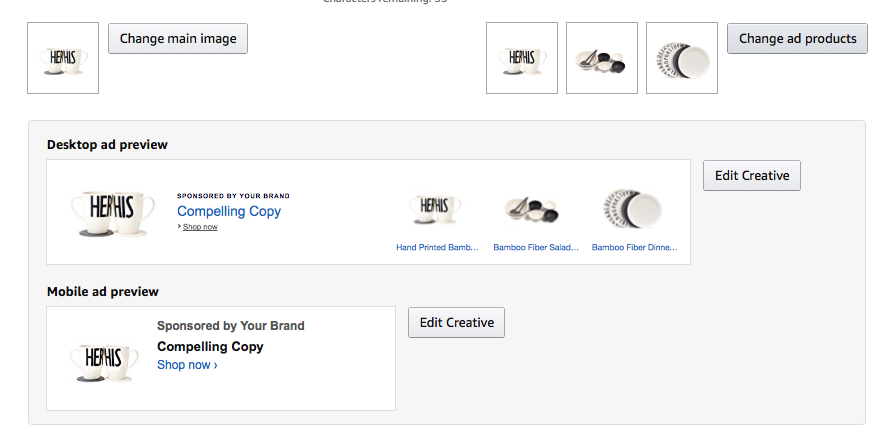
Select your product’s headline and product image display


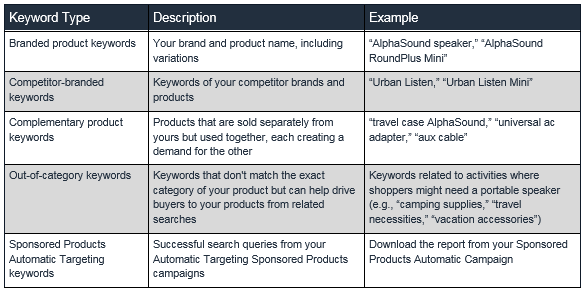
4) Targeted Keywords: Headline Search Ad’s keywords are set up using exactly the same interface as Sponsored Product ad campaigns. Aside from the additional consideration of branding benefits, keywords should follow the same best practices as any other ad campaign, namely relevance, relevance and relevance. Choosing one set of target keywords for multiple products means this is worth extra consideration, A/B testing, and monitoring in the case of Headline Search Ads.

Amazon’s guidelines for HSA keywords are as follows:

amazon keyword guidelines headline search ads


For more on what Amazon has to say about Headline Search Ads, check out the following links:

1) Headline Search Ads Optimization Tips (Amazon)

2) Headline Search Ads Overview (Amazon)

Configure Zabbix Alert Scripts

zabbix alert scripts banner

Steps:


  • Create Jabber Script
  • Test from terminal
  • Configure Zabbix to use Jabber script
  • Create Email Script
  • Test from terminal
  • Configure Zabbix to use phpmailer script
  • Tell Zabbix to notify
  • Flap a server to verify operation

jabber.sh is a replacement for the built-in Jabber/XMPP functionality within Zabbix.  You may need to install ‘sendxmpp’ prior to installation.  This is functional in an Ubuntu Xenial server installation, but the path may vary for CentOS/RHEL deployments.

Contents of /usr/lib/zabbix/alertscripts/jabber.sh:


#!/bin/bash
to=$1
body=$2


cat < $2
EOF


Adjust ‘user’, ‘server’ and ‘password’ accordingly for your particular setup.  The script should be owned by the zabbix user and have execute permissions set:

-rwxr-xr-x 1 zabbix root 288 Jun 16 05:11 jabber.sh

To test, simply execute the script like any other. Note the arguments passed into it:

# /usr/lib/zabbix/alertscripts/jabber.sh recipient@server message

If unable to send, try using sendxmpp outside the script and make sure it can send that way, then debug the script as required.

Your Zabbix should look like this:


zabbix setup 1

zabbix alert scripts screenshot 2

Note that the ‘Type’ of the media for the user corresponds to the name of the script we added earlier.

Email follows a similar procedure. Just make sure to have the necessary PHP modules installed. Below is the setup to use a gmail account:

Contents of /usr/lib/zabbix/alertscripts/phpmailer.php:


#!/usr/bin/php
require_once "Mail.php";


$from = "ZABBIX <user@domain>";
$to = $argv[1];
$subject = $argv[2];
$body = $argv[3];


$host = "ssl://smtp.gmail.com";
$port = "465";
$username = "username";
$password = "password";


$headers = array ('From' => $from,
'To' => $to,
'Subject' => $subject);
$smtp = Mail::factory('smtp',
array ('host' => $host,
'port' => $port,
'auth' => true,
'username' => $username,
'password' => $password));


$mail = $smtp->send($to, $headers, $body);


?>

Adjust ‘user’, ‘server’ and ‘password’ accordingly for your particular setup. The script should be owned by the zabbix user and have execute permissions set:

-rwxr-xr-x 1 zabbix root 572 Jun 16 12:26 phpmailer.php

To test, simply execute the script like any other. Note the arguments passed into it:

# /usr/lib/zabbix/alertscripts/phpmailer.php [email protected] subject body

Make Zabbix look like this:

zabbix-4


Note that the ‘Type’ of the media for the user corresponds to the name of the script we added earlier.

zabbix screenshot 5

Most important step!  This tells zabbix to actually use everything we just set up.  Once this is enabled, flap a server to give zabbix something to tell you about.  Check Pidgin and your email to see if it worked! 🙂


What does “Business Buyer” Mean in Seller Central Orders?

If you’re selling on Amazon, chances are that you may see the label “Business Buyer” next to an order number. This can appear in your Orders tab or in your Sales Reports.

business buyer order seller central

What does this label mean?

This label simply means that the buyer is registered with an “Amazon Business” Buyer account. From their end, this gives them access to extra features that aren’t included in normal Amazon accounts, including some extra flexibility, and analytics. Most importantly, business buyers have access to special pricing provided by sellers participating in the Amazon Business program.

What does this mean as a seller?

If you’re seeing multiple orders from Business Buyers, it’s a fair bet that you may benefit from being able to target this market with special pricing and several other advantageous features. If this is the case, you’ll need to apply as an “Amazon Business” Seller.

The business seller program has a higher bar for seller performance and asks that you be able to accommodate certain business purchasing needs (e.g. recognition of buyers’ tax status and provision of purchase orders).

However, the benefit of being able to offer lower prices to a higher tier of purchasers may well be worth the small hassle of application and qualification.


Registration and Qualification

To register as a business seller follow the below link (Note: Seller Central Accounts Only):

https://sellercentral.amazon.com/business/b2bregistration

The below Seller Central Link answers FAQ and includes the basic requirements for approval into the business seller program. As it requires logging in to Seller Central, the basic requirements are pasted below as well.

https://sellercentral.amazon.com/gp/help/201750810

In Amazon’s own words:

Who is eligible for the Amazon Business Seller program?

Sellers who have the capability to fulfill the following requirements of business customers.

  • High bar for performance. 
    Selling on Amazon Amazon Business Seller program
    • An Order-Defect Rate (ODR) of 1% or less. 
    • Pre-shipment Cancellation Rate of 2.5% or less. 
    • Late Shipment Rate of 4% or less. 
    • An Order-Defect Rate (ODR) of 0.5% or less. 
    • Pre-shipment Cancellation Rate of less than 1%.
    • Late Shipment Rate of less than 1%.
    • Few chargebacks, A-to-z Guarantee claims, and negative feedback.
  • If the seller participates in Amazon’s tax calculation services, the seller must honor the customer’s tax exemption through the Amazon Tax Exemption Program. 
  • There must be a tracking number on every business order package.
  • There must be a packing slip with every business order package.
  • There must be a purchase order number with every business order package.

Have any questions or feedback about this post or the Amazon Business program? Let us know below!

Differences between Facebook Subdomains in Google Analytics

When visiting Google Analytics and looking at Source / Medium -> search for: Facebook -> you’ll see Facebook referral traffic listed in up to four different types:

google analytics Facebook referral types

By typing Facebook in the filter search bar you can see the total facebook referral traffic. However, understanding what each link type is can give more detailed insight into referral traffic.

The four types of Facebook referral traffic will be displayed as follows in Analytics:

1) m.facebook.com – Referral traffic coming from a click in facebook mobile app.

2) facebook.com – Referral traffic coming from normal web link click in facebook.com

3) l.facebook.com – Referral traffic coming from a link shim link click. A link shim link is facebook’s internal system checking this URLs against internal and external blacklists of malicious or spammy sites.

4) lm.facebook.com – Referral traffic from link shim link on mobile browser.

Why do I care?

  1. Knowing whether your facebook referral traffic comes from desktop or mobile app is an advantage that it allows you to tailor your landing pages & content to the appropriate device(s).
  2. If you’re not seeing l.facebook, or lm.facebook referral links but you have good reason to expect them, check whether your site’s been blacklisted by Facebook..

Increase Your Email Open Rates *TIP*

email marketing open rates

Even with the ever-increasing number of online platforms to use for marketing campaigns, our experience is that email campaigns still provide a significant ROI for many of our clients.

Of course, the ultimate goal of an email campaign is to increase conversions, and that all starts with the open rate. There are a number of reasons that open rates can be low, but we’d guess that a significant percentage of unopened emails were not consciously ignored. Rather, they were received or seen at the wrong time of day, in the wrong place, or on the wrong device (and so on).

Here’s a (really) simple method to increase your open rates:

1) Compose your email and send it out to all of your users.

2) Wait 5 to 7 days and send out the same email with a new subject line only to your subscribers who did not open the initial email (easily segmented with any newsletter delivery system)

When sending or scheduling your second email, experiment with using a different time of day or day of the week (e.g. if initial email was sent during lunchtime on a weekday, try sending the second in the evening, if sent on a weekday, try sending on a weekend, and so on). This increases the chances that you’ll be getting your email in front of people who didn’t see or open the first one due to their schedule and circumstances.

As simple as this sounds, the potential increase in subscribers is well worth the extra couple of minutes it takes to segment, compose a new subject line, and send.

As always, let us know how this works for you!