Fundamental VPS Security Best Practices

Imagine that you are running a super busy physical store right in the middle of the city, who doesn’t want your money? Robbers and burglars are famous from the old age, that’s why you always have your security camera on 24/7 at your stores.

We are all now living in a world where everything is online, including your business (burglars are now online, too!). You already have your business running on the web, then what? Doing online business is not just about developing your site, conducting promotion for your products, and paying all the bills that you receive from the hosting company. The one important thing is also maintaining your website so no one will ruin your business.

Normally when you run an e-commerce website, you will either host your site under a shared hosting service, a VPS, or cloud. If you are on a shared hosting plan, you probably won’t worry too much about server security as it’s mostly gonna be done by the hosting company. But for VPS and cloud-based service (such as AWS), you will need to do everything by yourself.

This article will only cover security best practices for VPS / dedicated servers. As for cloud-based service, it’s gonna be a completely different article to write. 🙂

There are several things that you need to know about securing your servers. These are what we can think of at the moment. We won’t cover the details in this article, but we will tell you how to do it in the next articles.

  1. Securing SSH login
    SSH login is the first thing to secure because once an intruder gains access to SSH, then likely he can do whatever he wants. To secure it, we would always suggest this checklist:
    1. Disable password authentication for SSH, and use only key-based authentication
    2. Disable root login
    3. Change SSH login port from the default port 22
  2. Firewall

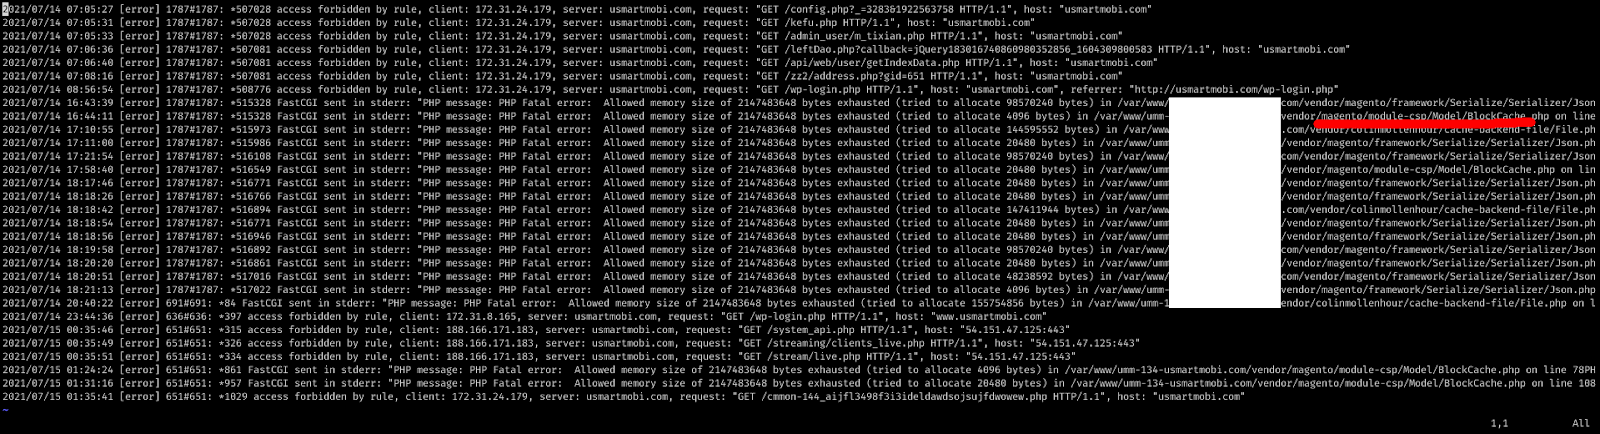
Firewall is also super important. We had a chance when someone said that his database server is completely empty. Later we found out that mysql port 3306 was publicly open and allowed public access. This was then likely the entry point of the hacker ransom bot by guessing username and password of mysql, removing all the database, then asking a certain amount of money to restore the database. If you don’t want this to happen, here’s what we suggest, all is done via iptables:

  1. Allow only specific IP addresses to SSH to the server
  2. Only open access to the services that you need, and close everything else
    For example if you only need a webserver on that server, then literally just allow port 80 and 443 (plus your SSH port if needed), and close everything else.
  3. Setup user access

Limit your user access. This is important because if someone gains access to your server by hijacking one of your server’s users, then he wouldn’t be able to do anything other than what you allowed him to. Some precautions that you can do are:

  1. Create login for each user that need to access the server
  2. Never do “sudo for everybody”
  3. Get rid of bad habit “chmod 777”
  4. Limit access for the services

Apart from the firewall, it is also a good habit that you also secure the server on its service / application level. For example, never add a mysql user for any host, never allow redis and elasticsearch connection from the webserver, and others.

  1. Do regular software update

Clear enough, and plus “unattended upgrade” would be very useful!

  1. Backup regularly!
    Pro tip: don’t rely on your hosting provider’s automated backup especially for your database. When your provider makes a backup of your server, the database service might be in an unstable state, and restoring it probably won’t work. Instead, make a backup script that will dump your database to a file daily, then you can restore from it when needed.

Plus, make sure that your backup is reliable and restorable!

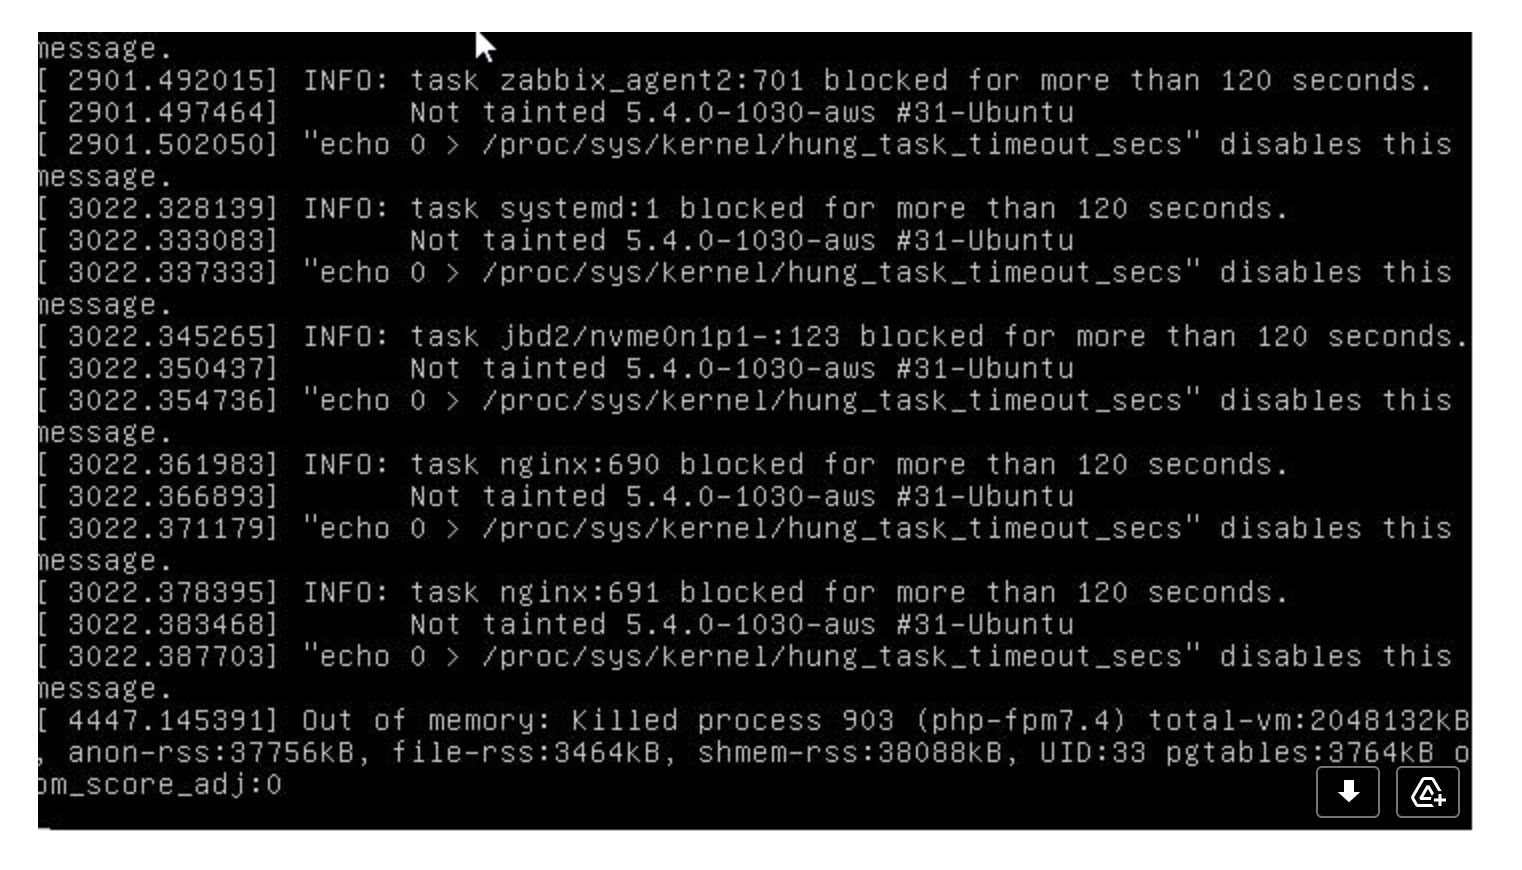
  1. Relax and monitor your server

Zabbix, nodeping, grafana, htop, lnav are your friends! Set them up properly and set alerts for what you like.

That’s mainly it for now, we will cover the details in the coming articles.

Tutorial: allowing SSH to docker container

We all must have heard about docker. It was built to make development, testing, and delivery easier and faster than ever, while not sacrificing security and performance. Here at Astral Web, we use docker pretty often and we really love it.

Normally, when we’re building apps in a docker environment, we only allow incoming connections to services that we need. For a magento app, we usually only have port 443 exposed to the host machine (or internet if needed), and everything else (database, redis, elasticsearch) will never be available on the internet. However, there might be some cases where you will need to add some additional services and connect to it via the internet.

Last week we got a request to allow SSH connections to one of our dockerized magento applications in our shared development server so that some third-party developer can help with some debugging. 

I personally don’t like to provide access to third party developers. So, when I really need to, I will do it super carefully. My other article will explain how to restrict SSH access on a traditional server environment.

Unlike in a traditional server, docker makes things easier. I can just add a few lines to docker-compose.yml file so I can enable SSH only for that specific docker container. Enjoy!

Via docker-compose.yml:

version: “2.1”

services:

  openssh-server:

    image: ghcr.io/linuxserver/openssh-server

    container_name: openssh-server

    hostname: openssh-server #optional

    environment:

      – PUID=1000

      – PGID=1000

      – TZ=Europe/London

      – PUBLIC_KEY=yourpublickey #optional

      – PUBLIC_KEY_FILE=/path/to/file #optional

      – SUDO_ACCESS=false #optional

      – PASSWORD_ACCESS=false #optional

      – USER_PASSWORD=password #optional

      – USER_PASSWORD_FILE=/path/to/file #optional

      – USER_NAME=linuxserver.io #optional

    volumes:

      – /path/to/appdata/config:/config

    ports:

      – 2222:2222

    restart: unless-stopped

Or, docker CLI:

docker run -d \

  –name=openssh-server \

  –hostname=openssh-server `#optional` \

  -e PUID=1000 \

  -e PGID=1000 \

  -e TZ=Europe/London \

  -e PUBLIC_KEY=yourpublickey `#optional` \

  -e PUBLIC_KEY_FILE=/path/to/file `#optional` \

  -e SUDO_ACCESS=false `#optional` \

  -e PASSWORD_ACCESS=false `#optional` \

  -e USER_PASSWORD=password `#optional` \

  -e USER_PASSWORD_FILE=/path/to/file `#optional` \

  -e USER_NAME=linuxserver.io `#optional` \

  -p 2222:2222 \

  -v /path/to/appdata/config:/config \

  –restart unless-stopped \

  ghcr.io/linuxserver/openssh-server

Main reference: https://github.com/linuxserver/docker-openssh-server

Dealing With Cloudflare’s False Positives

Cloudflare is a very powerful tool. You can use it to manage your DNS entries, adding an additional layer of security to your site, improving your site’s speed, and many other things. However, as with any other man-made creations, cloudflare isn’t perfect. In this article we’re gonna explain one of the problems that might happen when you are using cloudflare on your site.

When you are enabling cloudflare proxy for your site (see above image), cloudflare by default will apply some firewall rules to your domain so that (hopefully) you won’t get hacked. This feature works fine most of the time. But, sometimes cloudflare blocks legitimate connection requests. We had several chances where cloudflare blocked our own connection. That’s mostly because of WAF (Web Application Firewall) false positives.

If you have similar situation, then here’s what you can do to deal with such situation:

  • Add the client’s IP address(es) to the IP Access Rules whitelist. This is what we have done in our case, because we always use the same IP address.
  • Disable the WAF rule(s). You can see which rule blocks your request by going to your firewall summary, then simply disable the corresponding WAF rule. This is not the best solution because your overall site security is reduced.
  • Bypass the WAF with a Firewall Rule. You will need to create a custom Firewall Rule for this.
  • Disable WAF completely for specific traffic to a URL. You can configure this via Page Rules, but this is not good practice because you will lose all the WAF benefits.

That’s what we know so far. You can read more about it on Cloudflare documentation here.

Fastly CDN With Any Magento (Including Open Source and Commerce On-Premise)

Introduction

Magento generally is not known for the fastest one on the block but this has now changed. Starting from a couple years ago Magento suggested the use of Varnish on production for caching storage and it will significantly increase the speed of your Magento site.

Fastly in addition to its CDN and firewall capabilities, it also includes Varnish functionality. Fastly does mention that it uses Varnish as its core, so it’s basically an advanced and distributed Varnish server. Fastly accelerates the website speed with its CDN networks and caching storage. If Cloudflare is famous for its (free and) fast CDN, Fastly also integrates pretty well with Magento’s full page caching.

We know that Magento Commerce Cloud includes Fastly on its bundle, but now your self-hosted Magento Open source and Magento Commerce sites can also have Fastly. Read more to see how easy it is to configure Fastly for Magento Open Source / Commerce on-premise.

Requirements

Here are the things that you will need to integrate Fastly into self-hosted Magento:

  1. A running Magento 2.3 / 2.4 of Open Source / Commerce On-Premise edition with composer installed
  2. A basic understanding of Magento admin configuration (including cache cleaning)
  3. A registered account on https://www.fastly.com (we tested both free developer trial and paid accounts)
  4. A working Magento 2 Access Key https://marketplace.magento.com/customer/accessKeys/ 
  5. A Fastly Personal API Token with global scope: https://manage.fastly.com/account/personal/tokens 

Extension installation

Installing Fastly’s Magento extension is a straightforward process. Just like any other Magento extensions, you can do the following steps:

  1. Go to https://marketplace.magento.com/fastly-magento2.html 
  2. Select your magento version and checkout:
  3. Now login to your server and go to the root directory of your Magento
  4. Paste the access key in your auth.json file inside your magento install:
  5. Now execute sudo -u www-data composer require fastly/magento (see that I’m using sudo -u www-data to avoid messing with file permission)
  6. Clean magento cache with sudo -u www-data bin/magento cache:flush

Finished! Now you should be able to see Fastly module in Magento admin under Stores – Configuration – Advanced – System – Full Page Cache and you will have a new option called Fastly CDN under Caching Application:

Fastly basic configuration

In order to get your site served by Fastly, you will need to add a new Fastly service and a host. To create a new service, follow these steps:

  1. Login to your Fastly account
  2. Click on Create Service button right on the top right of your dashboard
  3. Insert the domain that you want to use then click Add

To create a new host, do the following:

  1. Click on Origins link on the left sidebar
  2. Insert the host IP address or the hostname, then click Add. Once you have the host configured, then you are ready to do the Magento extension configuration.

Magento extension settings

Once you’ve configured service and host on Fastly, you can go to Stores – Configuration – Advanced – System – Full Page Cache of your Magento admin and you will have a new option called Fastly CDN under Caching Application.

  1. Copy the service ID from your newly-created Fastly service to Fastly Service ID field
  2. Do the same thing for the Fastly API Token (described in the requirement section at the top of this article)
  3. Verify the details by clicking on Test credentials
  4. Save Config – Flush Magento cache
  5. After save, go back to the previous Fastly configuration, then click on Upload VCL to Fastly, tick on Activate VCL after upload, then click Upload
  6. Once again Save Config and Flush Magento cache

Fastly uses VCL for its service configuration. You can always write it by hand, but this Magento extension will do it for you. The only thing that you need to do is make sure to upload VCL after changing any Fastly Configuration.

At this point, Magento should be ready to work with Fastly but you won’t be able to test it until you update your DNS record as explained below.

DNS Configuration

Fastly acts as a proxy for your server. All web requests going to your domain will go through Fastly before actually reaching your server. This way, Fastly can apply firewalls, manipulate requests, filter traffic, and others. In order to do that, you will need to point the domain to Fastly hostname instead of your server directly. 

Fastly has several different hostnames that you can choose depending on your SSL/TLS configuration and/or whether you choose to limit your traffic to a certain network. More details here: https://docs.fastly.com/en/guides/adding-cname-records#choosing-the-right-fastly-hostname-for-your-cname-record

Friendly warning reminder: once you change the DNS, it literally means the traffic will start flowing through the new Fastly service. If you are on production, make sure that everything is good before you switch the DNS.

In short, if you don’t want to use Fastly TLS, then use nonssl.global.fastly.net.

If you need to try Fastly TLS without paying anything, use [name].global.ssl.fastly.net.

And if you already enabled paid account and want to use fully-working fastly TLS, use j.sni.global.fastly.net or k.sni.global.fastly.net.

More details here: https://docs.fastly.com/en/guides/adding-cname-records#tls-enabled-hostnames

Please note that once you change the DNS, it might take some time for the whole internet to propagate your new domain configuration.

If everything goes well, you will be able to start seeing live traffic statistics on your Fastly dashboard. Also, don’t forget that your Magento site is now blazing fast!

Fastly X Magento overview

Overall, we love Fastly. We have been using Cloudflare for our clients and we will also offer Fastly integration for our clients soon. Fastly offers something that Cloudflare doesn’t: seamless Magento integration. Based on our test, Magento running Luma theme can be fully loaded in nearly the blink of an eye. Magento has never been this fast.

Using Fastly is also a timesaver rather than configuring and maintaining your own Varnish server. You probably need to pay at least USD 50 / month for a Fastly paid account while you can build a Varnish server under USD 10 / month, but remember the maintenance cost and all the hassle that you will need to do in the future.

That cost consideration also come in to play when you need to enable something like Image Optimizer. Fastly has it, too and we have confirmed that it is integrated with the Magento extension pretty well.

If you have a need for speed for your high-traffic Magento, go with Fastly. Contact us for assistance and we’re ready to help.

Magento 2.4 CSP Module Issue

Recently we experienced a production project that We have one client that reported their production Magento site keeps having problems with random downtime that lasts for several weeks. Our client runs Magento 2.4.0 open source edition. 

In order to fix the issue, initially we checked everything and nothing seems strange with the server, nor with the Magento itself. There was only one small error complaining about PHP memory limit so we decided to increase PHP memory limit (slowly but we did it several times) up to 2G. This 2G is considerably too big for a Magento application, given how relatively small the site is.

At that point we already know that it is the Magento_Csp module that has been complaining about the PHP memory limit but we didn’t know that the fix needs something more than just increasing the PHP memory limit. Plus, the timestamps of the error log isn’t always 100% matched with the actual downtimes.

Our attempt to fix the problem isn’t over yet. After a few days the site keeps crashing randomly with similar errors. Same as previous occurrence, when downtime happens, Zabbix records that CPU and memory consumption goes high thus triggering out-of-memory (OOM) error and Linux system will start killing processes randomly. In this case, PHP-FPM is always in the kill list.

The strangest thing that we realized during the most recent downtime is that the disk usage was growing very quickly. In our case, about 15G of disk space was eaten in less than 2 hours, causing high IO and server collapsed.

We knew that the disk was being eaten by something, but we didn’t know what’s doing it. This then leads to a theory: something in Magento is writing something into the disk. This theory was supported by the PHP-FPM error log related to the Magento_Csp module which mentioned something about cache. Also we couldn’t think about anything else but the Magento cache.

A quick research gave us this: https://github.com/magento/magento2/issues/29964 and it turned out to be the exact same thing that we experienced. However, most people only complain about the OOM issue but there’s one guy who mentioned that the disk also got eaten.

If you are too lazy to read that whole github issue for the solution, here’s the summary of the solutions offered by the people there. Best if you can upgrade to the newer Magento version, at least 2.4.2. I know upgrading may not be easy for most merchants because you will need to make sure that all integrations are still functioning, so…. Fortunately if you have the Magento_Csp module sitting there from the default installation (and you’ve never done anything to it), you should be safe to disable the Magento_Csp completely

bin/magento module:disable Magento_Csp

bin/magento cache:flush

After disabling the module, we can now have a good sleep at night. Server is super quiet:

This solution works as a quick fix for that CSP problem, but probably scheduling a time for a Magento upgrade isn’t a bad idea either.