Magento Cloud – How to apply a patch to make corrections in the project

Nowadays, installing third-party packages through composer is a very common practice in any project. The code installed by composer is a public version of code from the Internet, which means that it cannot be arbitrarily modified.

In practice, it is inevitable that developers will encounter bugs in third-party packages, where no corrections have been released yet. By design, developers cannot directly modify the code downloaded from composer, because every time the composer is updated and installed the code will be overwritten by the public version again. In response to such correction requirements, Magento Cloud has designed patch mechanisms during and after the deployment process.

To apply a patch, developers need to create a patch file. Supposing that we want to add a line of comment as follows to the file vendor/magento/framework/Phrase.php:

First, create a copy of the file to be modified, in this case: vendor/magento/framework/Phrase-fix.phpvendor/magento/framework/Phrase.php to and copy it in the same root location as follows: vendor/magento/framework/Phrase-fix.phpvendor/magento/framework/Phrase-fix.php.

After modification, the following commands need to be executed in the project root directory as a root:

diff -rupN vendor/magento/framework/Phrase.php vendor/magento/framework/Phrase-fix.php > demo.patch

This command compares the original file Phrase.php with the new file Phrase-fix.php and generates a demo.patch file with the differences between them.

Then, open the demo.patch file for making adjustments:

First, add the git diff information and modify it to the original file change:

diff –git a/vendor/magento/framework/Phrase.php b/vendor/magento/framework/Phrase.php

index 3ee2rd7..8349152 111644

The index is a git hash, but it can be given arbitrarily since vendor files are usually listed in .gitignore.

Adjust the file path as follows:

— A/vendor/magento/framework/Phrase.php 2021-04-14 23:05:30.077087570 +0800

+++ b/vendor/magento/framework/Phrase.php 2021-04-14 23:05:22.469044185 +0800

At the end the adjusted patch file content would like as follows:

After this, the file patch can be placed into the m2-hotfixes folder in the cloud root project, if there is no such folder, it needs to be created.

The last step is to push the changes to the environment. After the deployment is completed, the patch should be applied successfully.

First, check the contents of the target file:

As expected, the changes have been added. In addition, Magento Cloud also provides tools to view the patch status by executing the following command:

php ./vendor/bin/ece-patches status

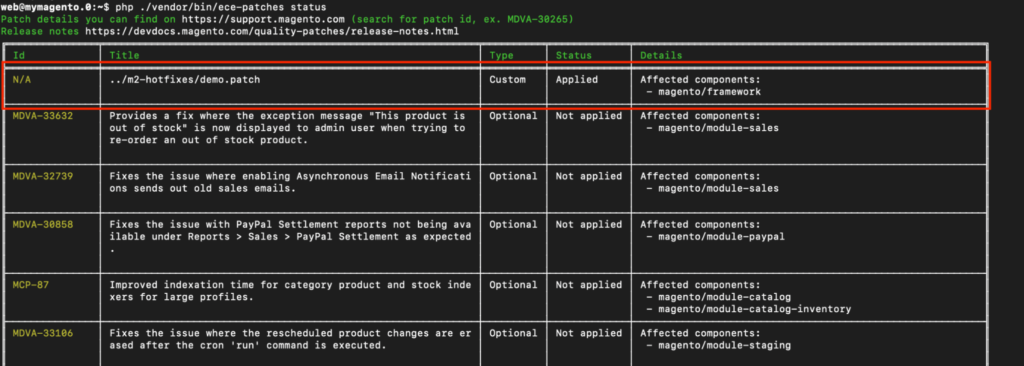
The patch file just uploaded will appear in the list, and it shows that it has been executed.

Besides this patch, there are many unexecuted patches on the list. These are some optional official patch files released by Magento. They are also easy to apply. For example, for applying MDVA-12304 and MDVA-30972 they need to be added in the .magento.env.yaml file as follows:

stage:

   build:

     QUALITY_PATCHES:

       – MDVA-12304

       – MDVA-30972

Then, commit the changes and push them to the environment for applying them. After redeploying the same command can be executed for confirmation: 

php ./vendor/bin/ece-patches status

After confirmation, the environment can continue working as usual; however, it is recommended to apply patches only if the regular Magento customization options (preferences, plugins, etc) are not convenient for the specific code and/or the 3rd vendor module provider has not provided any code update via composer.

Fixing .gitignore not working in git

Every time a developer requires to exclude/ignore files and/or folders, in a certain git repository, the .gitignore file becomes handy. However, sometimes git will not exclude files/folders added in .gitignore. The reason is that those resources had been committed before, without being noticed by the developer. In the following example, a new file test.xml has been added, so after executing git status the display will look like this.

Fixing this issue is quite simple by simple using the CLI, just as follows:

  1. Update .gitignore by adding the folder/files to be ignored, in this example test.xml will be added.
  1. Add changes and commit

git add .

git commit -m “Modified .gitignore file”

  1. Execute the following command to clear git cache for the whole repository

git rm -r –cached .

  1. After this, when executing the git status command git will not display test.xml as an untracked file.

From this point, every change to the text.xml will be excluded/ignored.

Changing Magento Cloud PHP version

Technology hardware and software are upgrading constantly, mostly in order to provide a better service and/or improve security, in the middle of this constant changing the PHP scripting language needs to cope with all these dynamic environments. 

Magento Cloud also facilitates changing the PHP version; providing more convenience to any DevOps team. 

When upgrading the PHP version, its version needs to be compatible with the Magento host version. The following table can be referenced for helping to determine the correct PHP version.

Adobe Commerce versionPHP version
2.3.57.2, 7.3
2.3.67.3
2.3.77.3, 7.4
2.4.07.3, 7.4
2.4.17.4
2.4.27.4
2.4.37.4
2.4.48.1
2.4.58.1

For changing the PHP version, the file .magento.app.yaml must be edited. For example:

Original service definition:

type: php:7.2

Updated service definition:

type: php:7.3

Commit the changes and push the changes for activating a redeploy:

git add –all

git commit -m “Changed PHP version”

git push <remote> <branch>

After redeploying open a tunnel via Magento CLI:

mgc tunnel:open

mgc tunnel:info

And check the service version for confirming the upgrade by SSH into the environment and check the PHP version:

php -v

After confirmation, the environment can be used as normal.

Images not loading in Magento Cloud Due to Cache Issue

By design, when the site administrator uploads a new product image, Magento will autogenerate all the image sizes and required cache folders inside the pub/media folder. After this, every time the frontend browses those images Magento will serve those cache folders, aiming for faster browsing times.

Magento Cloud architecture allows extra settings for handling those image cache folders; including the minimum persistence time on the cloud.

The .magento.app.yaml file, besides allowing to configure the PHP version, extensions, and relationships, also allows configuring how long the cache folder must persist in the cloud. Let’s consider the following example where the cache folder is being configured to be stored for at least 1 year.

“/media”:

            root: “pub/media”

         …

            expires: 1y

    …

This will assure that the cache folder will not lose any data for at least 1 year; however if after one year the environment is redeployed, it is possible that the images will not be displayed and the browse console will display a 404 error when attempting to load any product image.

For solving this issue and also, for renewing the cache folder for another year, the cache needs to be regenerated by accessing the environment via SSH and executing the following command:

php bin/magento catalog:images:resize

This command will regenerate all necessary images sizes and their corresponding cache resource inside pub/media. Also, after this, it is recommended to re-index and clean the cache.

php bin/magento indexer:reindex 

php bin/magento cache:flush

After this, all product images will be displayed normally.

Downgrading Magento Cloud Services Versions

Magento Commerce Cloud allows a service downgrade for any particular environment; the downgrade process is not as direct as upgrading, but it is still very convenient.

When downgrading a service, its version needs to be compatible with the Magento host version. The following table can be referenced for helping to determine the correct service version.

ServiceAdobe Commerce 2.4.xAdobe Commerce 2.3.5 ~2.3.9
elasticsearch7.7, 7.96.8, 7.5, 7.7, 7.9
mysql/mariadb10.2, 10.410.1 ~10.3
rabbitmq3.83.7, 3.8
redis5.x, 6.x5.x, 6.x

The easiest way for downgrading a service is by renaming it or creating a new one in the magento/services.yaml file. For example:

Original service definition:

elasticsearch:

    type: elasticsearch:7.7

    disk: 1024

Updated service definition:

elasticsearch2:

    type: elasticsearch:6.8

    disk: 1024

After that, the services relationship must be updated in the .app.magento.yaml file. For example:

Original service relation:

relationships:

    database: “mysql:mysql”

    redis: “redis:redis”

    elasticsearch: “elasticsearch:elasticsearch”

    rabbitmq: “rabbitmq:rabbitmq”

Updated service relation:

relationships:

    database: “mysql:mysql”

    redis: “redis:redis”

    elasticsearch: “elasticsearch2:elasticsearch”

    rabbitmq: “rabbitmq:rabbitmq”

Commit the changes and push the changes for activating a redeploy:

git add –all

git commit -m “Downgraded elasticsearch service”

git push <remote> <branch>

After redeploying open a tunnel via Magento CLI:

mgc tunnel:open

mgc tunnel:info

And check the service version for confirming the upgrade:

elasticsearch2:

    –

        username: null

        …

        type: ‘elasticsearch:7.7’

       …

After confirmation, the environment can be used as normal.