Magento API’s – SOAP, REST, and GraphQ – A Brief Explanation

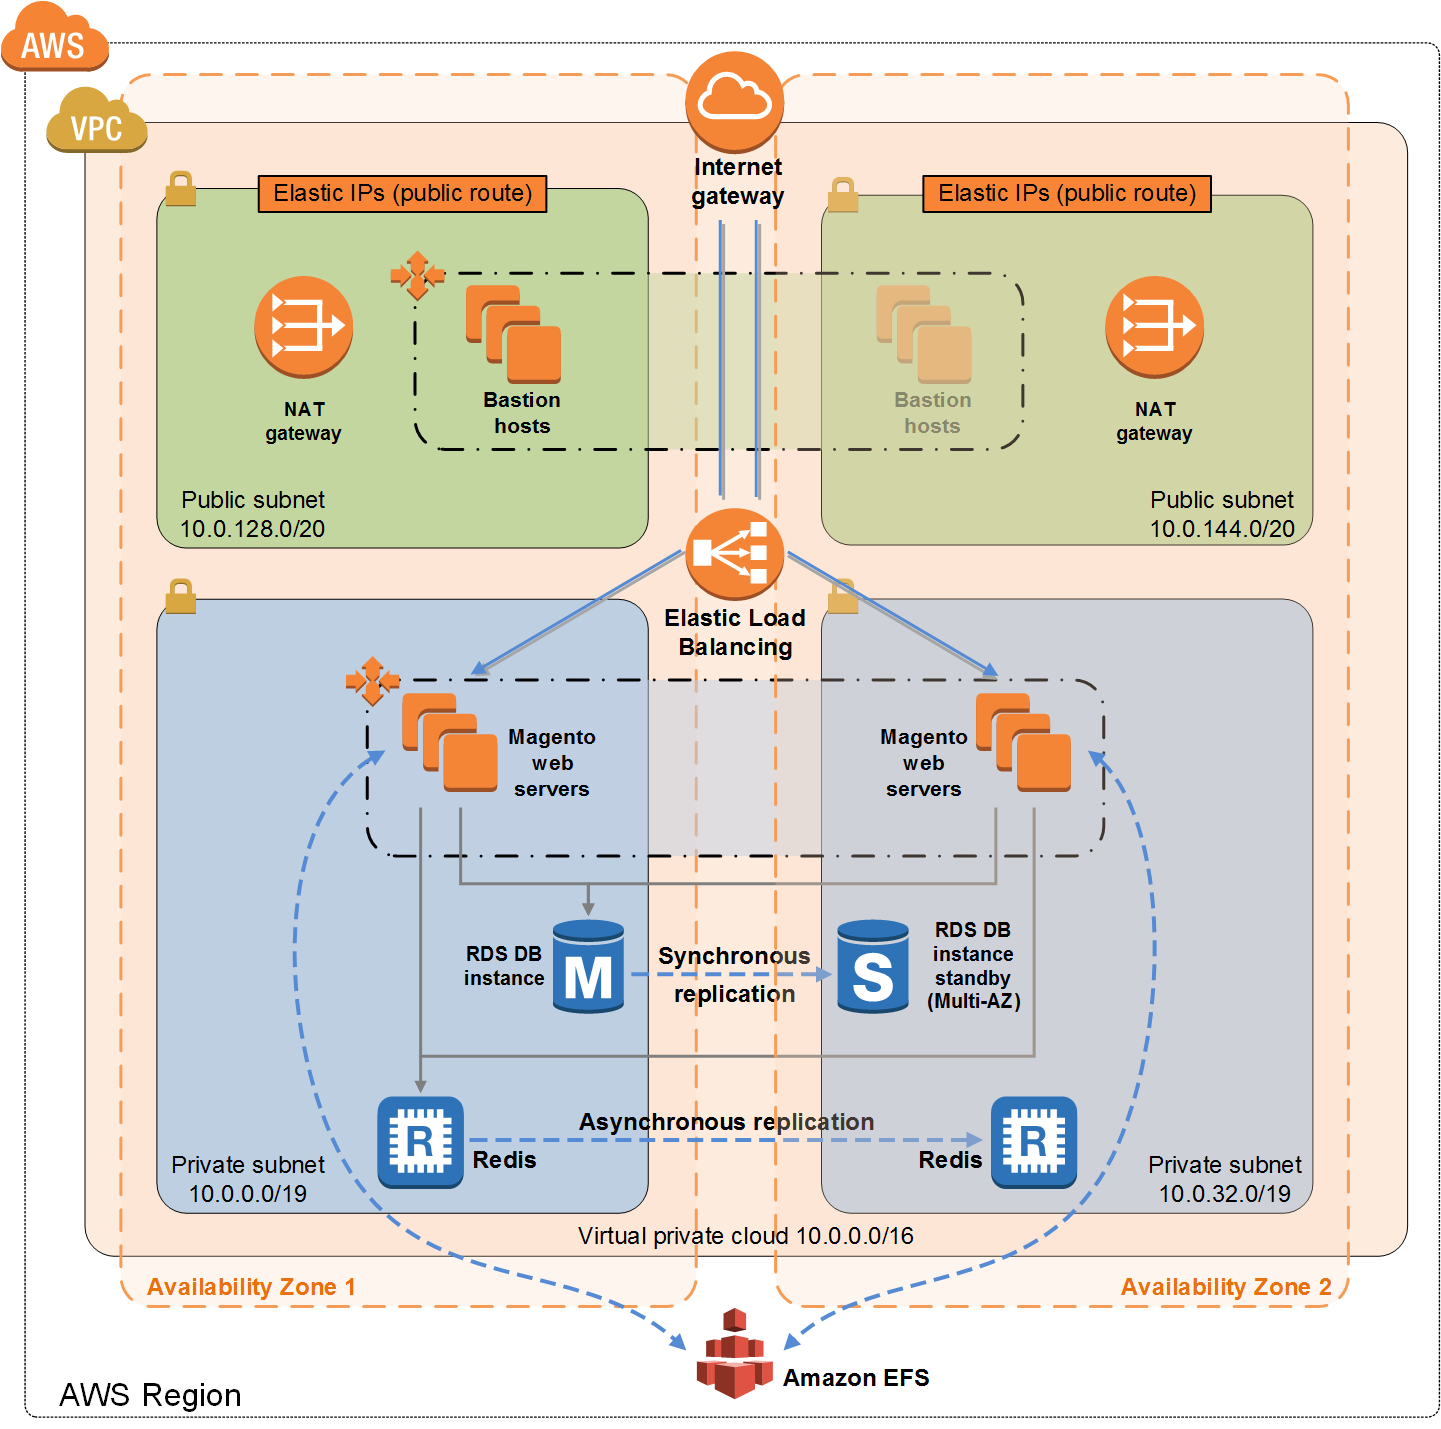
The main purpose of Magento is to allow merchants and clients to perform purchasing-related operations, but Magento also provides mechanisms for allowing external applications to communicate with it. 
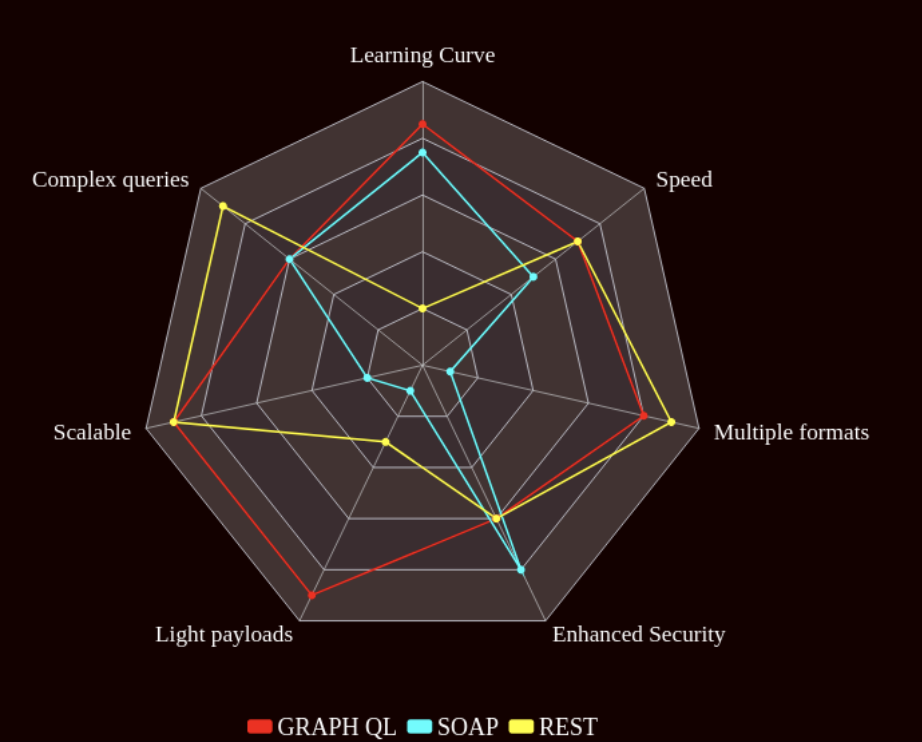
SOAP

This protocol is the least popular among all the protocols provided by Magento due to its complex learning curve. It is also the least flexible, because it only works with XML; not ideal for speed performance because the payload sizes tend to be big. 

However, the lack of flexibility ensures great security and tends to enforce a clear business flow when interacting with the API.

When to use it?

  • The project requires a very strict request logic.
  • Performance speed is not critical.
  • There is plenty of time for studying the protocol.
  • No need to scale in the future.

REST

At the moment of writing this article this is the most popular API protocol; so it is the most documented API, converting it into the entry point of many new developers into API development. 

Its messaging format is very flexible, allowing many formats such as JSON, XML, objects, Simple Text, etc.

Since it is the most popular API protocol, it is cache friendly in almost all web browsers and HTTP protocols; however, storing huge amounts of unnecessary data is the biggest flaw.

When to use it?

  • The project requires a simple API protocol that follows standard conventions.
  • Performance speed is not critical.
  • Very little time left in the project.
  • More suitable for complex database querying.
  • Scalability is required in the future.

Graph QL

The newest of the API provided by Magento, improves speed performance by only returning the info required; however, the learning curve is very steep; also, not suitable for complex querying, because it will reduce its original performance speed for handling nested queries.

When to use it?

  • Performance speed is critical.
  • No need for performing nested queries.
  • Need to update the project with the newest GraphQL technology.
  • There is plenty of time for learning/studying. 
  • Scalability is required in the future.

According to the documentation, Magento supports SOAP, REST, and GraphQL protocols, allowing almost any external system to communicate with its database/entities; however, when developing a new Magento API, the developer must understand how to choose the correct protocol for the right situation; at the end this will help a project to run smoothly.

Vuestorefront + Magento Implementation

Magento is cool and it has almost everything that you need for your online shops. But, many people complain about its speed, resource intensive, difficulty to maintain, etc. If you want to make your magento experience faster, you might need to burn more money for the server resources. But if you don’t want to do that, Vue Storefront might be an alternative.

“Vue Storefront is a headless and backend-agnostic eCommerce Progressive Web App (PWA) written in Vue.js” – quoted from their site. In theory, you can transform your magento to a PWA which should be able to perform like a native mobile app. So, if you want to make your Magento (especially, Magento 1) faster without spending too much money for the server upgrade, or; spending too much time upgrading to Magento 2, likely this is the answer.

We got a chance to help our major client to implement Vue Storefront to their existing Magento 1. The implementation is not that difficult and we’re on our way to make it happen. This article is gonna talk more about architectural implementations of it. 

AWS has a good reference on how to implement Magento on its cloud service (see pict above). It’s pretty standard architecture for Magento, though: load balancer (with optional autoscaling group), and the load balancer has several availability zone with its own independent services (multiple web servers, one single database, and one redis instance).

However, when you look at Vue Storefront architecture, there’s not so much difference. Vue Storefront will still use Magento to get what it needs via Magento API, then store the information in its own data storage (in this case it can be Elasticsearch or Redis).

This way, Vue Storefront will be the first server behind your load balancer that will process requests from the website’s visitors. Then, it will check on its storage (which is a lot faster because it uses no SQL) of the information that it needs, and return it back to your visitors. If the information doesn’t exist, it will finally request that information via Magento API. Behind the scene, Vue Storefront also does something cool to grab store info such as products, carts, orders, and others via Magento API regularly and store it on its own fast data storage. 

See that you will literally only need at least one additional server for Vue Storefront, one Elasticsearch, one Redis, and you are good to go!

In short, if you want to make your Magento 1 faster without spending too much time and money, Vue Storefront might be good for you. 😉 

Configuring Let’s Encrypt to reload Nginx / Apache2 after successful certificate auto-renewal

Let’s Encrypt is cool. It is more than enough for most of your SSL needs. Not only because it’s free, it can also automatically renew the SSL certificate for you (so theoretically you don’t need to do anything). You can always use Let’s Encrypt for your Nginx, Apache2, or anything else. One thing that you need to be aware of is that by default, it won’t reload / restart your web server after successful renewal. Then eventually, you will realize that your site is running under an expired SSL certificate while you see on the server that your certificate is still valid.

This problem isn’t a Let’s Encrypt bug nor the webserver’s. What you really need to do is just simply reloading / restarting your web server so it will load the newly renewed certificate. Otherwise, your web server will keep serving with the old expired certificate.

For Nginx, you can always do /etc/init.d/nginx reload, but you can automate it after successful Let’s encrypt renewal by using post_hook renewal parameter in your Let’s Encrypt domain renewal config. This way you can configure the post_hook configuration for each domain. Edit the file located at /etc/letsencrypt/renewal/yourdomain.com.conf and append post_hook parameter as below:

The second method, you can setup the renewal hook action for all domain by writing a simple script under /etc/letsencrypt/renewal-hooks/deploy/ and let’s name it with 01-reload-nginx. The full path is /etc/letsencrypt/renewal-hooks/deploy/01-reload-nginx.

Put this inside the file:

#! /bin/sh

set -e

/etc/init.d/nginx configtest

/etc/init.d/nginx reload

Then, save, and run the following command to make it executable:

chmod a+x /etc/letsencrypt/renewal-hooks/deploy/01-reload-nginx

Voila!

Fundamental VPS Security: SSH

In the previous article, we have listed some of the important things that you need to know about VPS security. In this second part, we’d like to dig a little bit deeper for securing your SSH.

SSH (secure shell) is a protocol to securely connect to your VPS over a non-secure network. Means, even if you are on a public wifi, your connection to the server will always be encrypted. We always put SSH security on the top of our security checklist because it is the most important thing to secure. If an intruder can gain access to your SSH, then he most likely will be able to read your files, put some malware, execute some commands, even use your computer resources for bitcoin mining or downloading illegal contents.

There are some prerequisites before we can change the config. All of the commands below need to be executed as root / sudo user.

First, you need to make a new user that we can allow them to SSH to the server, then we can disable root user login. So, let’s create a new user:

adduser john #adding user called John, follow the step and set the password

Then, generate a new SSH keypair for that new user. Remember that we’re gonna disable password-based SSH login. The SSH user needs to use the SSH key to login to the server.

su john     #login as the new user John

ssh-keygen  #and follow the prompts

Now you have the user and his keypair. Next, we’re gonna change the SSH config to secure it. There are at least three things that we normally do to ensure SSH security. What we’re really gonna do in this article is to edit /etc/ssh/sshd_config. Pretty simple.

So you can edit the config file:

vim /etc/ssh/sshd_config (or use any other text editor that you love) then, add these configurations below, or replace the existing ones (if any).

PermitRootLogin no         #disabling SSH login for root user

PasswordAuthentication no  #disable password-based authentication

Port 23232                 #you can change port number to anything here

Lastly, restart the SSHD service and you’re done!

systemctl restart sshd.service

Now you can test SSH login. Copy the private key that you generated on the server to your local machine. The file is usually located at /home/username/.ssh/id_rsa, so in this tutorial it should be /home/john/.ssh/id_rsa. Copy the content and put it somewhere in your local machine.

Then, try to login via ssh:

ssh john@your_domain_or_ip_address -p 23232 -i /path/to/your/copied/private/key

Now your SSH should have better security! Keep in mind not to share your private key to anyone.

Fundamental VPS Security Best Practices

Imagine that you are running a super busy physical store right in the middle of the city, who doesn’t want your money? Robbers and burglars are famous from the old age, that’s why you always have your security camera on 24/7 at your stores.

We are all now living in a world where everything is online, including your business (burglars are now online, too!). You already have your business running on the web, then what? Doing online business is not just about developing your site, conducting promotion for your products, and paying all the bills that you receive from the hosting company. The one important thing is also maintaining your website so no one will ruin your business.

Normally when you run an e-commerce website, you will either host your site under a shared hosting service, a VPS, or cloud. If you are on a shared hosting plan, you probably won’t worry too much about server security as it’s mostly gonna be done by the hosting company. But for VPS and cloud-based service (such as AWS), you will need to do everything by yourself.

This article will only cover security best practices for VPS / dedicated servers. As for cloud-based service, it’s gonna be a completely different article to write. 🙂

There are several things that you need to know about securing your servers. These are what we can think of at the moment. We won’t cover the details in this article, but we will tell you how to do it in the next articles.

  1. Securing SSH login
    SSH login is the first thing to secure because once an intruder gains access to SSH, then likely he can do whatever he wants. To secure it, we would always suggest this checklist:
    1. Disable password authentication for SSH, and use only key-based authentication
    2. Disable root login
    3. Change SSH login port from the default port 22
  2. Firewall

Firewall is also super important. We had a chance when someone said that his database server is completely empty. Later we found out that mysql port 3306 was publicly open and allowed public access. This was then likely the entry point of the hacker ransom bot by guessing username and password of mysql, removing all the database, then asking a certain amount of money to restore the database. If you don’t want this to happen, here’s what we suggest, all is done via iptables:

  1. Allow only specific IP addresses to SSH to the server
  2. Only open access to the services that you need, and close everything else
    For example if you only need a webserver on that server, then literally just allow port 80 and 443 (plus your SSH port if needed), and close everything else.
  3. Setup user access

Limit your user access. This is important because if someone gains access to your server by hijacking one of your server’s users, then he wouldn’t be able to do anything other than what you allowed him to. Some precautions that you can do are:

  1. Create login for each user that need to access the server
  2. Never do “sudo for everybody”
  3. Get rid of bad habit “chmod 777”
  4. Limit access for the services

Apart from the firewall, it is also a good habit that you also secure the server on its service / application level. For example, never add a mysql user for any host, never allow redis and elasticsearch connection from the webserver, and others.

  1. Do regular software update

Clear enough, and plus “unattended upgrade” would be very useful!

  1. Backup regularly!
    Pro tip: don’t rely on your hosting provider’s automated backup especially for your database. When your provider makes a backup of your server, the database service might be in an unstable state, and restoring it probably won’t work. Instead, make a backup script that will dump your database to a file daily, then you can restore from it when needed.

Plus, make sure that your backup is reliable and restorable!

  1. Relax and monitor your server

Zabbix, nodeping, grafana, htop, lnav are your friends! Set them up properly and set alerts for what you like.

That’s mainly it for now, we will cover the details in the coming articles.