Magento URLs With Numbers

Are you seeing some product URLs that look like this – www.mymagentostore.com/mycoolproduct-1435?

Below is a brief explanation of this issue and how to fix it using only the admin panel of Magento. Please note, if you have a large number of products with this issue, you’ll want to look for a coding solution. This is for those who’re experiencing the issue with a relatively small number of products that have likely been uploaded manually.

Why:  Magento (rightly) won’t accept multiple products with identical URLs. This is true regardless of whether or not your simple products are visible individually.

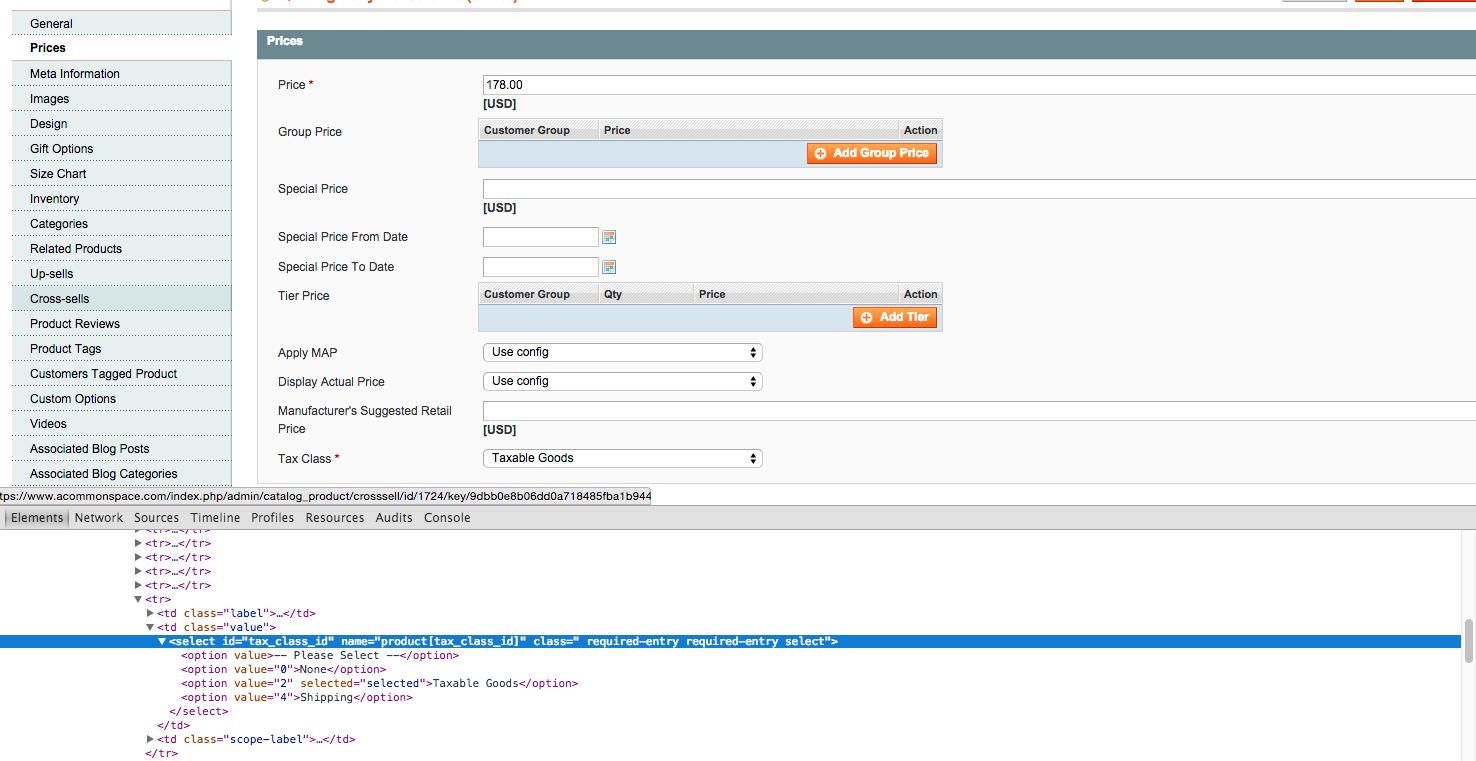
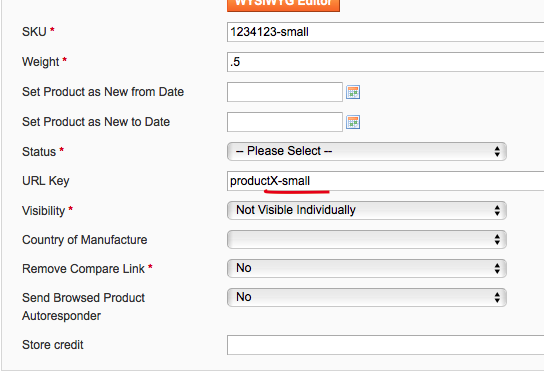
How: This issue may show up for different reasons, but the most common–and most simply addressed– for an administrator is when Simple and Configurable products are created with the same URL key. For example, if you create a three simple products in three different sizes but do not give each one a unique URL key (e.g. productX-small), Magento will add a numeric suffix to each product that is subsequently added with the same root URL. So, in this case your configurable product can end up looking something like /productX-1458.

Remember that magento will auto generate a URL key from the product title. So if you’re simple product title is the same as your configurable product title leaving the URL key field blank will have the same result as entering duplicate URL keys.

What to do? (Again, this is simplest solution without coding or spreadsheets necessary)  To address this issue there are three steps to take:

1) Give each of your products a unique URL key

Simply identify the configurable product and all associated simple products. Starting with the simple products, save each one with a URL that is unique (include reference to size, color, etc). After doing so, make sure that your configurable URL key is correct.

Magento Simple Product URL Key field


2) Get rid of URL rewrites

URL rewrite management tabWhen multiple products and variations are created with a single URL key, Magento will create a rewrite to direct links to what it thinks is the correct URL. After you’ve saved your product and it’s variations with unique URLs, you need to delete these rewrites.

To do so, go to Catalog > URL Rewrite Management. Here you should be able to identify all associated rewrites by searching for the base URL key (e.g. productX). Once you’ve identified all associated rewrites, delete them.

Note: this is assuming that the products have URL issues because they are recently added and no significant URL rewrites have been created by the administrator.

3) Reindex Data

The final simple step is to reindex your site so that Magento recognizes the new URLs you’ve created. This is done by going to System > Index Management, Select “Catalog URL Rewrites” (or simply select all, and select the action “Reindex Data.”

reindex data action in magento admin panel

After having completed these steps, you should be able to view www.mymagentostore.com/mycoolproduct without any suffixes being added.

In the near future we’ll try to provide a slightly more complex, but more comprehensive solution for those who are encountering this issue on a larger scale or with a different root cause.

As always, please feel free to add your suggestions!


Spend More Save More Magento Coupon Creation

Spend more save more magento coupon tutorial banner

In this article, we’ll briefly go over the method and concept of setting up a multi-tiered promotion using Magento’s Shopping Cart Price Rules promotion creation. In this case, the desired promotion is:

  • Spend $100, get 10% Off
  • Spend $200, get 20% Off
  • Spend $300, get 30% Off

For this set up, we will only go over the necessary fields. Please see our Overview of Shopping Cart Price Rules, for a more detailed explanation of all the available fields and their functions.

Unfortunately, Magento doesn’t offer a simple option for such a multi-tiered discount, so we need to create three separate coupons. Using the rules available to us we will set up three, exclusive shopping cart rules that apply 10% off orders over $100, 20% off  $200+, and 30% off $300+ orders. Theoretically you could also also apply non exclusive rules that add a fixed discount percentage each time someone reaches another amount (i.e. 10% off $100, $200, and $300 NON-exclusive), but this complicates the promotion unnecessarily in our case. Our method assumes that this is the sitewide promotion for the moment and that it cannot be combined with further promotions or coupons.

The actual set up for this promotion is relatively simple. The three rules we’ll create for this promotion are:

  1. 10% Off $100
  2. 20% Off $200
  3. 30% Off $300

Each rule will be set up nearly identically, with the obvious differences in spend / discount and a difference in priorities to prevent all three rules from applying at the same time.

To begin, go to Promotions > Shopping Cart Price Rules > Add New Rule

Rule Information Tab:

The screenshot below shows how we set up the Rule Information tab for the first rule. Most fields here are self explanatory. As this is a site-wide sale, we’re assuming that we have banners, emails, and/or other marketing that’s alerted our site users to the promotion, making a coupon unnecessary.

Note- the Priority Field. For our promotion it is important that we create a higher priority (lower number) for each successive amount of money spent. In our example we choose an arbitrarily high number (low priority)  to begin with and assign decreasing numbers to each tier:

  • Spend 100 get 10% off: Priority- 33
  • Spend 200 get 20% off: Priority- 32
  • Spend 300 get 30% off: Priority- 31


magento promotions rule information tab 10% off

Priority is the only field that will vary in this tab between our three rules.

Conditions Tab:

In this tab we specify what conditions are necessary for each price reduction to go into effect. The three rules will be as follows on individual promotion rules:

If ALL of these conditions are TRUE

  1. Subtotal equals or greater than 100
  2. Subtotal equals or greater than 200
  3. Subtotal equals or greater than 300

Magento Promotions Rule - Conditions tab

Actions Tab:

This tab defines what will occur if the conditions in the previous tab are met in the shopping cart. All three rules will be set up as Percent of Product Price discount under the Apply dropdown menu. After that we will fill out the Amount tab according to each tier (10, 20, and 30).

NOTE- in order to have the Priorities that we’ve set have any effect we need to set Stop Further Rules Processing to YES. If this were not done, a purchase of over $300 would have %10, %20, and %30 discounts all applied

Magento Promotions - Actions Tab Demonstration


Labels Tab:

This tab allows you to name your promotion as it will appear on the front end. Note that exactly where and how this displays (or doesn’t) is dependent on the unique construction of each site. In our case we can give each rule a label describing it’s discount because the rules will not be applied simultaneously.


Magento Promotions Demostration - Labels Tab


Finally, the Manage Coupon Codes tab is unnecessary as we did not choose the coupon option under Rule Information.


Once you’ve set up these three rules you should have the desired promotion ready to go and advertise. As a recap, we’ve set up three separate rules with identical logic, but each with a marginally higher discount according to higher amounts spent. The key factors for this promotion are the Priority numbers assigned to each of the three rules and that Stop Rule Processing is set to YES in all three instances.

A final note: always be sure to test any promotions in the most safe manner possible. If you don’t have access to a test site, try out promotions with insignificant (but test-able) percentages or amounts, and test them at times when you know that your site traffic is lowest.

See more about Price Cart Shopping Rules Fields Here.

Shopping Cart Price Rules Fields Overview

magento promotions shopping cart price rules overview bannerTo accompany our example of a multi-tiered (spend more, save more) promotion set up in Magento, we’ve created this brief description of the Shopping Cart Price Rules fields and their functions. When setting up promotions, or making any changes for that matter, be sure to test thoroughly before you leave it to run on its own. If you don’t have a test site to do so, try creating first creating promotions that are not very drastic and setting them Active during hours of the day when you’re least likely to have site traffic.

Fields Overview:

Tab: Rule Information

This tab contains general rules including timeline, groups that the promotion will apply to, internal description, and other broad rules.

It includes the following fields (mandatory magento fields always marked with asterisk):

Rule Name: This is for internal use only (i.e. 30% off Labor Day Sale). Rule Name will appear on your Promotions list so include enough detail to distinguish promotions as the list number increases.

Description: Not a mandatory field, but this is your opportunity to spell out the rules of the promotion in plain English for future reference for yourself or others.

Status: Active or Inactive, determines whether your promotion is applied on your site.

Customer Groups: If you have different customer groups and access set up on your site, this field allows you to limit a promotion to only specific groups (e.g. Members Only Sale).

Coupon: Magento offers you the option to choose No Coupon or Specific Coupon

  • No Coupon: Select this option to apply the promotion to all eligible site users (e.g. general sales)
  • Specific Coupon: Allows you to enter the coupon code of your choice. Use this option for targeted promotions, reachout, or any discount you’d like to provide to a limited number of customers.
    • If you choose Specific Coupon option, you’ll have the further option to Use Auto Generation. If selected, Magento will auto generate codes which you can then manage and distribute.

Uses Per Coupon- Depending on your business and the scope of your promotion, use this field to limit uses per your wishes or set to an arbitrarily high number to–in effect–have no limit until the promotion expires or is manually ended

Uses Per Customer: Again, this very much depends on the manner of the promotion you are running. Set according to your wishes.

  • Note: This will be tracked according to customer accounts. If you are trying to limit a coupon to say, only one use, do not use this field. Not only can the coupon be shared but multiple accounts can be created by customers.

From Date: Allows you to specify start date of your promotion. Note that whether a promotion is Active or not is independent of this field. If you plan to set a future start date, set your promotion to Active AND enter a From Date.

To Date: Allows you to specify the end date of your promotion (ending a minute before midnight on the date entered).

Priority: This field is important when running multiple promotions, and essential to creating Multi-Tiered spending promotions (i.e. spend X, get Y% off; spend 2X, get 2Y% off).

The lower the number entered here the higher the precedence/priority in the application of your promotion.

In our three-tiered example we choose an arbitrarily high number (low priority)  to begin with and assign decreasing numbers to each tier

  • Spend 100 get 10% off: Priority- 33
  • Spend 200 get 20% off: Priority- 32
  • Spend 300 get 30% off: Priority- 31

The Priority number you assign promotions will depend on the size and nature of your business and promotions. As a general rule, the less your promotion is limited in scope, the lower number you can assign to it.

See related field Stop Further Rules Processing


Tab: Conditions

This tab contains the essential rules or criteria that must be met in order for your promotion to apply.

The rules are fairly easy to set up, and allow for a virtually endless list of conditions.

Generally, by selecting If All conditions Are True you can endlessly narrow down the promotion by product # /products / product attributes / total cost / and so on.

By selecting If Any Conditions are True (or False) you can cast a wider net, allowing you to choose multiple products or price ranges.

In our example, we have a very simple rule set up for the 2nd rule in our three-tiered Spend X, Save X example: the promotion will apply if the customer’s subtotal is equal to or greater than $200.

magento manage promotions conditions tab


Tab: Actions

In the Actions tab, you are able to define what happens IF the rules in the Conditions tab are met. It further contains a section that allows you to apply extra conditions to items in the cart, narrowing to specific categories, prices, and more as needed. In our example, we leave this section blank as we have no need to further narrow the application of the promotion.

Section- Apply: Has four, relatively self-explanatory options for what kind of discount is applied in your promotion:

  • Percentage of Price Discount: Allows you to enter a percentage that will be taken off of the subtotal in the Discount Amount field below. In our example, we use this field to create 20% Off
  • Fixed Amount Discount: Allows you to enter a fixed monetary amount (in the next field) to be taken off of products that you define in the second section of this page. If left blank, it will apply to all products that have met the criteria in the Conditions tab.
  • Fixed Amount Discount for the Whole Cart: Allows you to enter a fixed monetary amount to be taken off of products that you define in the second section of this page. As stated, this rule applies to the entire cart.
  • Buy X get Y free (discount amount is Y): Allows you to set up a rule specifying number of item(s) X purchased in order to receive number of items(s) Y free.

Discount Amount: This field is the percentage or fixed amount discounted depending on the Apply action you selected in the step before. In our example, this is where we specify 20 for 20% off purchases over $200.

Maximum Quantity Discount is Applied to: Allows you to limit the number of products that can are discounted if stock or margins are low.

Discount Qty Step (Buy X): This section is where you specify the amount of product X purchased in order to receive product Y if you’ve selected the Buy X get Y free (discount amount is Y) Apply action.

Apply to Shipping Amount: Determines whether the price rule, if a percentage or a fixed number that exceeds subtotal will apply to shipping costs.

Free Shipping: Simple yes/no option to offer free shipping with your promotion (or as your promotion).

Stop Further Rules Processing: This is an important field when running simultaneous or complimentary promotions. Selecting Yes  prevents any further promotions from applying on top of the one you’re creating. When this is the case, it is the Priority  numbers assigned to each promotion that will determine which one ultimately applies. 

In our multi-tiered example, we set this to Yes. Otherwise, using three separate promotions for one “Buy 100 get 10%, Buy 200 get 20%, Buy 300 get 30%,” each rule would apply to a purchase of over $300 dollars, effectively becoming %50 Off.

The second section under this tab is “Apply the rule only to cart items matching the following conditions (leave blank for all items)” – This is where you you specify what items the promotion will actually apply to, as opposed to the Conditions tab, which specifies which items (amounts, etc.) activate the promotion in the first place. It has essentially the same logic rules available as the Conditions tab, and can be used exclusively or in combination with Conditions depending on the specific  promotion you would like to create.

shopping cart price rules actions tab shopping cart rules

Tab: Labels

This section is where you give your promotion the title that you would like site users to see. Whether and where it shows up will depend on the way your site is constructed, but will usually appear on the checkout page.


Tab: Manage Coupon Codes

This section is fairly self-explanatory and, of course, only applies if you’re using a promotion that requires a coupon. It is primarily for coupons that you want to closely manage. E.G. a small number of unique coupons to provide to a few exclusive reviewer, in most cases it’s easier and more manageable to enter a single coupon code under the Rule Information tab.

Coupon Quantity: Determines how many coupons will be created.

Code Length: Length of the coupon to be generated.

Code Format: Alphanumeric, Alphabetical, or Numeric.

Code Prefix / Code Suffix: Manually add a set prefix or suffix for organization and management of multiple unique codes.

Dash every X characters: Insert a dash in order to make your coupons uniform with another system or extra unique

Magento: Importing CSVs

magento csv import article banner image

Importing products into Magento with a .csv file can be an incredibly time consuming and sometimes frustrating experience. One can be faced with one hundred columns of product attributes, only some of which seem to match up with the product information that you have on hand. However, uploading via .csv is the best option for uploading multiple products in one batch, and can be made a little easier by following a process and having a little understanding of how to match the cryptic information seen on a magento excel sheet with what you’re seeing or want to see on the front end of your website.

Mandatory Attributes:
When you’re uploading products to Magento, not every variable that is listed in your exported template is necessary to fill out (or include at all). However, in order to successfully upload a .csv, you’ll need to include the mandatory attributes. These include attributes that are, by default, mandatory for any Magento product, as well as attributes that are mandatory to your site exclusively, according to its design and specific needs. If you are only uploading the minimum mandatory fields for products that don’t yet exist, you will need to upload further further information before the products are live.

Magento’s mandatory attributes are:
sku
_attribute_set
_type
price
name
status
visibility
description
tax_class_id
short_description
weight

These attributes are listed in their “attribute code” form as they will appear on a spreadsheet for Magento. Even if some of these field have been altered by site developers, the majority will be mandatory on any Magento site:

sku – your products’ unique alphanumeric identifier.

_attribute_set – refers to a default attribute set that each type of product has. for example “shoes” _attribute_set would likely include a single number representing shoe size and color attribute, whereas “pants” _attribute_set would automatically include a number for both waist and inseam as well as color. _attribute_set defines the attributes that apply to categories of products.
Attribute sets will be defined by the sites developers, so they will vary from site to site, and it’s best to speak with the person who set them up in order to get a good grasp of what they are on your site.

_type – refers to whether your product is simple or configurable. In other words whether it is a stand alone product, a variation, or the parent of variations
price – Self explanatory, the price of the products

name – The title of your product

status – whether or not the product is active on the website. Shown in the back end product page as “Enabled” or “Disabled,” and represented in a .csv by a 1 (enabled) or 2 (disabled)

visibility – Refers to visibility of product on site: Search and Catalog. Most simple products that belong to a parent configurable will not be visible individually. Represented numerically in a .csv.

description – Self explanatory, this is a text field for you to enter a product description. Where this appears on the front end of your site depends on its design.
Note- this field can be changed to non-mandatory by site developers

tax_class_id – Refers to what, if any, taxes will be applied to your products. Found in a dropdown menu under “Price” on the Manage Product page and represented numerically in a .csv. Refer to below tip to find out numerical values associated with dropdown menues

short_description – Similar to description, this text field will display in different ways depending on your site’s design. Also, like description, short_description can me made not mandatory by site developers.

weight – self explanatory. Like other fields, if it has no bearing on your site’s business you can enter a dummy number in order to successfully upload files.
TIP – For variables with numerical values, there’s a relatively simple way to “cheat” and find out what number is associated with each option. Using Chrome, Firebug, or any other application that allows you to view the page source:

  • Find the field in the magento product page
  • Select the variable field (dropdown or text) and inspect the source code – the values and their associated options will be displayed

magento attribute code source code inspection


Best practice for uploading products via CSV:

1) Export a representative of each Type of product to use as a template.

If you do not already have products uploaded to your site, manually add a product of each type and make sure that they are all displaying correctly on the front end.

The most important part of exporting a .csv that will be useful to you as a template is that you export one representative of type of product that will be carried on your site. The most important variations will be type–simple or configurable–and _attribute_set–defined by your site developers.

It’s important to briefly define Simple and Configurable products as understanding their relationship and different characteristics has an impact on the necessary fields in an import:

Configurable Products: Configurable products represent the “face” of a product that exists in different variations. On ecommerce sites these variations will most often be “size,” “color,” or other such variations. The configurable product is what will show on a website’s front end, allowing consumers to add simple products that have been associated with the configurable product to their cart. Examples of fields that may be required of configurable but not simple products are: associated products, multiple images, product descriptions, and much more.

Simple Products: A simple product will be created for each variation of a configurable product. For example, if you are selling a shirt that comes in three different sizes, you will upload three individual simple products in addition to the configurable product. Fields such as weight, price, and others that are dependent on which variation a consumer chooses may be required of simple products where they are left blank on a configurable.

Due to these differences, it’s very important that you find a representative of each type of product so that later you can see the differences on a magento .csv.

Once you have found the products that represent everything in your catalog, you’ll export your .csv which will give you all the information under attribute code column titles (for identifying attribute codes see below).

This is done through System > Import/Export > Export.

magento csv export navigation


Select Products:

export magento csv screenshot

Note – the simplest way to pull out your sample products for a template is simply to download all existing products and copy and paste your selected samples onto a new template page. However, if you have identified the products that you want for your template, you can limit your export to only the products you want by checkboxing them ( search by sku, name, etc.).

See example:

select attributes for export magento screenshot


To export click Continue at the bottom-right of the page and open the .csv file in Excel or Google Sheets.

2) Create your template:

When you are faced with the full range of data that is exported by Magento for each product it can be incredibly difficult to view easily. In this case using the Hide Columns feature for attributes that are non mandatory and are not necessary for the information you’re uploading is a massive help.

If the spreadsheet is being filled out by a client for you to upload, providing them with a clear template such as this will simplify the upload process for both parties.

If you are only updating a small number of attributes for many products, you can actually delete all but the mandatory columns, leaving you with a much cleaner spreadsheet.

3) Enter one product from each category into your spreadsheet for a trial upload:

One thing that you want to avoid is spending hours on entering your entire catalog into an excel sheet only to find that you’ve made a mistake and need to go through the entire thing and modify every product. For this reason it’s worth your time to experiment with an upload.

At this point you should have a list of several products, with the unnecessary columns either hidden or deleted for simplicity. When adding to an excel sheet for upload pay close attention to detail:

  • fill out fields in the exact format that your example has shown.
  • pay attention that you do not include any spaces in your entries – it’s particularly easy to accidentally add a space at the end of an entry when copying and pasting.
  • Use caution when using search and replace. Although using spreadsheet shortcuts is a massive help when creating a .csv you need to exercise caution. Never forget about hidden columns.

Once you’ve filled out your sample spreadsheet, you’re able to check the data for errors. After this, you’ll upload. This is a fairly simple process: Go to  System > Imports / Exports > Import. Select “products” just like when exporting, and choose file (be sure that your spreadsheet is saved in .csv).

Note- Occasionally you may run into issues if you save your spreadsheet with MS Excel due to its unique encoding. As a result, some recommend using an alternative to Excel to avoid a possible error after completing your sheet.

If you’re lucky, you’ve encountered no errors and your products have been successfully uploaded however, more likely, you’ll get a screen like the following:

magento import error screenshot

As can be seen here Magento gives you an attribute code (meta_description in this case) followed by the lines on which it was entered incorrectly (or not at all). In this case “invalid value” tells us that it was an error with the format that we entered.

If the error messages do not specify rows you can often inspect the source code of the error message to identify the row with an error.

Just because Magento accepts your spreadsheet does not mean that everything is correct. Be sure to check how your products are appearing on the front end, particularly images, text, and any other information that is may be entered in several different attribute columns in the same format.

When you encounter errors, some of the attribute codes will make sense to you, but others may be a bit vague, and in this case it’s useful to know how to find what the attribute code represents in the backend of your site:

To Identify an Attribute Code (Or the column title on exported excel sheet)

Assuming that you did not develop the Magento site yourself (or even if you did) the column headers on your exported Excel sheet can be cryptic at times, making it hard to know what, if any, information you should enter into the column.

To identify an attribute code:

  • Copy the attribute code (column header) and paste it into Attributes in the Magento Back end.
    • To do this, navigate from the menu bar: Catalog > Attributes > Manage Attributes:

manage attributes magento screenshot

  • Once in Manage Attributes, paste the attribute code into the left-hand “Attribute Code” search box:

magento attribute codes screenshot

  • The “Attribute Label” is listed to the right of your search results, and is also displayed when you click into a specific attribute’s details. In most cases this should be enough to understand the Attribute that the code refers to. For more information, you can look at a specific product in the back end (Catalog > Manage Products > Select a product) to see if and how the attribute has been filled out for the pre existing product.
  • Many titles and section headings on front end product pages will directly correspond to their Attribute Label in the back end. Thus you can reverse this process by finding the field you’re looking for on the front end and finding the Attribute Code that corresponds to the Attribute Label, allowing you to find the appropriate column on your spreadsheet.


4) Upload your entire .csv

After you’ve uploaded a sample and identified any errors, you’ll go ahead and fill out all of your products for upload.

Most Common Errors- 

Incorrect Case Entry- Entering headers or fields in a case that does not match that of your export is an easy mistake that will cause Magento to be unable to upload. These can occur in unexpected places such as file extensions depending on the setup of your site.

Incorrect Column Headers – As with everything in the .csv upload process, there is no room for error in your variable names. Make sure that your upload .csv has exactly the same field names as the sample that you exported, paying particular attention to capitalization, spacing, and underscores.

Incorrect CSV File Encoding –  As mentioned before, this can be due to the program you’re using to save your .csv but can also be a result of differences in location (countries). Be sure that you’re using Unicode UTF-8 when you’re saving your file as this is the only format that Magento will accept.

Incorrect Characters – Some fields may use html code, in which case you’ll need to be sure that you don’t have characters that require special code (for example “<”).

Image Import Errors – Make sure that all of your images are uploaded to the /media/import folder and that your spreadsheet image names are identical to the names in the media folder.


Installing Sample Data on Magento Community Edition

In this article we’ll show you how to install sample data for the Magento Community Edition. This sample data is mainly used for learning about Magento and setting up data so you can test your developed themes and functionality.

* please note that importing sample data is done BEFORE you install Magento.

Let’s begin:

Step 1: Download Community Edition:

Go to magentocommerce.com/download and download sample data
* sample data version number is okay to be lower than you magento version

Download Magento Sample Data

Step 2: Create a MySQL Database

Go to your hosting account and create a mysql database (note your login info for later)

Create Mysql Database

Step 3: Unzip Sample Data Files on Server and Import

After you unzip your files, you will want to:

a. import .sql file via phpmyadmin (to database)

Import .sql file in phpmyadmin

b. import media folder into /media (magento main folder /media)

* you will need to first extract magento files on server (see step 4 below)

Import Media folder into Magento

Step 4: Magento Installing

(see video from other tutorial)

(see tutorial on how to install magento ce)

quick steps:
– download magento community edition
– upload to server and unzip
– copy “media” folder to magento main directory (see above step 3)
– go to url and fill out info on each screen

* Troubleshooting – if product images do not appear, go to media/ folder and rename .htaccess file (temporarily do so)

Let us know if you have any questions regarding this topic. Thanks for reading!!!